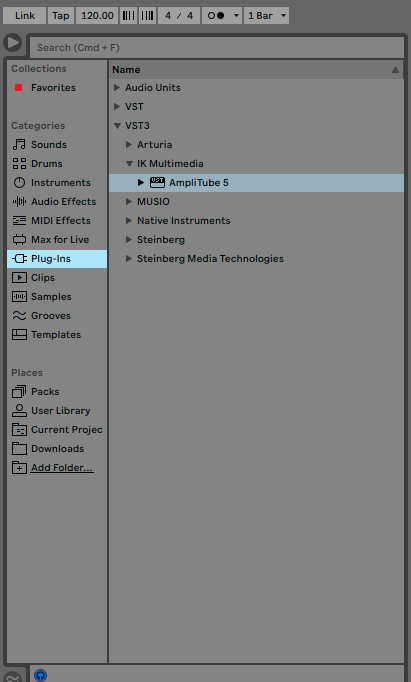
You can instantiate a plug-in on any kind of track (audio, MIDI, return, or master) or grouped tracks in Ableton Live. In the following steps, we'll use AmpliTube 5 as an example, and instantiate it on an audio track.
- Click on the Plug-Ins section of the Ableton Browser.
- Locate the plug-in you want to add to your track (AmpliTube 5 in this example). If you don't see the plug-in you are looking for, see the note about plug-ins below.

- Either drag and drop the plug-in onto the track, or click the track header once, then double click on the plug-in in the browser.
A Note about Plug-ins
How to Enable Virtual Instruments and Audio Units in Ableton Live
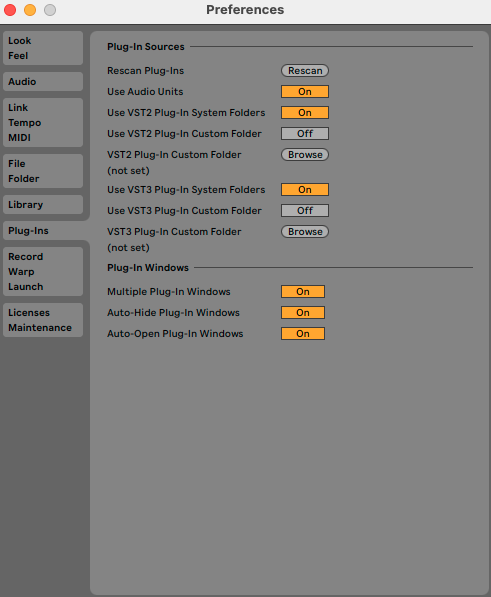
If you aren't seeing all of your installed plug-ins listed in the Plug-Ins section of the Ableton browser, it may be because you don't have all virtual instruments (VSTs) or audio units (AUs) enabled. To ensure you have them all enabled, take the following steps:
- Open the Ableton Preferences menu, and click the Plug-Ins tab
- Ensure the following are set to On:
- Use VST2 Plug-In System Folders
- Use VST3 Plug-In System Folders
- Use Audio Units

- Click the Rescan button on the Rescan Plug-Ins line
You may also want to enable the VST2 Plug-In Custom Folder and VST3 Plug-In Custom Folder options if you have plug-ins saved in a location other than the default. In that case, click the Browse button to select the appropriate location where those plug-ins are stored, then click the Rescan button again.

