Creating Your Cubase Project
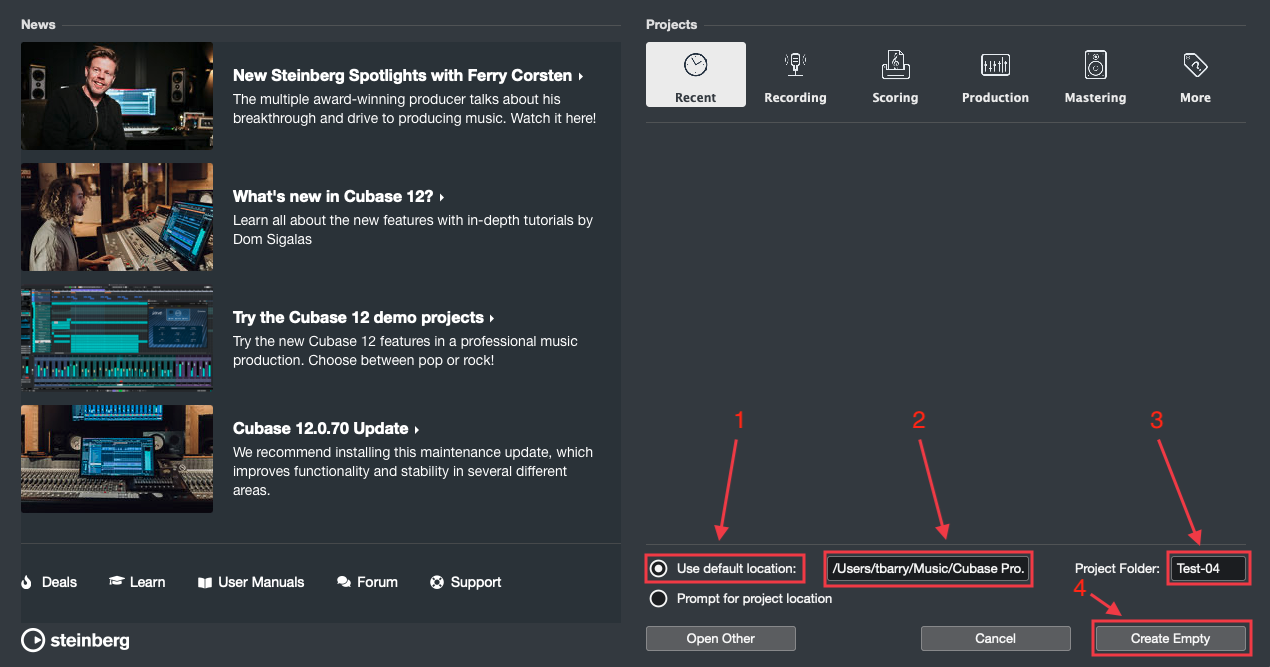
When you first open Cubase you'll see the Cubase Hub, which allows you to view templates, recently-opened projects, related news, and more. You can also create a new project from the Hub window. Take the following steps to create your project:
A Note About Creating New Projects
In the Cubase Hub, there are two options regarding where to create a new project—Prompt for project location (which is the default), and Use default location. For the purposes of this tutorial, we'll be selecting Use default location. If you select Prompt for project location, the initial steps will be slightly different.
- Select Use default location at the bottom of the Cubase Hub.
- If you want to change the default location, click in the text area next to Use default location, navigate to the folder you'd like to use instead, and click Open.
- Click in the text area next to Project Folder, and name your project folder. Note that this names the project folder, but not the project itself—you'll still need to name the project once you save it.
- Click Create Empty to create your project.
I/O Setup
Once you have your Cubase project created, you'll want to make sure your I/O is set up correctly. For the purposes of this tutorial, we'll assume you are using an audio interface, but you can also take similar steps if you are using your built-in microphone and/or speakers.
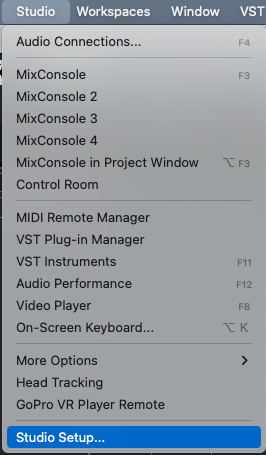
- Click on the Studio menu and select Studio Setup.
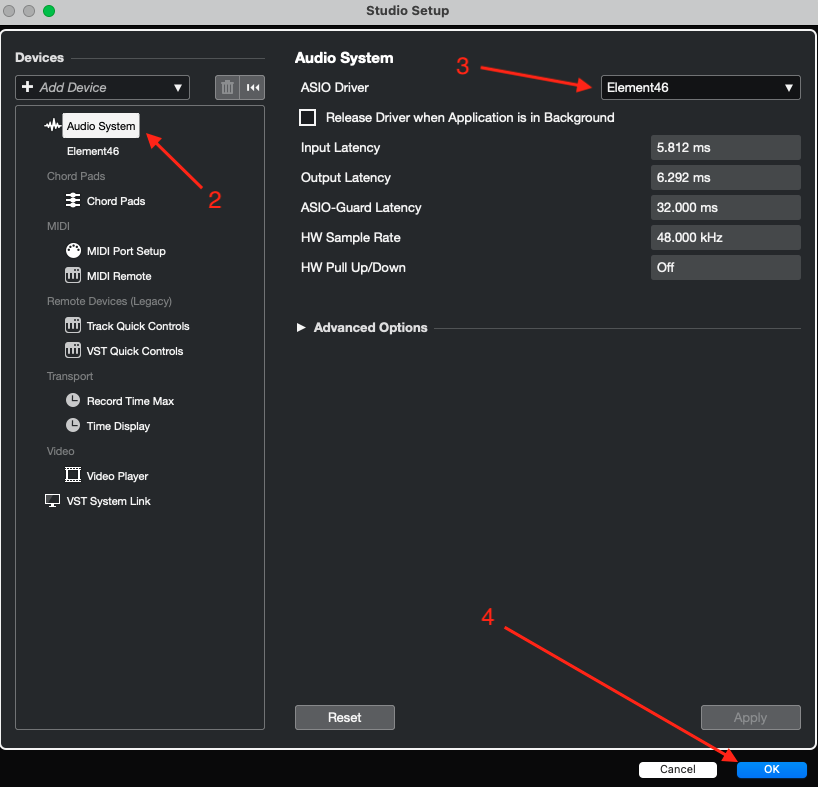
- On the left-hand side of the Studio Setup menu, select Audio System.
- In the ASIO Driver drop-down menu, select your audio interface.
- Click OK to close the Studio Setup menu.
- Click on the Studio menu and select Audio Connections.
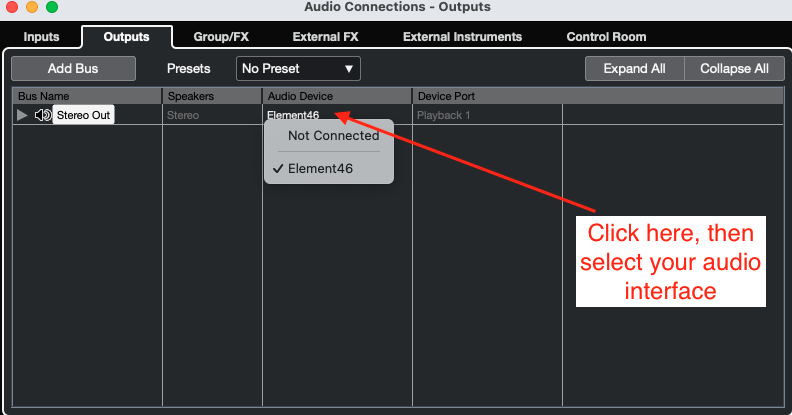
- Click the Outputs tab. You should see a single stereo output called Stereo Out.
- Click in the Audio Device column for the Stereo Out row, and then select your audio interface. Note: If you want to set up other outputs you can do that by clicking the Add Bus button, though you won't need to for the purposes of this tutorial.
- Click the Inputs tab. You should see a single stereo input called Stereo In.
- Click the Add Bus button, which will open the Add Input Bus window.
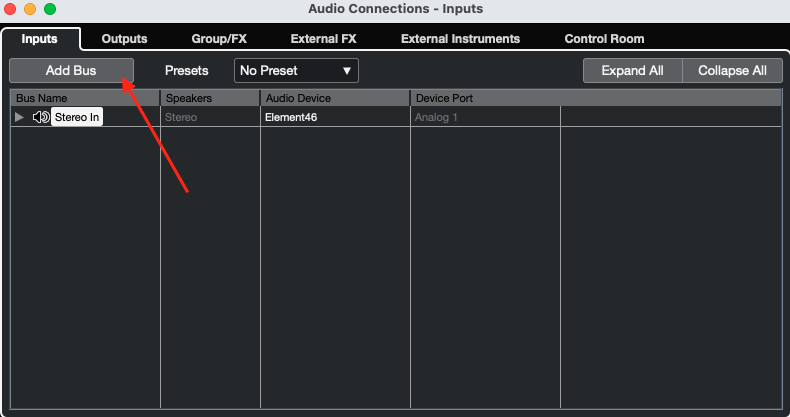
- Leave all the values at their default, click in the Bus Name field, type an appropriate name for the bus (ex. Input 1), then click Add Bus.

- You should now see a new entry in the Inputs tab of the Audio Connections window with the name you chose. Click in the Device Port field corresponding to the new entry and select the input on your interface that you want that bus to use. For example, if you named the bus Input 1, you'll probably want to select Analog 1 (or something similar).
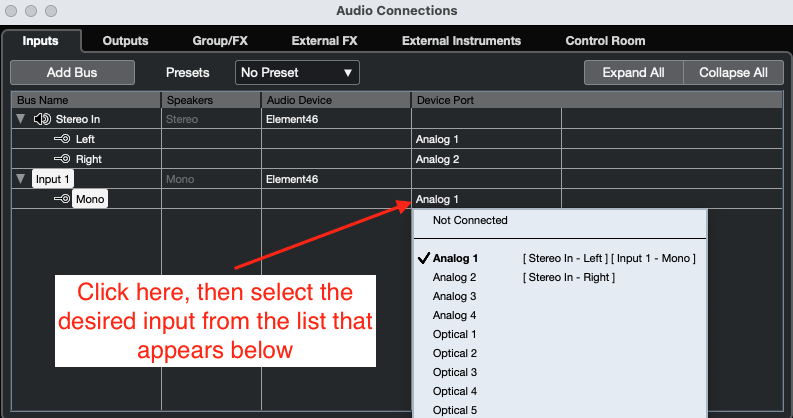
- If you want to set up additional inputs, repeat steps 9-11 for each input. When you've set up all the inputs you plan to use, close the Audio Connections window.
Preparing to Record
Now that your interface is selected, and you have created your input bus (or busses), you'll need to prepare your project before starting to record.
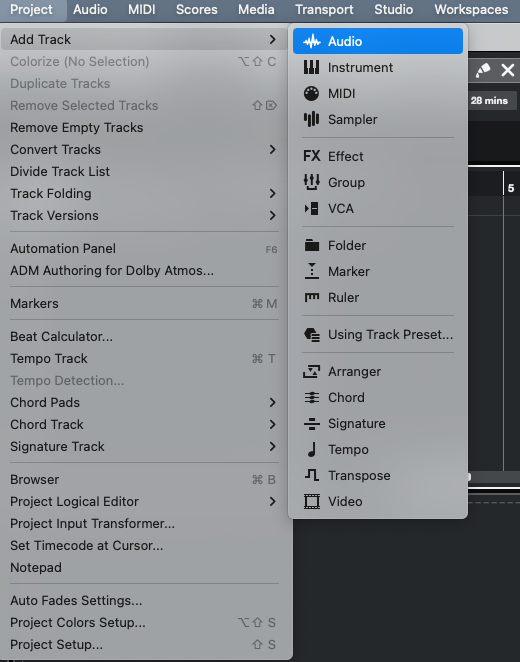
- Click on the Project menu, then select Add Track > Audio.
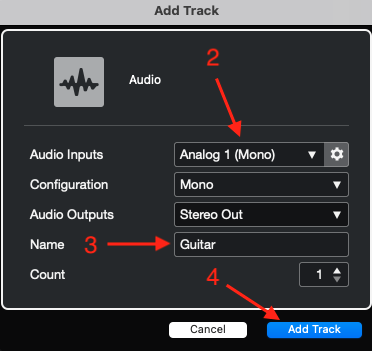
- Set the Audio Input to the bus you created in Step 10 (of the I/O Setup section above) corresponding to the input on your interface where your guitar/microphone is connected. If you followed along exactly with the example, this will be Analog 1.
- Name the track appropriately by entering text into the Name field. For example, if you'll be recording guitar, you might want to name the track Guitar.
- Once you are happy with the selections, click the Add Track button.
- If you plan to record with a backing track, follow the steps for Importing Audio in the collapsible menu below. Otherwise, continue to the next step.
Importing Audio
How to Import an Audio File in Cubase
A Note about Track Configuration
The following steps assume you are importing a stereo backing track into your Cubase project, and that you don't already have the track created in Cubase that you want the imported audio on. If you have already created the track, you can skip to Step 4. If you are importing a mono audio track the steps will be similar, but in Step 2, you'll select Mono instead of Stereo.
- Click the Project menu and select Add Track > Audio.
- Set the Configuration to Stereo—note that the Audio Input will also change, but that isn't important, as we'll be importing audio for this track, rather than recording.
- Name the track appropriately—something like Backing Track—and then click the Add Track button.
- Click the File menu, then select Import > Audio File.
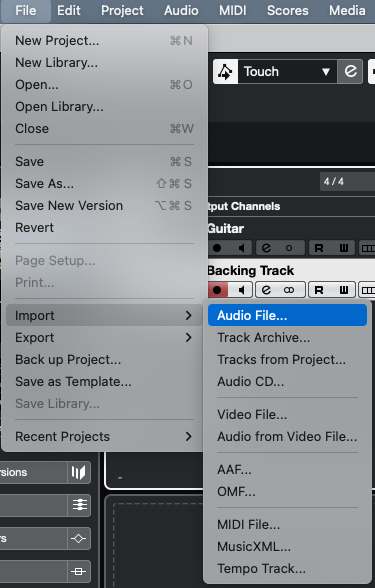
- Navigate to the file you'd like to import, select it, and then click Open.
- You'll then be prompted with some import options. We'd recommend selecting Copy File to Project Folder, as well as Sample Rate underneath Convert to Project Settings.
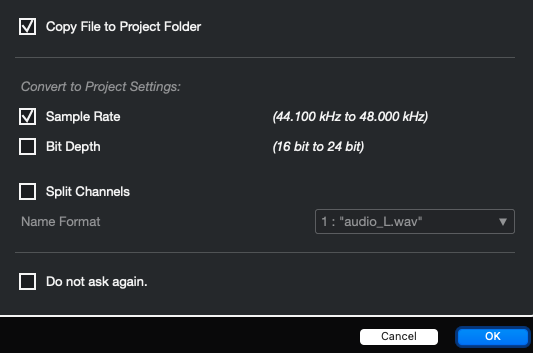
- Click the OK button to import the audio file.
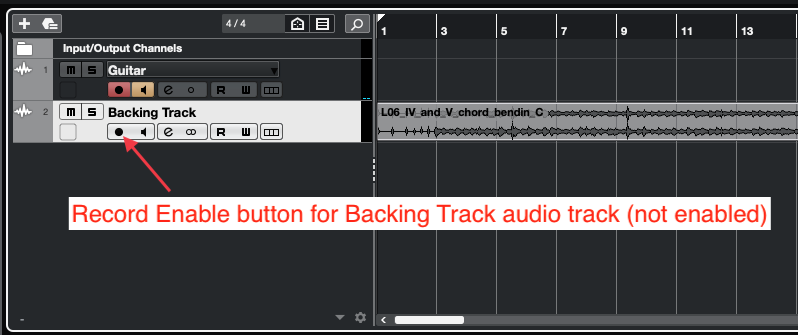
After importing the audio file, your backing track will be record-enabled (the record-enable button on the track will be red), since it was the last track that was created. Click the Record Enable button on the track in order to turn that off.
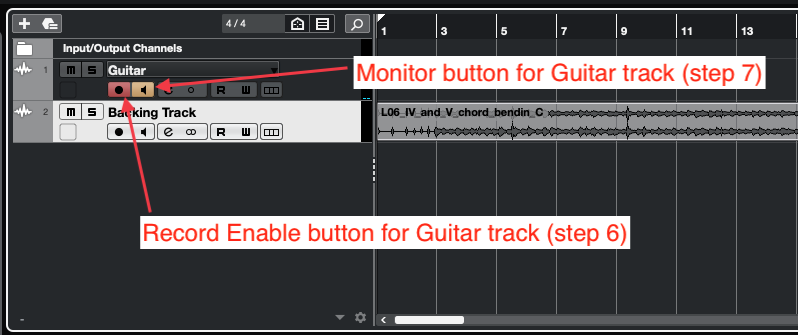
- Record enable your Guitar track (or whatever track you plan to record on), by clicking the Record Enable button for that track. When the track is record-enabled, the button with be red.
- While you can record onto your Guitar track now, you won't be able to hear the input of the track until you enable input monitoring. If you are using a microphone as your input source, make sure you are monitoring with headphones, and that your speakers are turned off, in order to avoid feedback. Once you've done that, click the Monitor button on the Guitar track to enable input monitoring.
- At this point, you may wish to instantiate a plug-in, such as AmpliTube, on your audio track. In that case, follow the steps in the collapsible menu below.
Instantiating a Plug-In
How to Instantiate a Plug-in in Cubase
You can instantiate a plug-in on any kind of track or grouped tracks in Cubase (audio, instrument, effect, master, etc.). In the following steps, we'll use AmpliTube 5 as an example, and instantiate it on an audio track.
- Make sure you have the Left Zone showing. If it's not already showing, you can hit Command+Option+L to reveal it.
- Select the Inspector tab at the top of the Left Zone, and the Track tab at the bottom of the Left Zone.
- Click the name of the track you wish to instantiate the plug-in on to select the track.
- In the Left Zone, click on Inserts to reveal the available insert slots.
- Click on an empty insert slot, navigate to the plug-in you want, then click on it to instantiate it. You'll find AmpliTube 5 under Distortion.
Recording
You are now ready to record! This section will utilize functions in the transport section of Cubase. You can find the transport at the bottom of your main project window, or you can open it independently by clicking on the Transport menu, then selecting Transport Panel.
- Click the Record button in the transport to start recording.

- When you are done recording, hit the space bar, or the Stop button in the transport to stop recording.

- If you aren't happy with your recording, click on the region you just recorded to select it, then hit the delete key on your keyboard to remove it. Then, click the Go to Previous Marker/Zero button in the transport to return the transport to the beginning of the project. Otherwise, you can move forward. Repeat steps 1-3 as many times as needed.

Exporting your Project as an MP3 file
How to Export an MP3 File from Cubase
Once you have finished a project in Cubase, you may want to export the project as an MP3 file. To export your audio from Cubase, take the following steps:
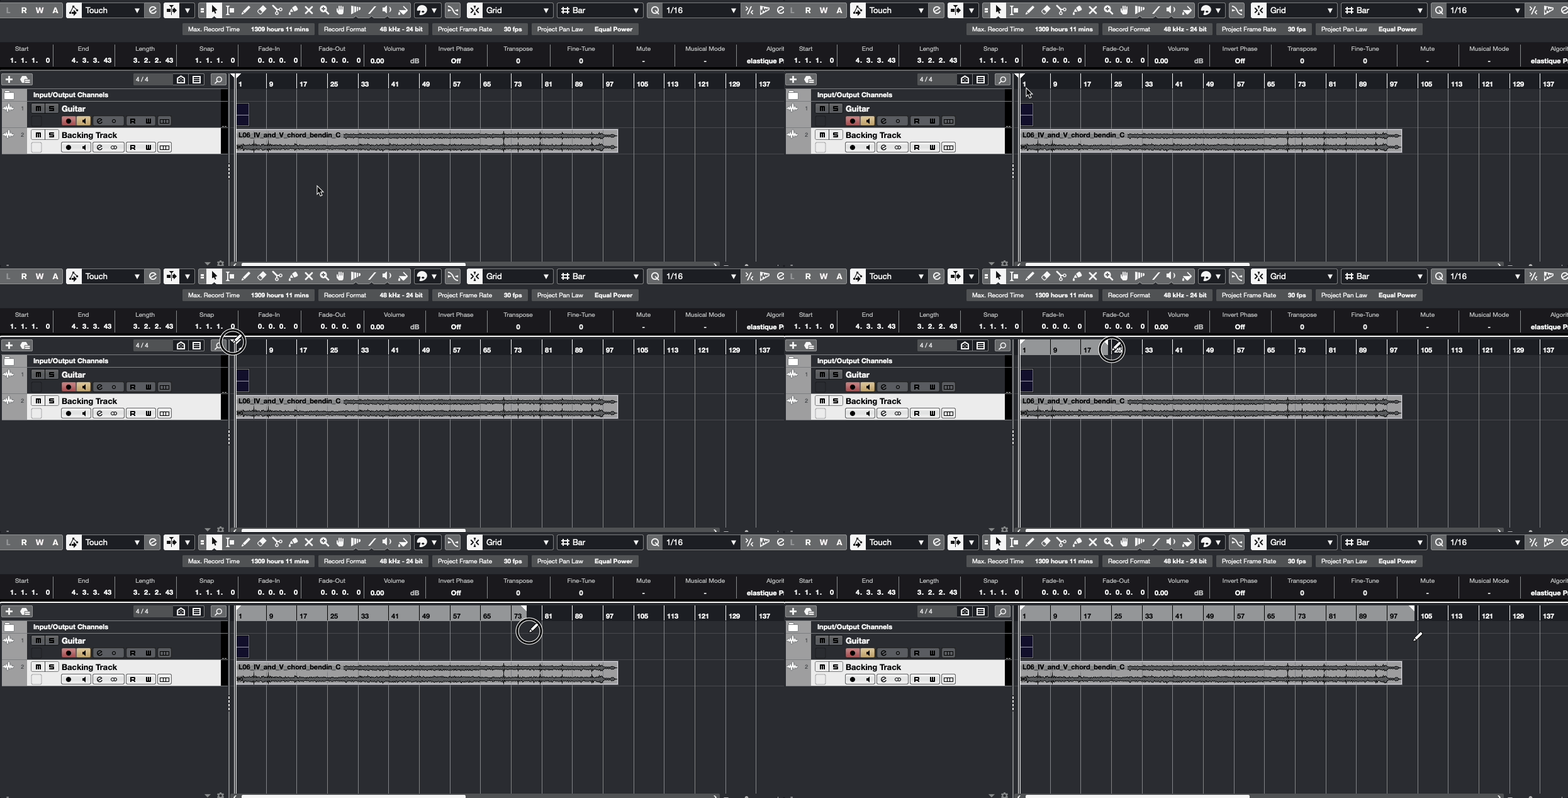
- Select the range you'll be exporting by setting the Left Locator and Right Locator positions in the transport. You'll likely want the Left Locator to be set to the beginning of the project, and the Right Locator to be a value shortly after your last region ends. Alternatively, you can set the range by clicking and dragging the Right Locator to the desired end point, as shown below.
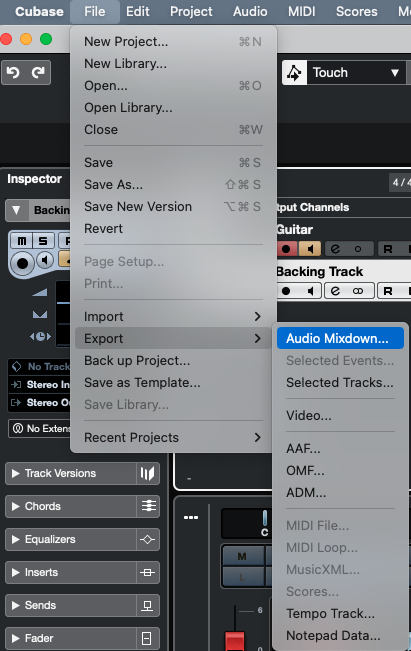
- Click on the File menu, then select Export > Audio Mixdown.
- Name your file by entering the desired name in the Name field.
- If you want to change the location where the file will be saved, click on the Path field, then navigate to and select a new location.
- Make sure the File Type is set to MPEG 1 Layer 3.
- Set the Bit Rate to 320 kB/s.
- You may want to change other settings, but this won't be necessary in most scenarios. Click the Export Audio button when you are happy with your selections.
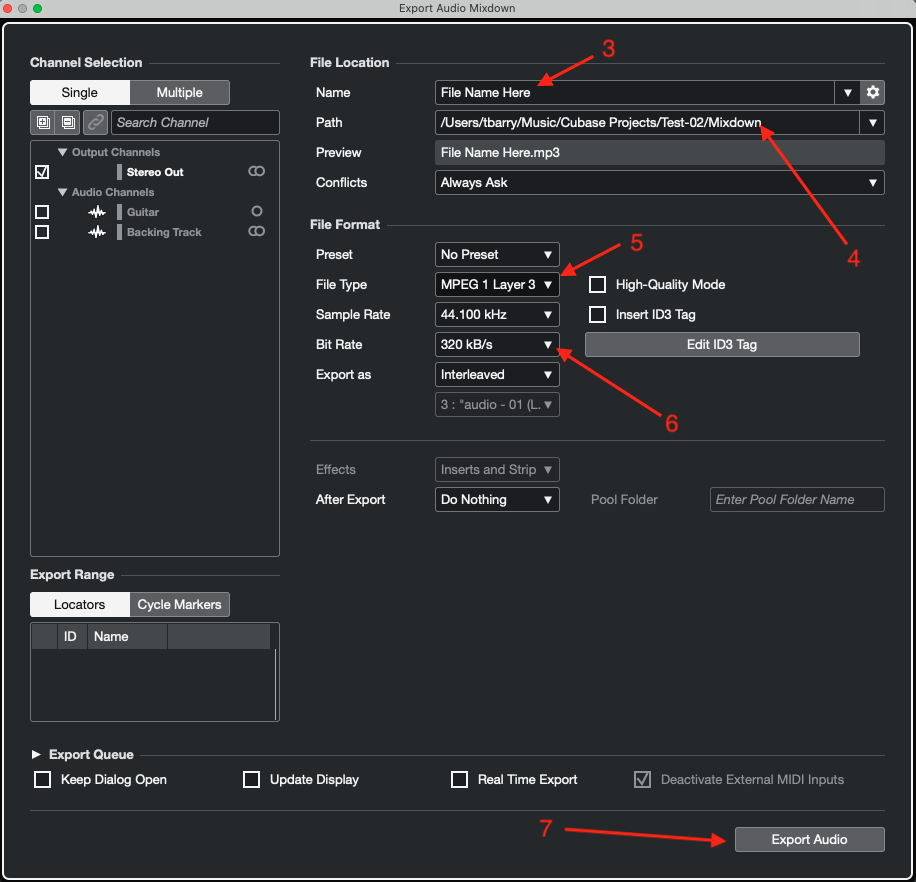
- Once the file has finished exporting, you can then find the MP3 file by navigating to the location on your machine where you chose to save the file in Step 4.

