Configuring Audio Preferences/Settings
- Open the Reason Preferences menu and then click the Audio tab. You can open the Preferences menu on macOS by clicking Reason in the top left corner of your screen and then Preferences. On Windows, click Edit and then Preferences. Note that in newer versions of macOS, Preferences may be referred to as Settings instead.
- Select your audio interface (or built-in audio device) from the Audio Device drop-down menu.
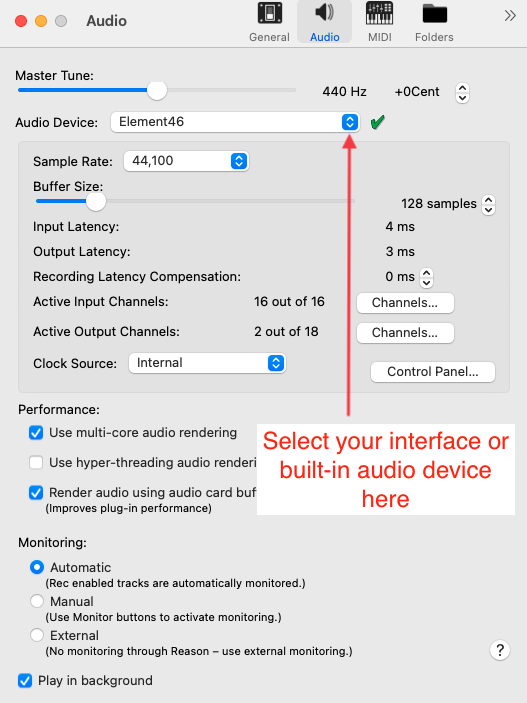
- This is also a good opportunity to check your Buffer Size and change it if necessary. The lower your buffer size, the less latency you will get. It's worth noting that you may experience audio issues, such as distortion or digital noise, if your buffer size is too low. We'd recommend starting at 128 samples and adjusting as needed from there.
- Note: You can also set Sample Rate, Active Input and Output Channels, and adjust Recording Latency Compensation, Monitor settings, and more from this menu.
- Close the Preferences menu.
Preparing Your Session for Recording
If you won't be recording with a backing track, skip to step 4 below. Otherwise import your backing track by following the instructions in the first 3 steps.
How to Import an Audio File in Reason
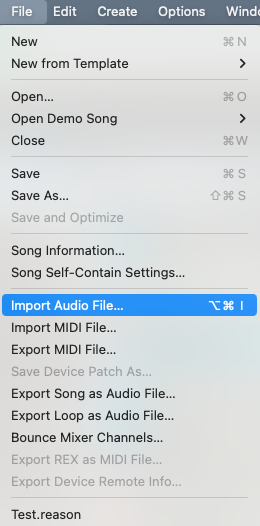
- Click on the File menu and select Import Audio File.
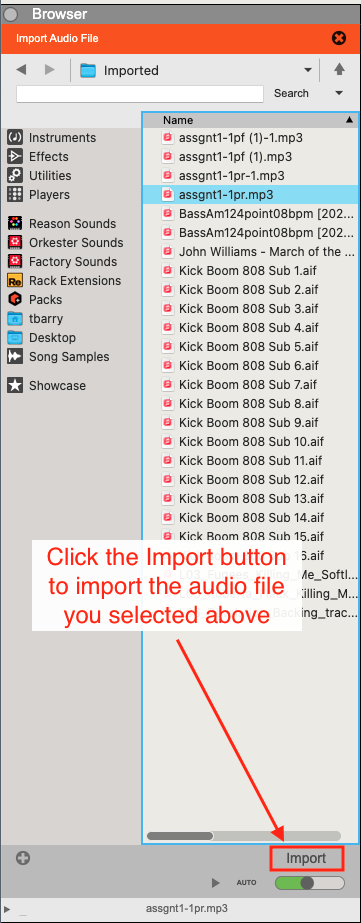
- Within the Reason browser, navigate to and click on the file you'd like to import.
- Click Import at the bottom right corner of the browser to import the audio file. If you didn't already select an audio track, this will create a new track for the imported audio.
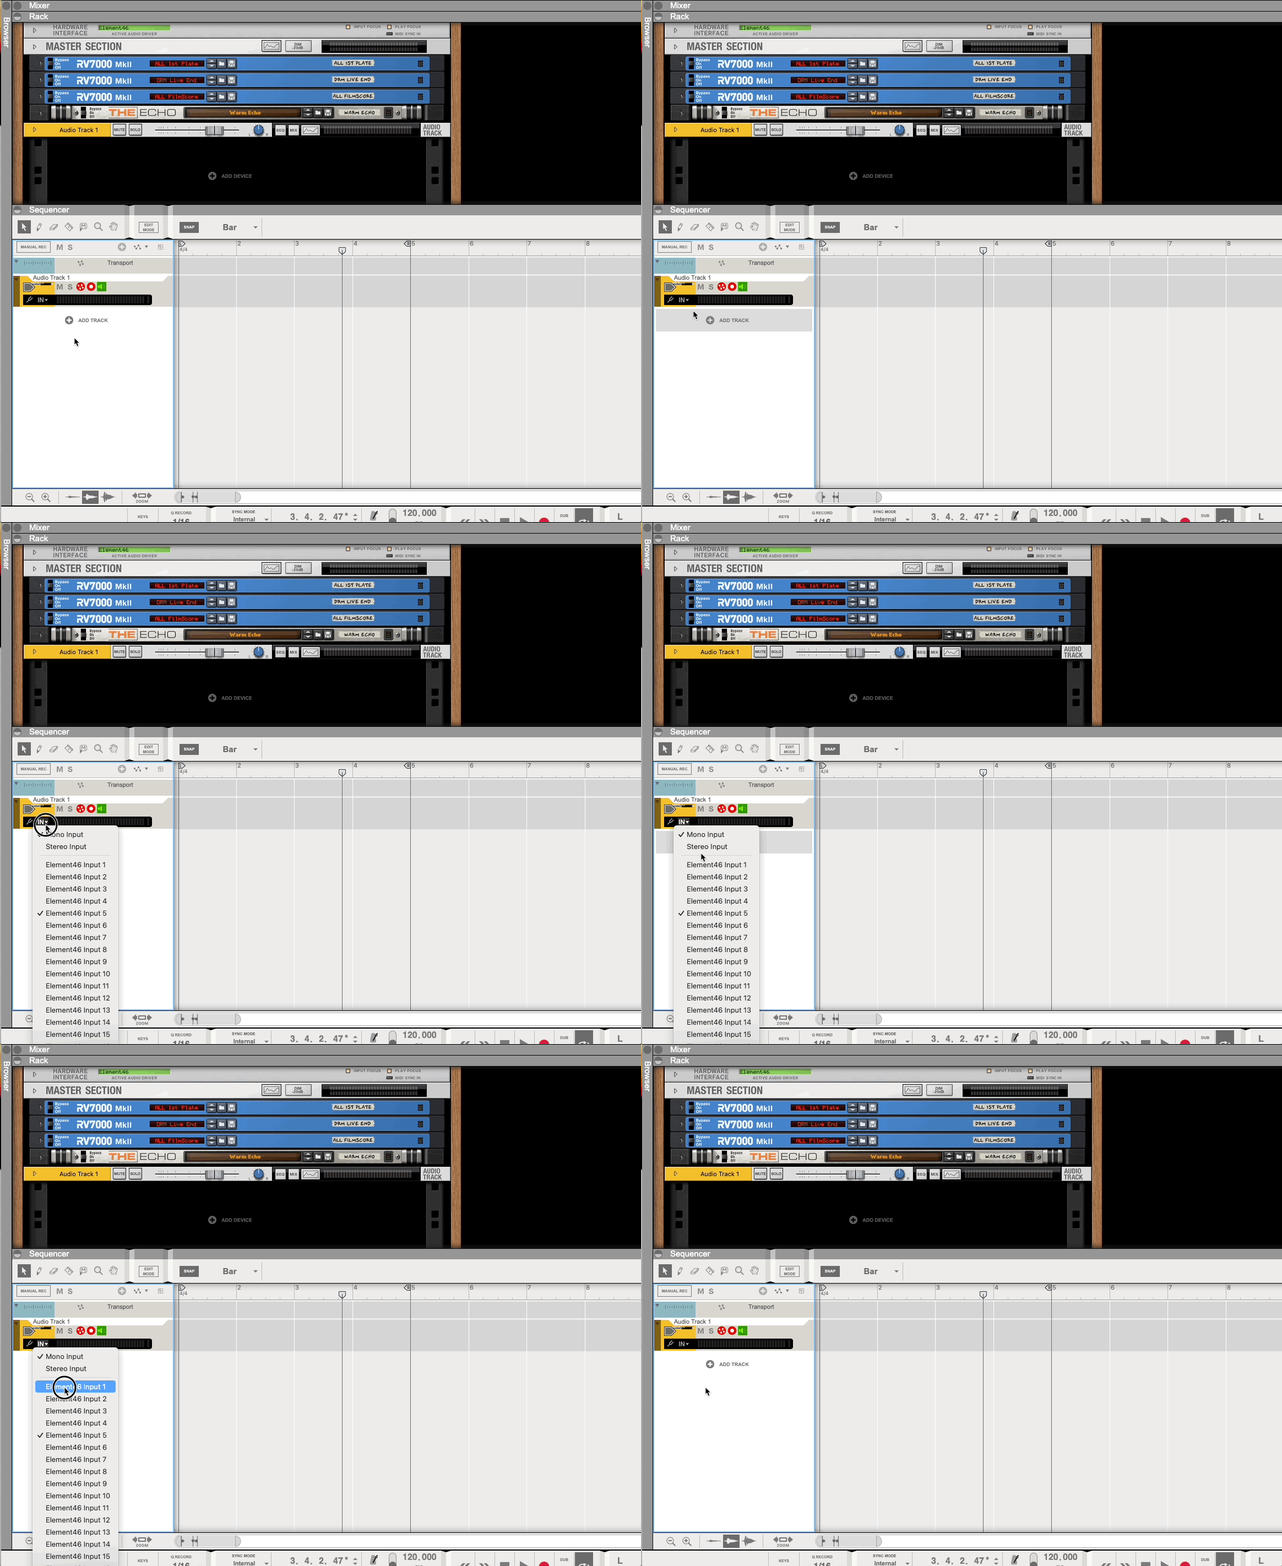
- Create a new track by clicking the Create menu, then choosing Create Audio Track.
- On your new audio track, click the In button, select either Mono Input or Stereo Input, then the appropriate input channel(s). If you are recording a mono instrument, like voice or guitar, select mono input. Note: if you are using a microphone as your input source, make sure to use headphones and have your speakers off in order to avoid feedback.
- If you are recording guitar and want to use an amp simulator, such as AmpliTube, instantiate that on the new track now. See the collapsed note at the bottom of this section for instructions on how to do that.
- By default, Reason is set to record in Loop mode with a four-bar loop. This is often not preferable, so if you want to change that behavior, you can either turn Loop mode off by pressing the L key on your keyboard, or adjust the loop length by changing the Right Locator value in the transport.
- The metronome, also known as the “click,” is also on by default. Press the C key on your keyboard to turn the metronome off (or back on).
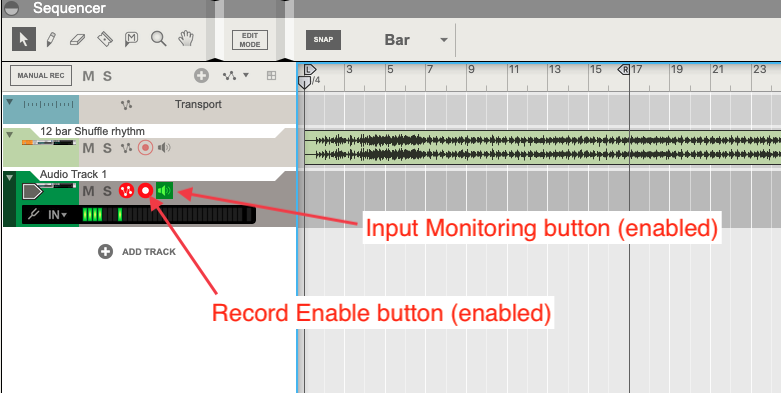
- If you followed all the steps listed above in order, then your second audio track will be record-enabled with input monitoring on. In order to record, you will need to have a track record-enabled, and in order to hear the input of the track, you will need to have input monitoring enabled on that track. See the screenshot below for the locations of those buttons.
How to Instantiate a Plug-in
How to Instantiate a Plug-in in Reason
You can instantiate a plug-in on a mix channel, audio track, or instrument track in Reason. In the following steps, we'll use AmpliTube 5 as an example, and instantiate it on an audio track.
- Select the track where you want to instantiate the plug-in by clicking it.
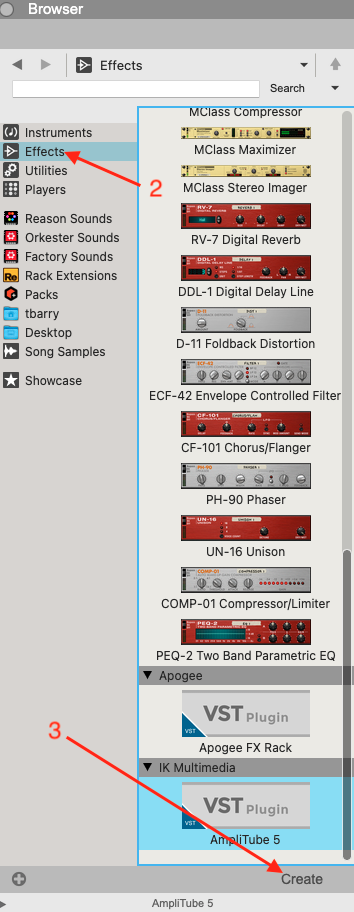
- Click on Effects in the Reason browser, then scroll to find the plug-in you want to add. Reason's built-in effects will be listed first while third party plug-ins are listed under the name of their manufacturer. AmpliTube 5 will be available under IK Multimedia.
- Double-click on the plug-in name in the Reason browser, or click on it once and then click the Create button, to add the plug-in to your selected track.
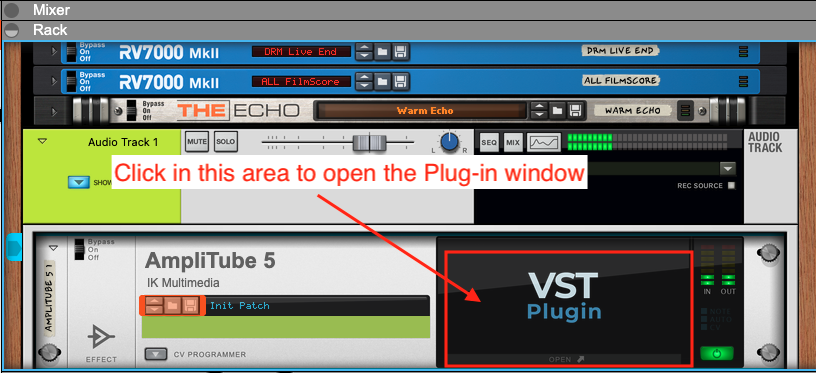
- To open the plug-in window, click VST Plugin within the Rack view.
Recording
Now you are ready to record!
- Click the Record button in the transport section to start recording.

- When you've finished recording, hit the Stop button in the transport section to stop recording.

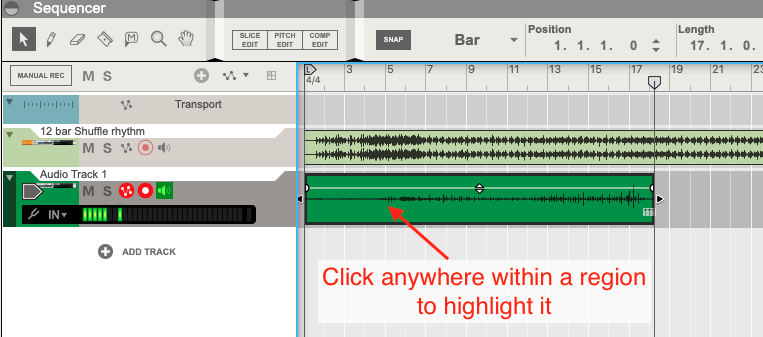
- If you are happy with your recording, you can proceed to the next section. If you aren't happy with the recording, click on the region you just recorded to select it, then hit the Delete key on your keyboard to delete the region.
- Hit the Stop button in the transport section to return the transport to beat 1 of bar 1.
- Repeat steps 1-4 as many times as needed until you are happy with your recording.
Exporting Audio from Reason
Once you have finished a project in Reason, you may want to export the project as an MP3 file. To do that, take the following steps:
How to Export an MP3 File from Reason
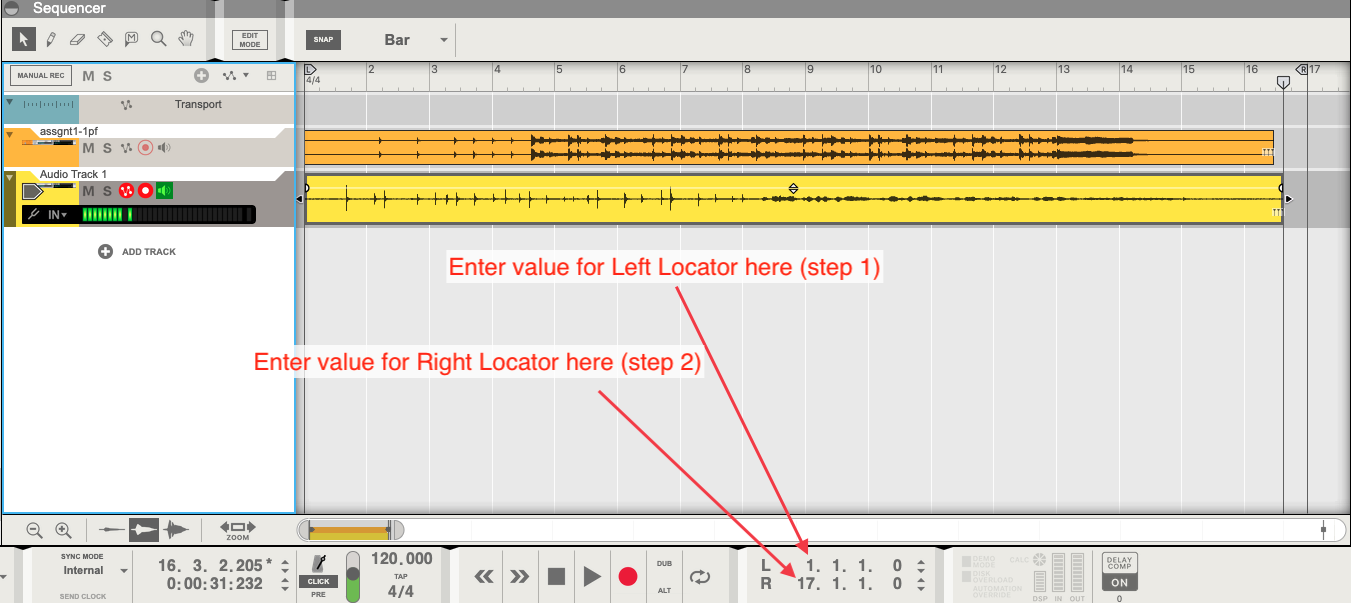
- Set the Left Locator to the beginning of the song. It will be there by default if you haven't changed it. To ensure this is the case, click the number just to the right of the L in the transport section, enter 1, then hit the enter/return key.
- Set the Right Locator to the point you want the song to end. Click the number to the right of the R in the transport section, enter the bar number where you want the song to end, then hit the enter/return key.
A Note about Moving Locators
As an alternative to the two steps above, you can also click and drag the locaters to the desired positions from within the sequencer area of Reason.
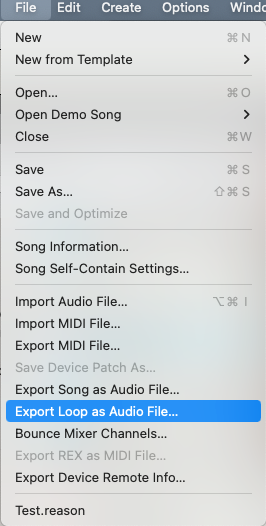
- Click File > Export Loop as Audio File.
- Name the file.
- Select a location to save the file.
- Make sure the value in the Format dropdown menu is MP3 File.
- Click Save.

- Once the file has finished exporting, you can then find the MP3 file by navigating to the location on your machine where you chose to save the file in step 5.

