Some of your courses may require recording video along with a backing track, which can be a little more involved than just recording basic video. To achieve the best possible audio quality on your submissions, it is recommended that you record your audio and video from separate sources, sync them together in a video editor or DAW, then export the resulting file for submission.
Using the BOCCE Built-in Video Recorder
An alternative to the process described in this article is to record your performance along with the backing track as a single audio track. While that doesn't achieve the same audio quality, doing so allows you to use the built-in video recorder in BOCCE, and also doesn't require any additional software (aside from a basic media player). Click here for instructions on the simple method of recording a video of your performance along with a backing track.
What You'll Need:
- Audio interface
- If you are recording your voice, an acoustic instrument, or a miked amplifier, you will also need a microphone.
- Headphones
- If you are recording an electric instrument signal directly into your interface, you could alternatively use monitor speakers.
- Video source, such as a smartphone, tablet, or digital camera
- Digital Audio Workstation (DAW), such as Pro Tools, GarageBand, Ableton, Logic, Cubase, Reason, etc.
- Video editing software, such as iMovie or Shotcut
- Your instrument or voice—you may also need amplification if using an electric instrument.
Note about Recording Multiple Audio Tracks
Some assignments require you to record more than one track of audio over the backing track, such as rhythm and lead guitar parts. In those situations, wait to record the video until you are recording the last of the audio tracks. Using the rhythm/lead guitar example, you would record an audio track of your rhythm performance prior to step 3 below, then create a new track for your lead guitar and continue with step 3.
Steps:
- Download the backing track from your course.
- Import the audio track into your DAW, and prepare your DAW for recording. See the section at the bottom of this article for step-by-step instructions regarding importing audio, recording with multiple tracks, and exporting audio with various DAWs.
- Begin recording your video, then record your audio in the DAW while performing over the backing track.
Note about Recording Video with Sync in Mind
It can be helpful when syncing your audio and video to have an obvious transient sound that you can use as a reference. If you are using a microphone, a clap before the music starts, or along with the count-off on the backing track, can serve that purpose. If you are recording an electric instrument directly, it's recommended to play muted strings or percussively hit the strings along with the count-off, which you can then use to sync the audio to the video later.
- Stop the video recording.
- If you are unhappy with your performance, delete the recorded audio in your DAW, then repeat steps 2-4. Otherwise move on to step 5.
- Export the audio from your DAW as an MP3 file.
- Transfer the video from your video recorder to your computer.
- See this article for instructions on how to import your video and audio into a video editor, combine them, and export as a single file.
- Submit your assignment, attaching the video you exported in step 7. See this article about submitting assignments with attachments for instructions on that process.
How to Record Multitrack Audio in Various DAWs
Select the appropriate tab below for instructions on how to record multitrack audio within your DAW. Each tab also contains instructions for preparing your session for recording, importing an audio track into your session, and exporting audio from the DAW.
Ableton Live
How to Record Multitrack Audio in Ableton Live
Configuring Audio Preferences/Settings
First, you'll need to check your audio preferences within Ableton and ensure your input and output devices are set up properly. To do that, take the following steps:
How To Configure Audio Preferences/Settings for Recording in Ableton Live
- Open the Preferences menu with one of the following key commands: Control + , on Windows, or Command + , on Mac. (Note that in some versions of Live, Preferences is referred to as Settings.)
- Click the Audio tab.
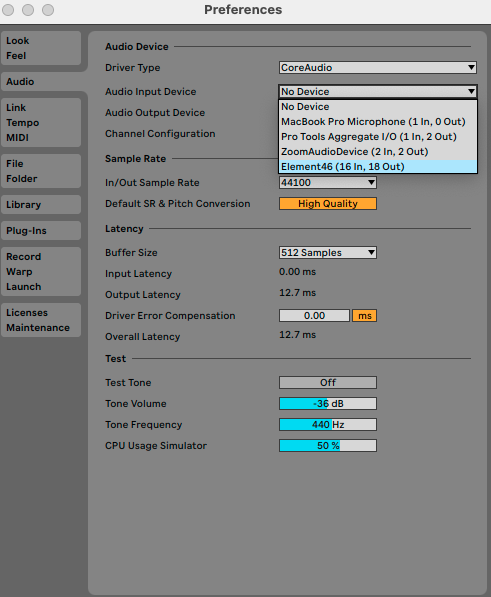
- Set the Audio Output Device by selecting your audio interface from the Audio Output Device dropdown menu. Note that you can also use your built-in speakers (and/or your built-in microphone for input), but for the rest of this article, we'll assume you are using an audio interface.

- Set the Audio Input Device by selecting your audio interface from the Audio Input Device dropdown menu.
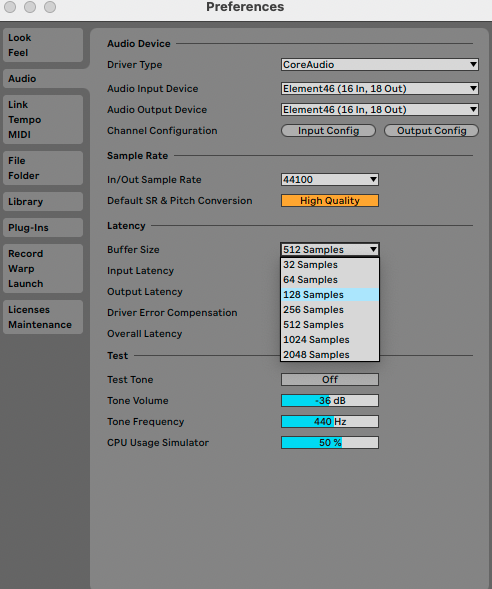
- This is also a good opportunity to check your Buffer Size and change it if necessary. The lower your buffer size, the less latency you will get. It's worth noting that you may experience audio issues, such as distortion or digital noise, if your buffer size is too low. We'd recommend starting at 128 samples and adjusting as needed from there.
A Note about Input and Output Configurations
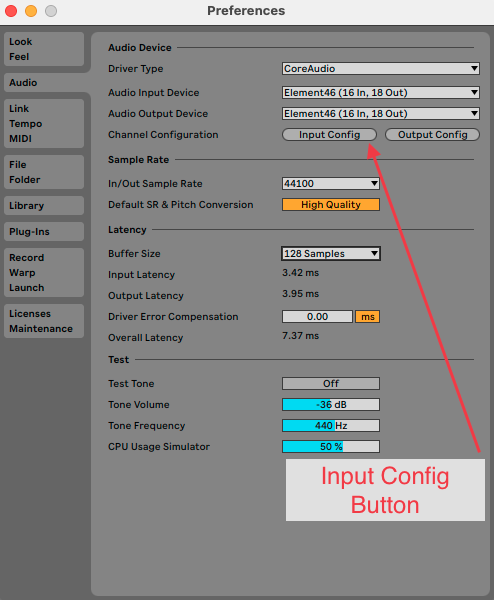
You may have noticed the Input Config and Output Config buttons on the Channel Configuration line of Audio Preferences. If your audio interface has more than two inputs and/or more than two outputs, and you want to use those additional inputs and outputs in Ableton Live, you'll need to enable them. To do that (using input as an example):
- Click the Input Config button.
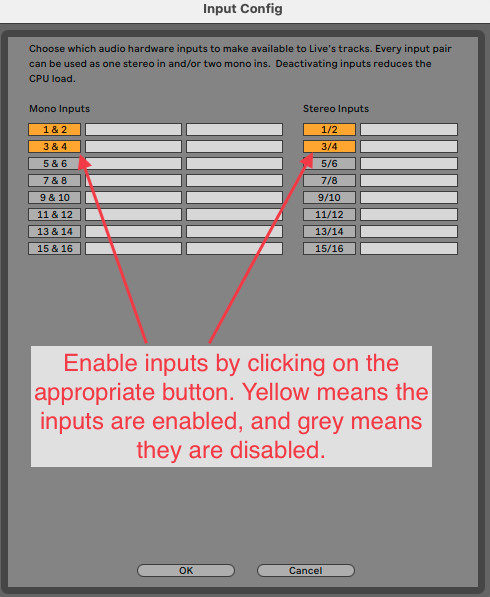
- Enable any additional inputs you'd like to use by clicking on the corresponding number so it turns yellow. Repeat the same steps for the outputs as needed.
Preparing Your Session for Recording
Now that your audio preferences are set, the next step is to ensure you have the right kind of track set up, and your routing is correct on the track. By default, Ableton Live opens in the Session view, which is where we'll start. Also by default, each Ableton Live session opens with two audio tracks and two MIDI tracks already created. To ensure you are ready to record audio on a track, take the following steps:
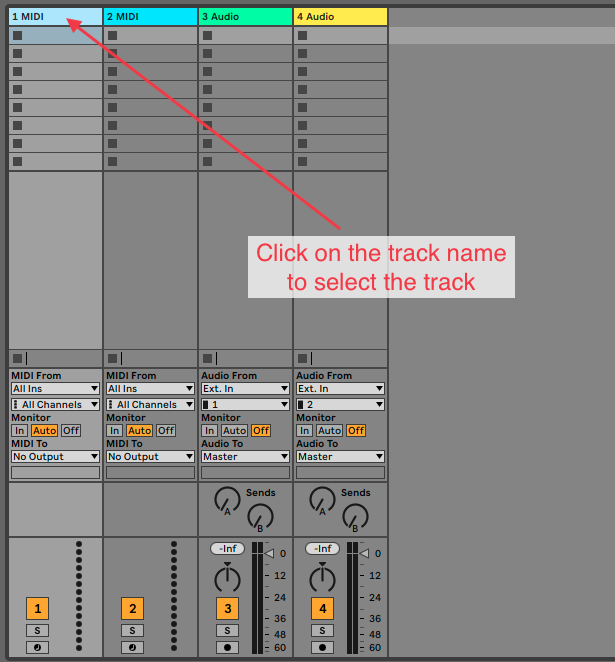
- Let's start by deleting the MIDI tracks, as we won't need them for this tutorial. To delete the first track, select the track by clicking on the title (1 MIDI), then hit your delete key to delete the track. Repeat for the second MIDI track (which will also be called 1 MIDI after you've deleted the first track).
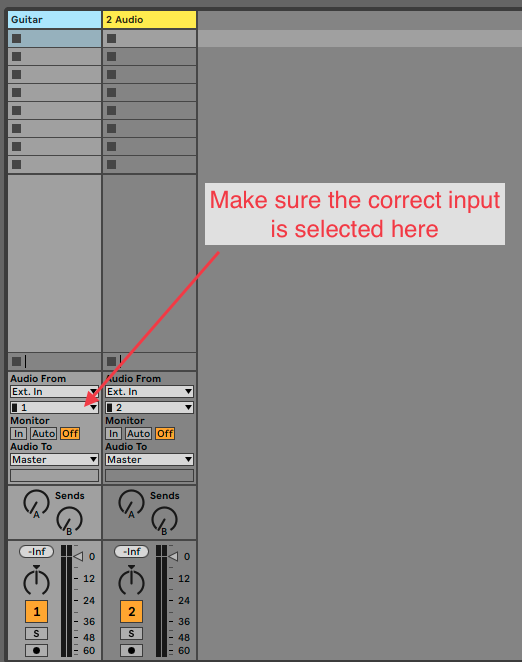
- Next, name the first audio track appropriately. For example, if you plan to record guitar, you may want to call it Guitar. To rename a track, either right-click on the track and choose Rename then type the track name. Alternatively you can select the track, then use the Rename command (command + R on Mac, control + R on PC).
- On your first audio track, ensure the proper input is selected. To do that, select the channel number that your instrument or microphone is connected to in the second dropdown menu under Audio From.
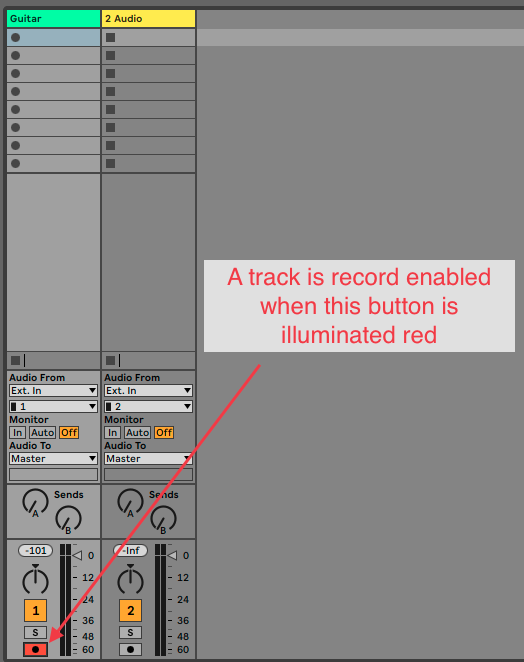
- Make sure the track is record-enabled by clicking the circle icon at the bottom of the track. Once the track is record-enabled, the background of that icon will turn red.
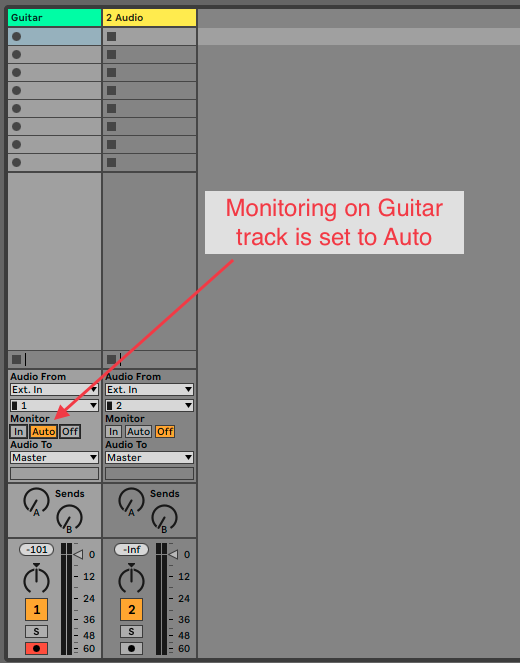
- Make sure Auto is selected in the Monitor section for the track. This will ensure that you hear the input of the track when you are recording, and the output of the track when you are playing back.
- If you are recording guitar and want to use an amp simulator, such as AmpliTube, instantiate that on the first track now. See the collapsed note below for instructions on how to do that.
How to Instantiate a Plug-in
How to Instantiate a Plug-in in Ableton Live
You can instantiate a plug-in on any kind of track (audio, MIDI, return, or master) or grouped tracks in Ableton Live. In the following steps, we'll use AmpliTube 5 as an example, and instantiate it on an audio track.
- Click on the Plug-Ins section of the Ableton Browser.
- Locate the plug-in you want to add to your track (AmpliTube 5 in this example). If you don't see the plug-in you are looking for, see the note about plug-ins below.
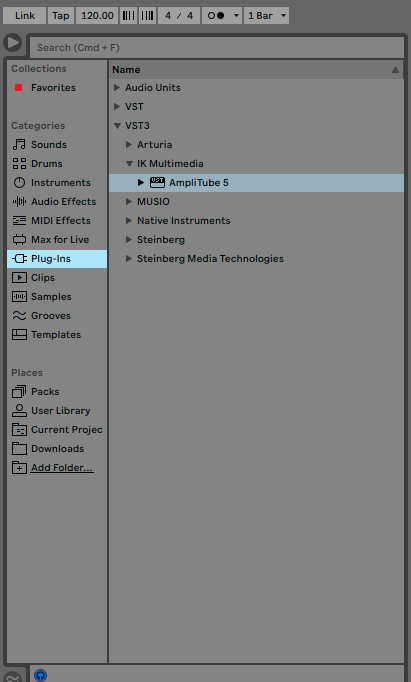
- Either drag and drop the plug-in onto the track, or click the track header once, then double click on the plug-in in the browser.
A Note about Plug-ins
How to Enable Virtual Instruments and Audio Units in Ableton Live
If you aren't seeing all of your installed plug-ins listed in the Plug-Ins section of the Ableton browser, it may be because you don't have all virtual instruments (VSTs) or audio units (AUs) enabled. To ensure you have them all enabled, take the following steps:
- Open the Ableton Preferences menu, and click the Plug-Ins tab
- Ensure the following are set to On:
- Use VST2 Plug-In System Folders
- Use VST3 Plug-In System Folders
- Use Audio Units
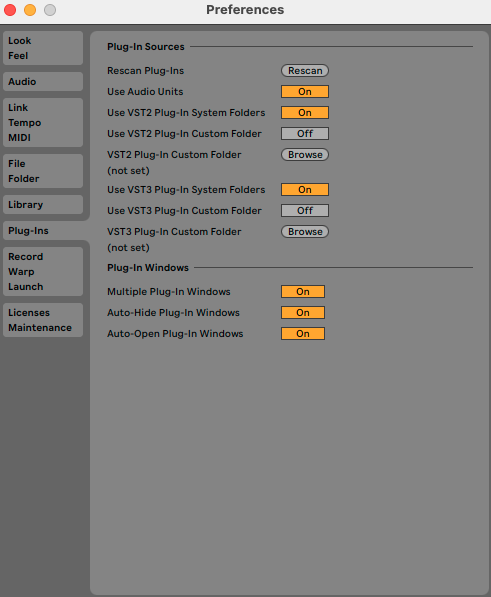
- Click the Rescan button on the Rescan Plug-Ins line
You may also want to enable the VST2 Plug-In Custom Folder and VST3 Plug-In Custom Folder options if you have plug-ins saved in a location other than the default. In that case, click the Browse button to select the appropriate location where those plug-ins are stored, then click the Rescan button again.
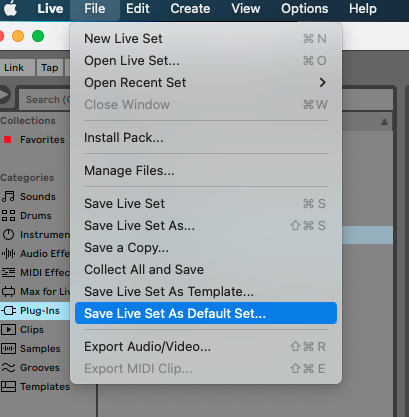
A Note about the Default Live Set
If you think you will be recording many projects using the same configuration, you may wish to save your current set as the default, so each new set you create will look like this one. If you'd like to do that, click the File menu, then choose Save as Default Set.
At this point you may choose to continue working in the Session view, but for the purposes of this tutorial we will switch over to the Arrangement view, which is more similar to what you would see in other DAWs.
To switch the Arrangement view, press the Tab key. As an alternative to using the Tab key, you can switch between views by clicking the icons in the top right corner of the Ableton window. Clicking the icon with three horizontal lines will display the Arrangement view, and clicking the icon with three vertical lines will display the Session view.
Importing a Backing Track
How to Import an Audio File into an Ableton Live Set
- Click the Add Folder button in the Places section of the browser.
- Select the folder where the audio you want to import is stored (not the audio file itself), then click Open. This will add the folder as an option under Places.

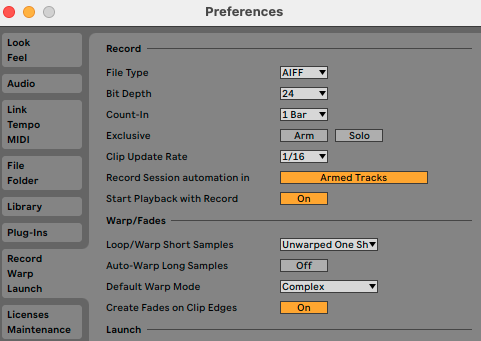
- To ensure you are not altering the original speed of the audio file once you import it, open your Preferences and select the Record Warp Launch tab. Ensure Loop/Warp Short Samples is set to Unwarped One Shot, and Auto-Warp Long Samples is set to Off.
- From the Places section of the Ableton Browser, access the folder where the audio file you wish to import is stored, then drag and drop the file into the timeline area corresponding to an empty audio track. Note that you can also drag the audio file to an empty clip slot on an audio track in Session view.
Recording
Now you are ready to record!
- Click the Arrangement Record button and record your part.
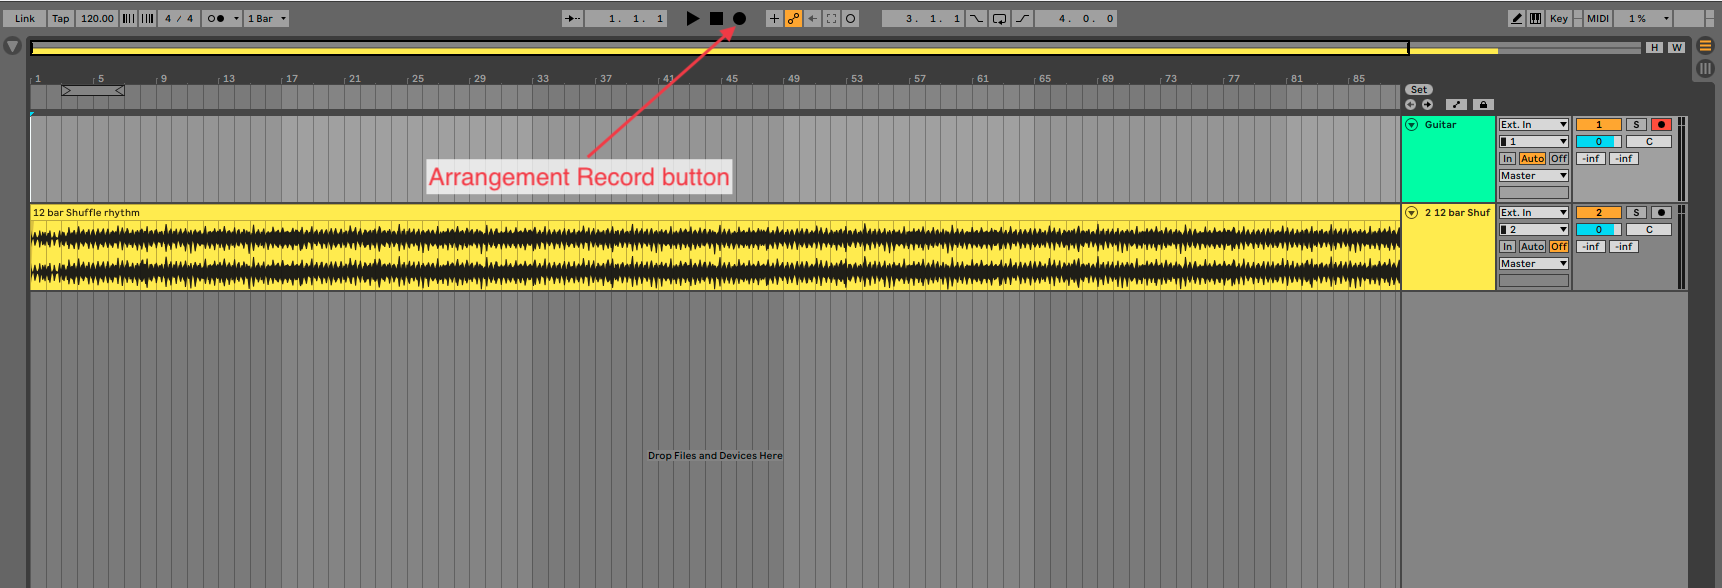
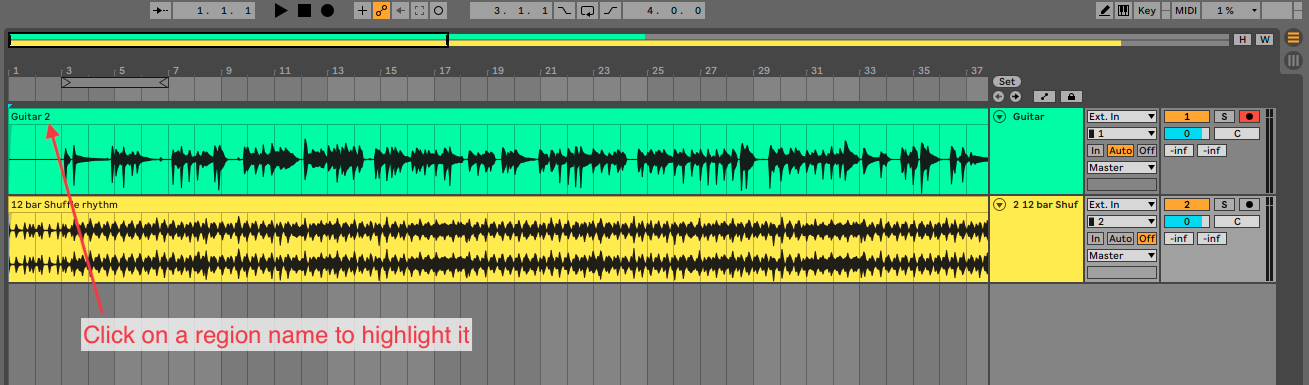
- When you are done, hit the spacebar to stop playback. If you aren't happy with what you recorded, you can delete it by selecting the newly created region, then hitting your delete key.
- You can repeat steps 1 and 2 as many times as needed until you are happy with your recording. Once you are happy with your recording, proceed to the next section of this article.
Exporting Your Recording as an MP3 File
How to Export an MP3 File from Ableton Live
Once you have finished a project in Ableton Live, you may want to export the project as an MP3 file. To do that, take the following steps:
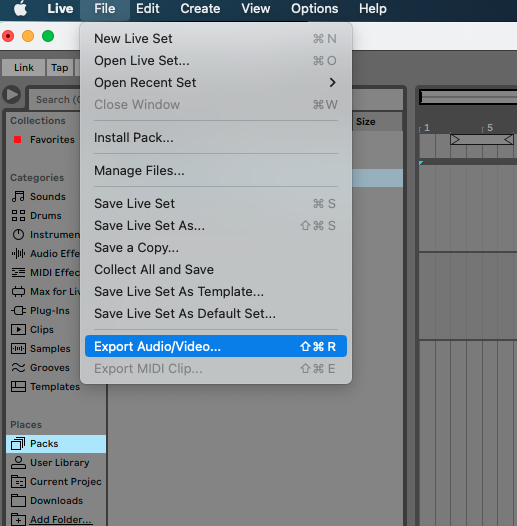
- In the Ableton Live menu, click File, then select Export Audio/Video.
- In the Export Audio/Video window, ensure Encode MP3 is On. If you want to simultaneously export a WAV or AIFF file, you can do so by ensuring Encode PCM is On, and the appropriate file type is selected in the File Type drop-down menu. Otherwise, ensure Encode PCM is Off.
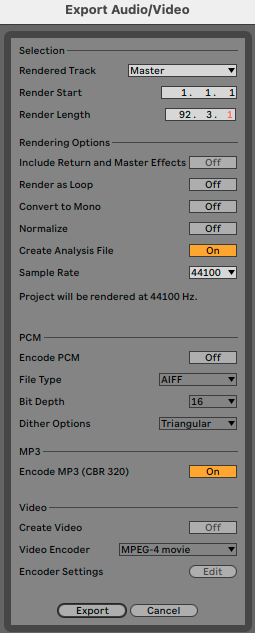
- Click the Export button.
- In the following window, name your file, select a location where it will be saved, and hit Save to finish the process.
- Once the file has finished exporting, you can then find the MP3 file by navigating to the location on your machine where you chose to save the file in Step 4.
Logic Pro
How to Record Multitrack Audio in Logic Pro
Creating your Logic Pro Project/Audio setup
When you first open Logic Pro, you'll be prompted to either open an existing project, or create a new one. At the same time, you'll be given options for audio input and output. The following steps will go over how to configure your Logic Pro Project.
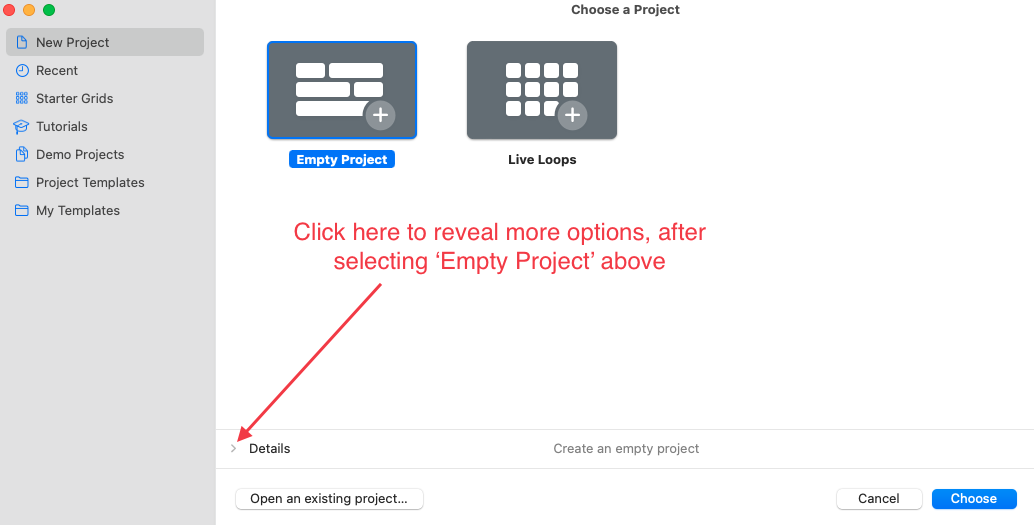
- After opening Logic Pro, if not already selected, select New Project in the left menu, then Empty Project in the main panel.
- Click the > icon next to Details to reveal more options.
- Set the Input Device by selecting your audio interface from the Input Device dropdown menu. Note that you can also use your built-in microphone, but for the rest of this article, we'll assume you are using an audio interface.
- Set the Output Device by selecting your audio interface from the Output Device dropdown menu.
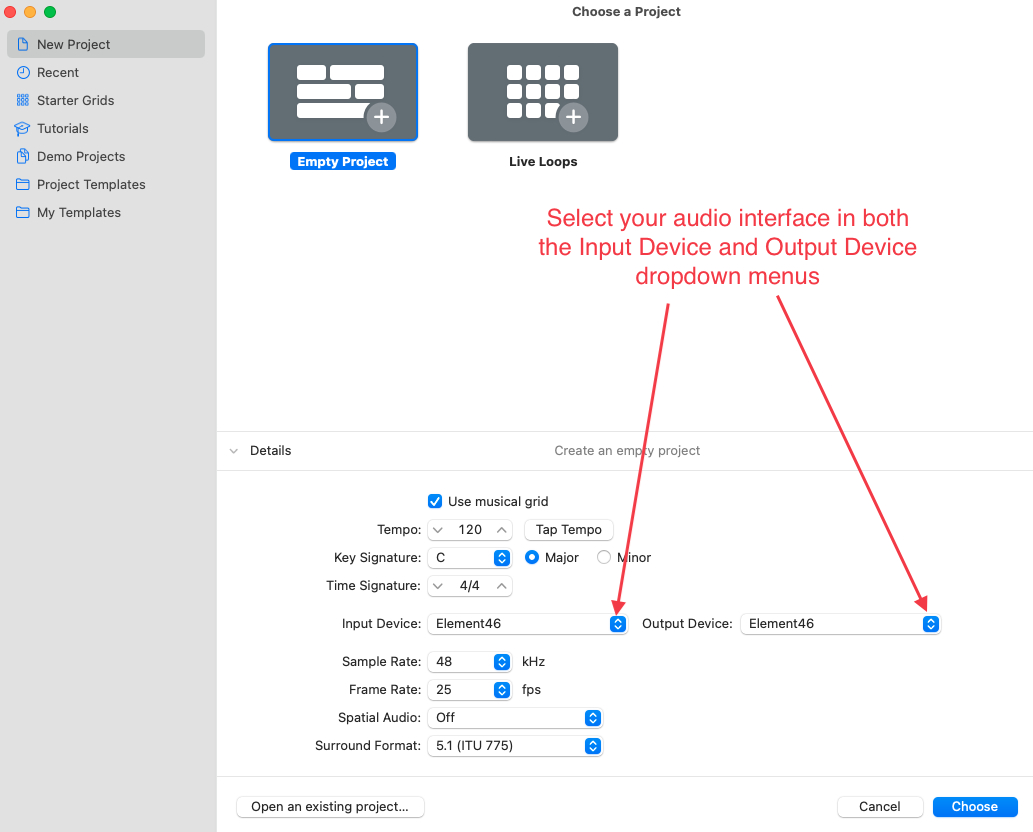
- Click the Choose button to create your project.
Preparing your project for recording
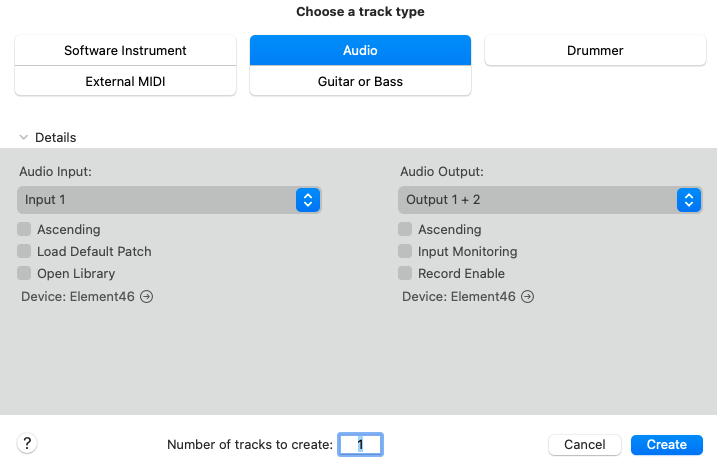
- After clicking Choose, you'll be prompted to create at least one track before continuing. Select Audio as the track type.
- In the Audio Input dropdown, select the input on your audio interface that your instrument or microphone is connected to.
- The Audio Output should default to Output 1+2, but if not, select Output 1+2 (or another set of outputs if that is more appropriate for your situation).
- Click the Create button.
- If you are going to be recording along with a backing track, create another audio track. To do that, click Track > New Audio Track.
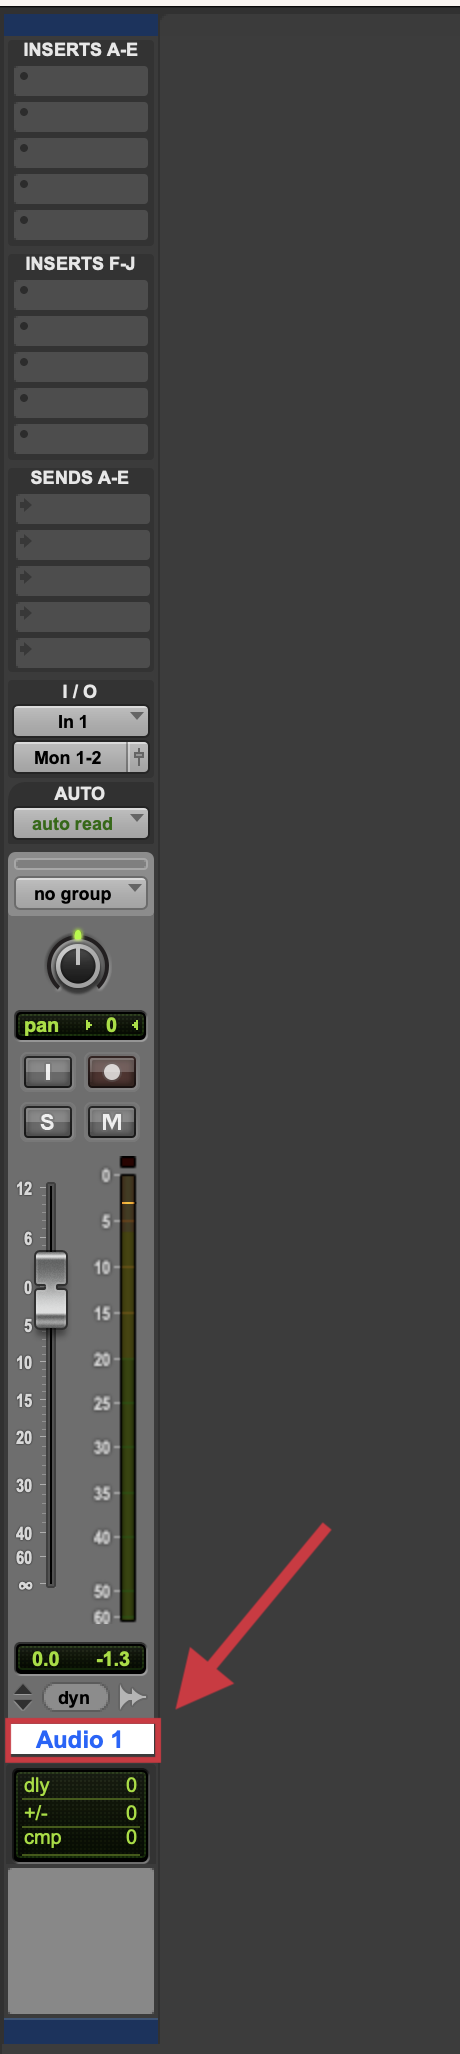
- The new track will be record-enabled by default. Click the red R button on the Audio 2 track to disable recording on that track.
- Record enable the Audio 1 track by clicking the red R button on that track. Note, if you are using a microphone in your input chain, it is advised that you monitor with headphones rather than speakers to avoid feedback.
- To rename either track, double click on the track name, enter the new name, then hit the return key. You may want to do this for organizational purposes within your session, and so any regions you record will be named appropriately. For example, if you are recording guitar on the first audio track, you may want to name the track Guitar.
- If you will be recording guitar and want to use an amp simulator plug-in such as AmpliTube, instantiate the plug-in on your first track now. See the collapsed note below for instructions.
A note about instantiating plug-ins
How to Instantiate a Plug-in in Logic Pro
You can instantiate a plug-in on any kind of track (audio, software instrument, aux, or master) or grouped tracks in Logic Pro. In the following steps, we'll use AmpliTube 5 as an example, and instantiate it on an audio track.
- Click on the track name of the track you want to instantiate the plug-in on so the track is displayed in the Left inspector channel strip.
- Click in the Audio FX section of the track in the Left inspector channel strip.
- Select Audio Units, find the plug-in in the appropriate folder, then click either Mono→Stereo (advised if the plug-in utilizes stereo effects) or Mono. For AmpliTube 5, click Audio Units > IK Multimedia > Amplitube 5 > Mono→Stereo.
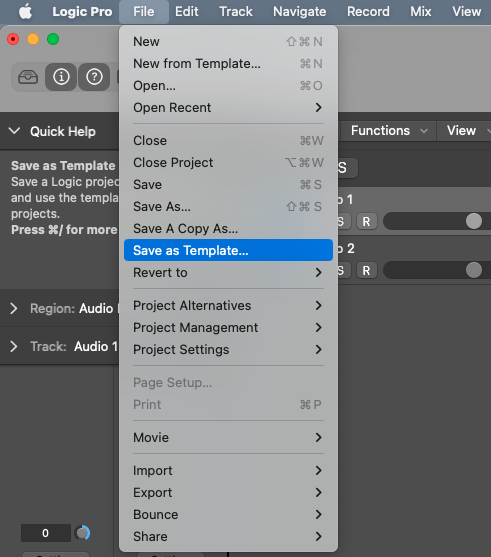
A note about templates
If you think you will be recording many projects using the same configuration, you may wish to save your current project as a template, so you won't need to take the previous steps every time. To save your current project as a template, click File > Save as Template and save the file in the Project Templates folder (which is the default location).
Importing an audio track
If you'll be recording along with a backing track, follow the steps below to import the audio file into your project. Otherwise, skip ahead to the next section.
How to Import an Audio File in Logic Pro
- Select the track where you want to import your audio into by clicking the track name.
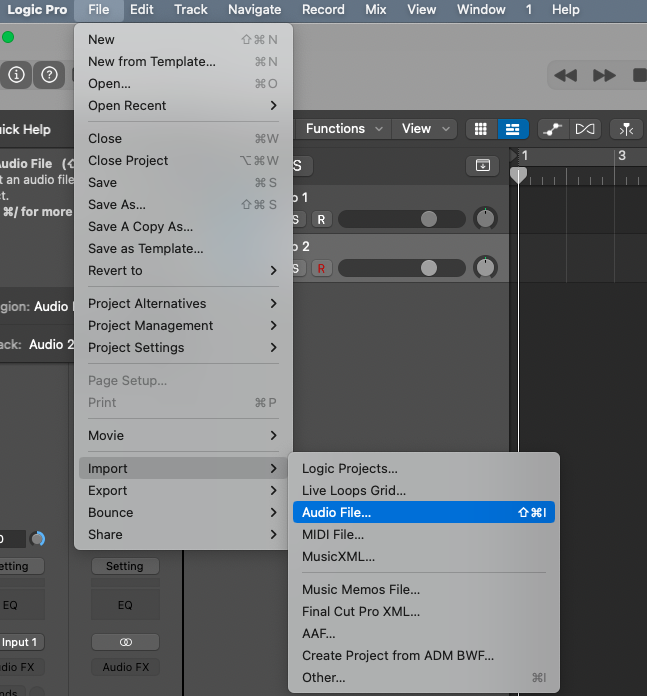
- Click File > Import > Audio File, as shown below.
- Navigate to the file you want to import, click on it to select it, then click Open.
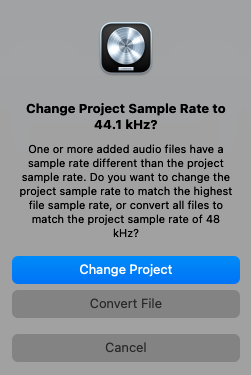
- If you are presented with the prompt in the screenshot below regarding sample rate, click either Change Project or Convert File depending on your preference—either is fine.
Recording
Now you are ready to record! To begin recording, take the following steps:
- To start recording, either click the Record button (which looks like a red circle) in the transport, or press the R key on your keyboard.

- When you are finished recording, either click the Stop button in the transport (which looks like a grey square), or press the spacebar on your keyboard.

- If you aren't happy with your recording you can delete it by pressing the delete key on your keyboard. Then, select either Delete or Keep on the following prompt, depending on your preference. Delete will permanently delete the file, while Keep will remove it from your view, but keep the file in the project folder. Before attempting to record again, return the transport to the beginning by clicking the Go to Beginning button in the transport.

- Repeat steps 1-3 as many times as needed until you are happy with your recording.
Bouncing your recording as an MP3 file
How to Bounce an MP3 File from Logic Pro
Once you have finished a project in Logic Pro, you may want to export (bounce) it as an MP3 file. To do that, take the following steps:
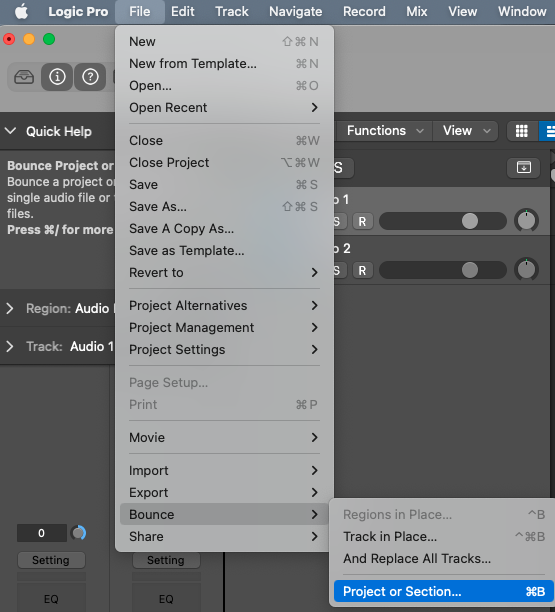
- Click File > Bounce > Project or Section.
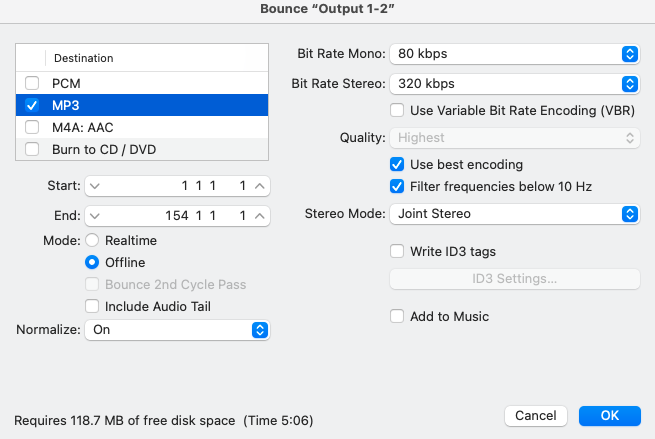
- In the Bounce “Output 1-2” window, uncheck the box next to PCM (unless you also want to bounce a WAV or AIFF file).
- Check the box next to MP3.
- Click on MP3 to reveal the MP3 bounce options.
- While the default Bit Rate Stereo is 160 kbps, it is advised to use the highest possible option (320 kbps). To do that, click the drop-down menu next to Bit Rate Stereo and select 320 kbps.
- Adjust any other settings as you see fit, though the settings in the screenshot below will be acceptable in most circumstances.
Notes about Bounce Settings
- The Start and End values (shown in the screenshot above) will be unique to each project you are bouncing.
- If you have cycling (looping) turned on, your bounce will only include the time period within the yellow cycle region.
- Normalize is set to On by default. With Normalize set to On, Logic will raise the peak level of the audio file by a specified amount—typically to its highest possible digital level without introducing distortion through clipping. This will generally ensure your exported MP3 file is at a comparable loudness to commercial releases. If you are bouncing audio for a course focused on mixing or mastering, you may want to disable normalization.
- Click OK.
- In the following window, name your file, select a location, and click Bounce.
- Once the process is complete, you can navigate to the location you chose in Step 8 to find your MP3 file.
Pro Tools
How to Record Multitrack Audio in Pro Tools
Configuring I/O and Settings
Before recording, you will need to set up your session's I/O and playback engine.
How to Set Up I/O for Basic Recording in Pro Tools
Setting up I/O in Pro Tools, while simple, can be daunting for someone unfamiliar with the software. You can take the following steps in most cases to ensure Pro Tools' I/O and routing is properly set up, as well as to troubleshoot any issues.
1. Select the Correct Playback Engine
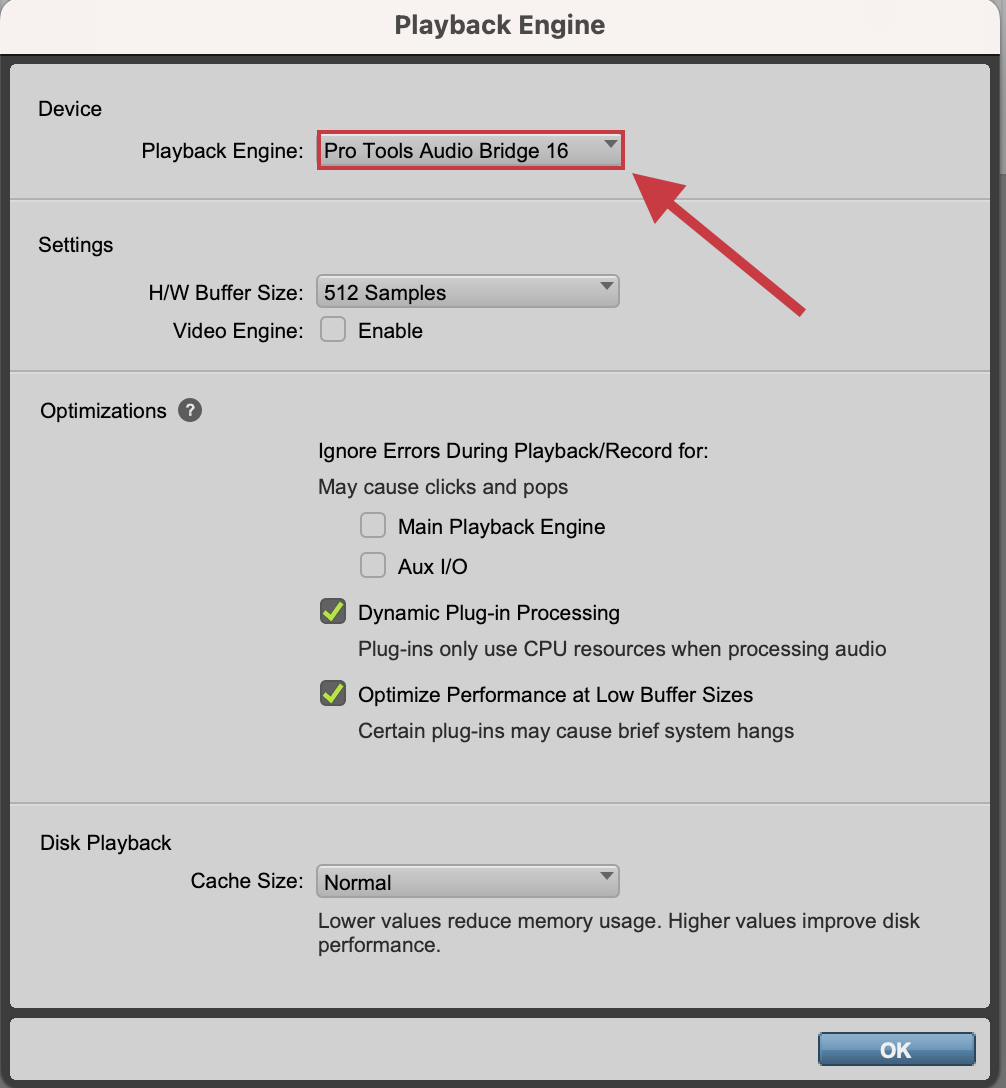
Whether you are using your built-in computer speakers, audio interface, or another audio device, you will need to ensure Pro Tools is communicating with your desired playback device. To do this, navigate to Setup > Playback Engine after starting Pro Tools and opening a session. In the resulting window, select your desired playback engine from the dropdown menu next to the Playback Engine field, then click OK. If the playback engine has changed, Pro Tools will close and reopen the current session.
You can also perform this action by holding down the N key on your keyboard while Pro Tools is starting up.
2. Set Inputs and Outputs
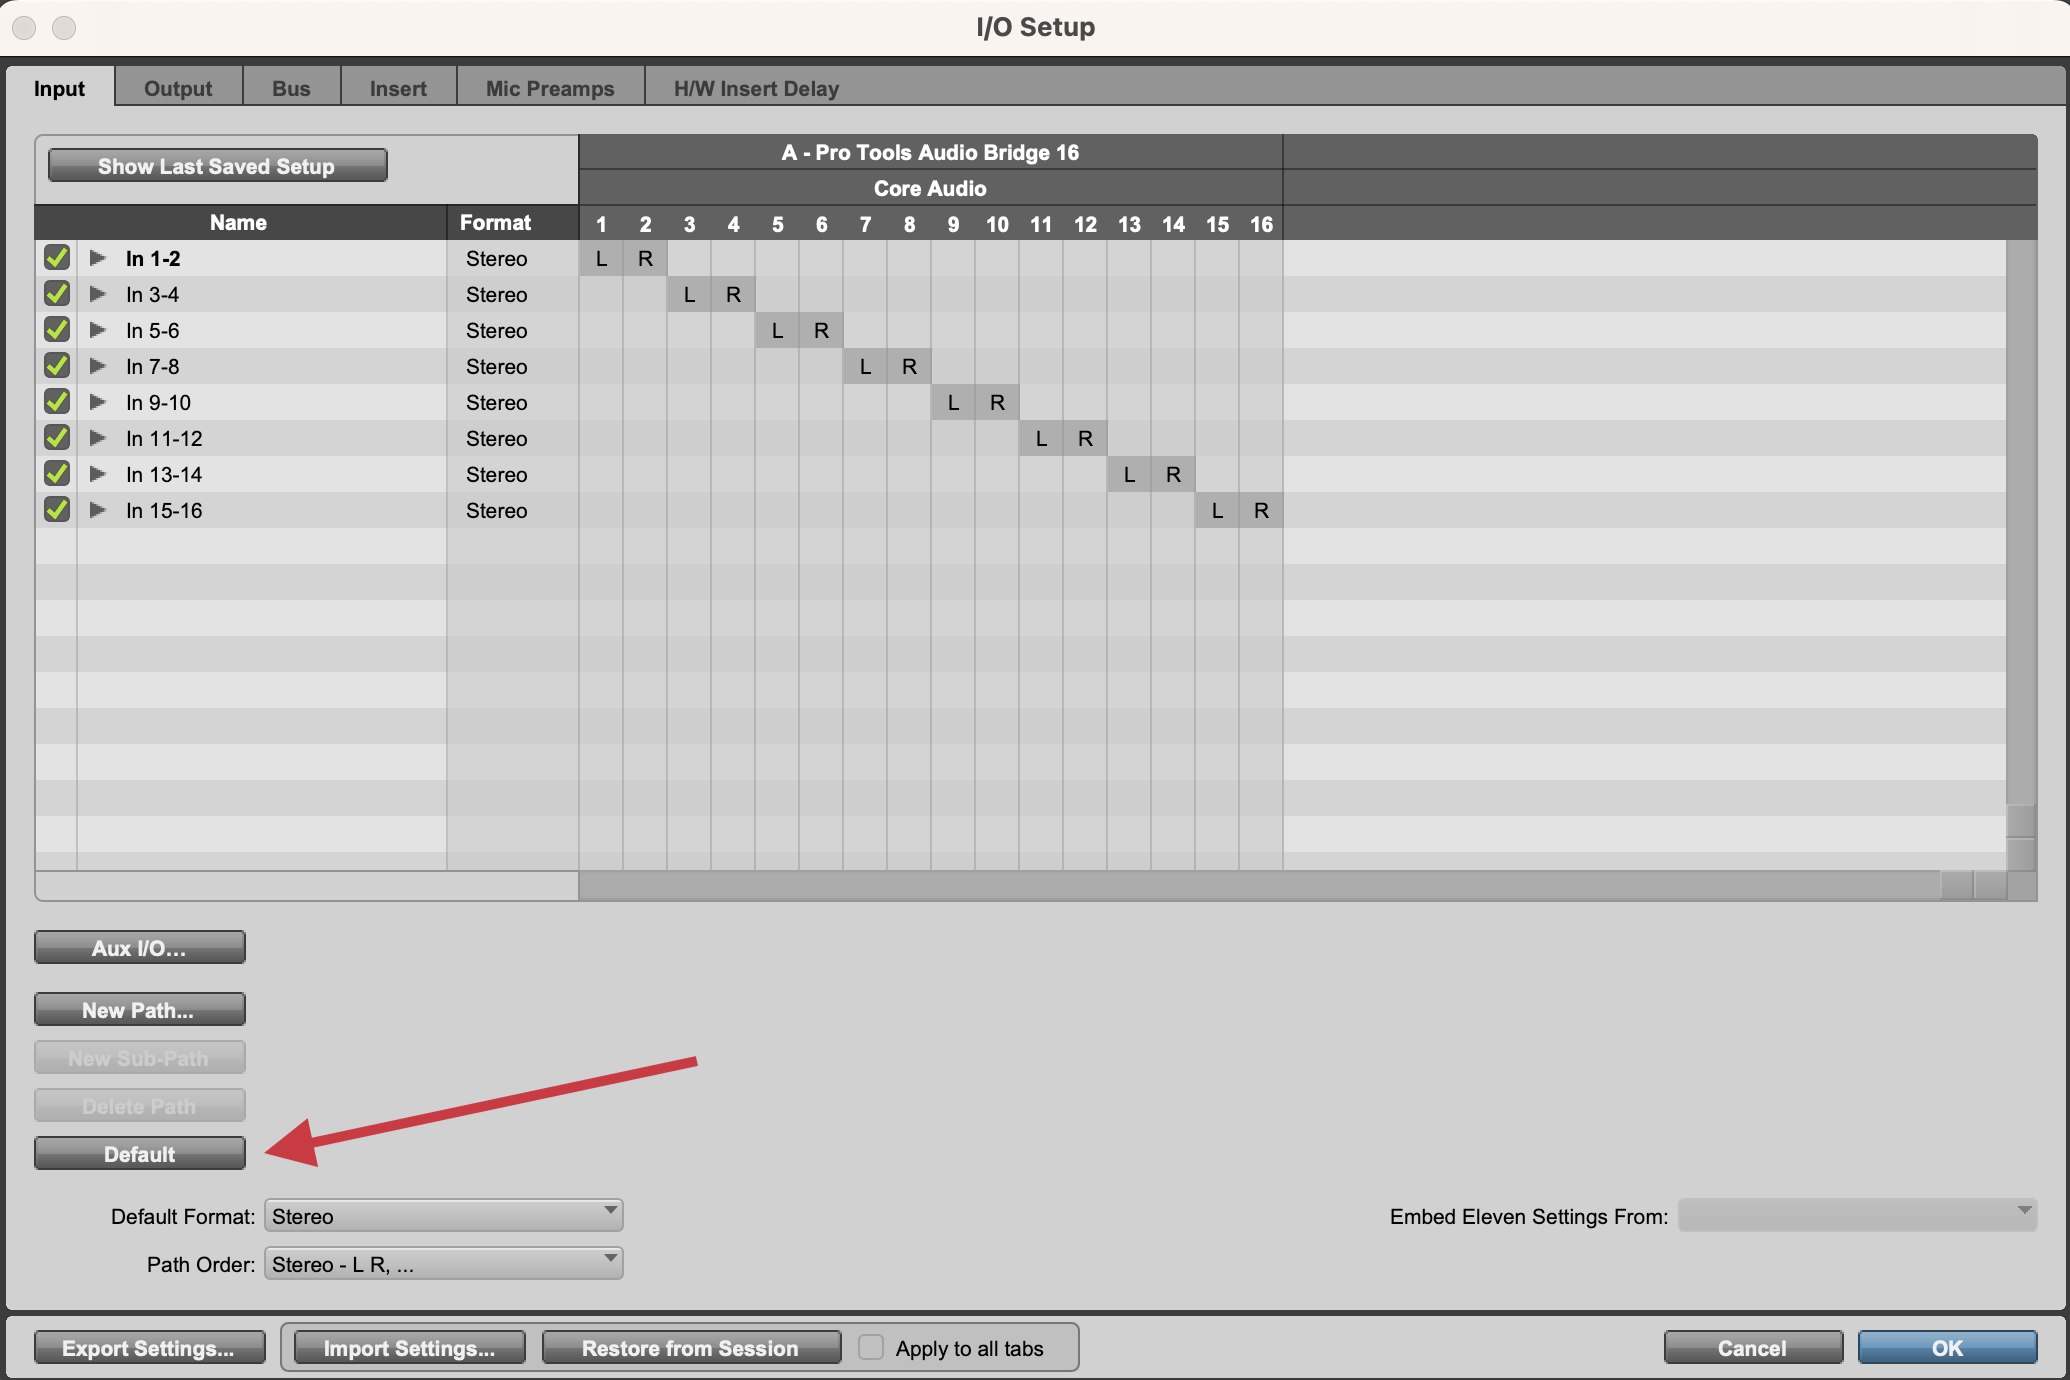
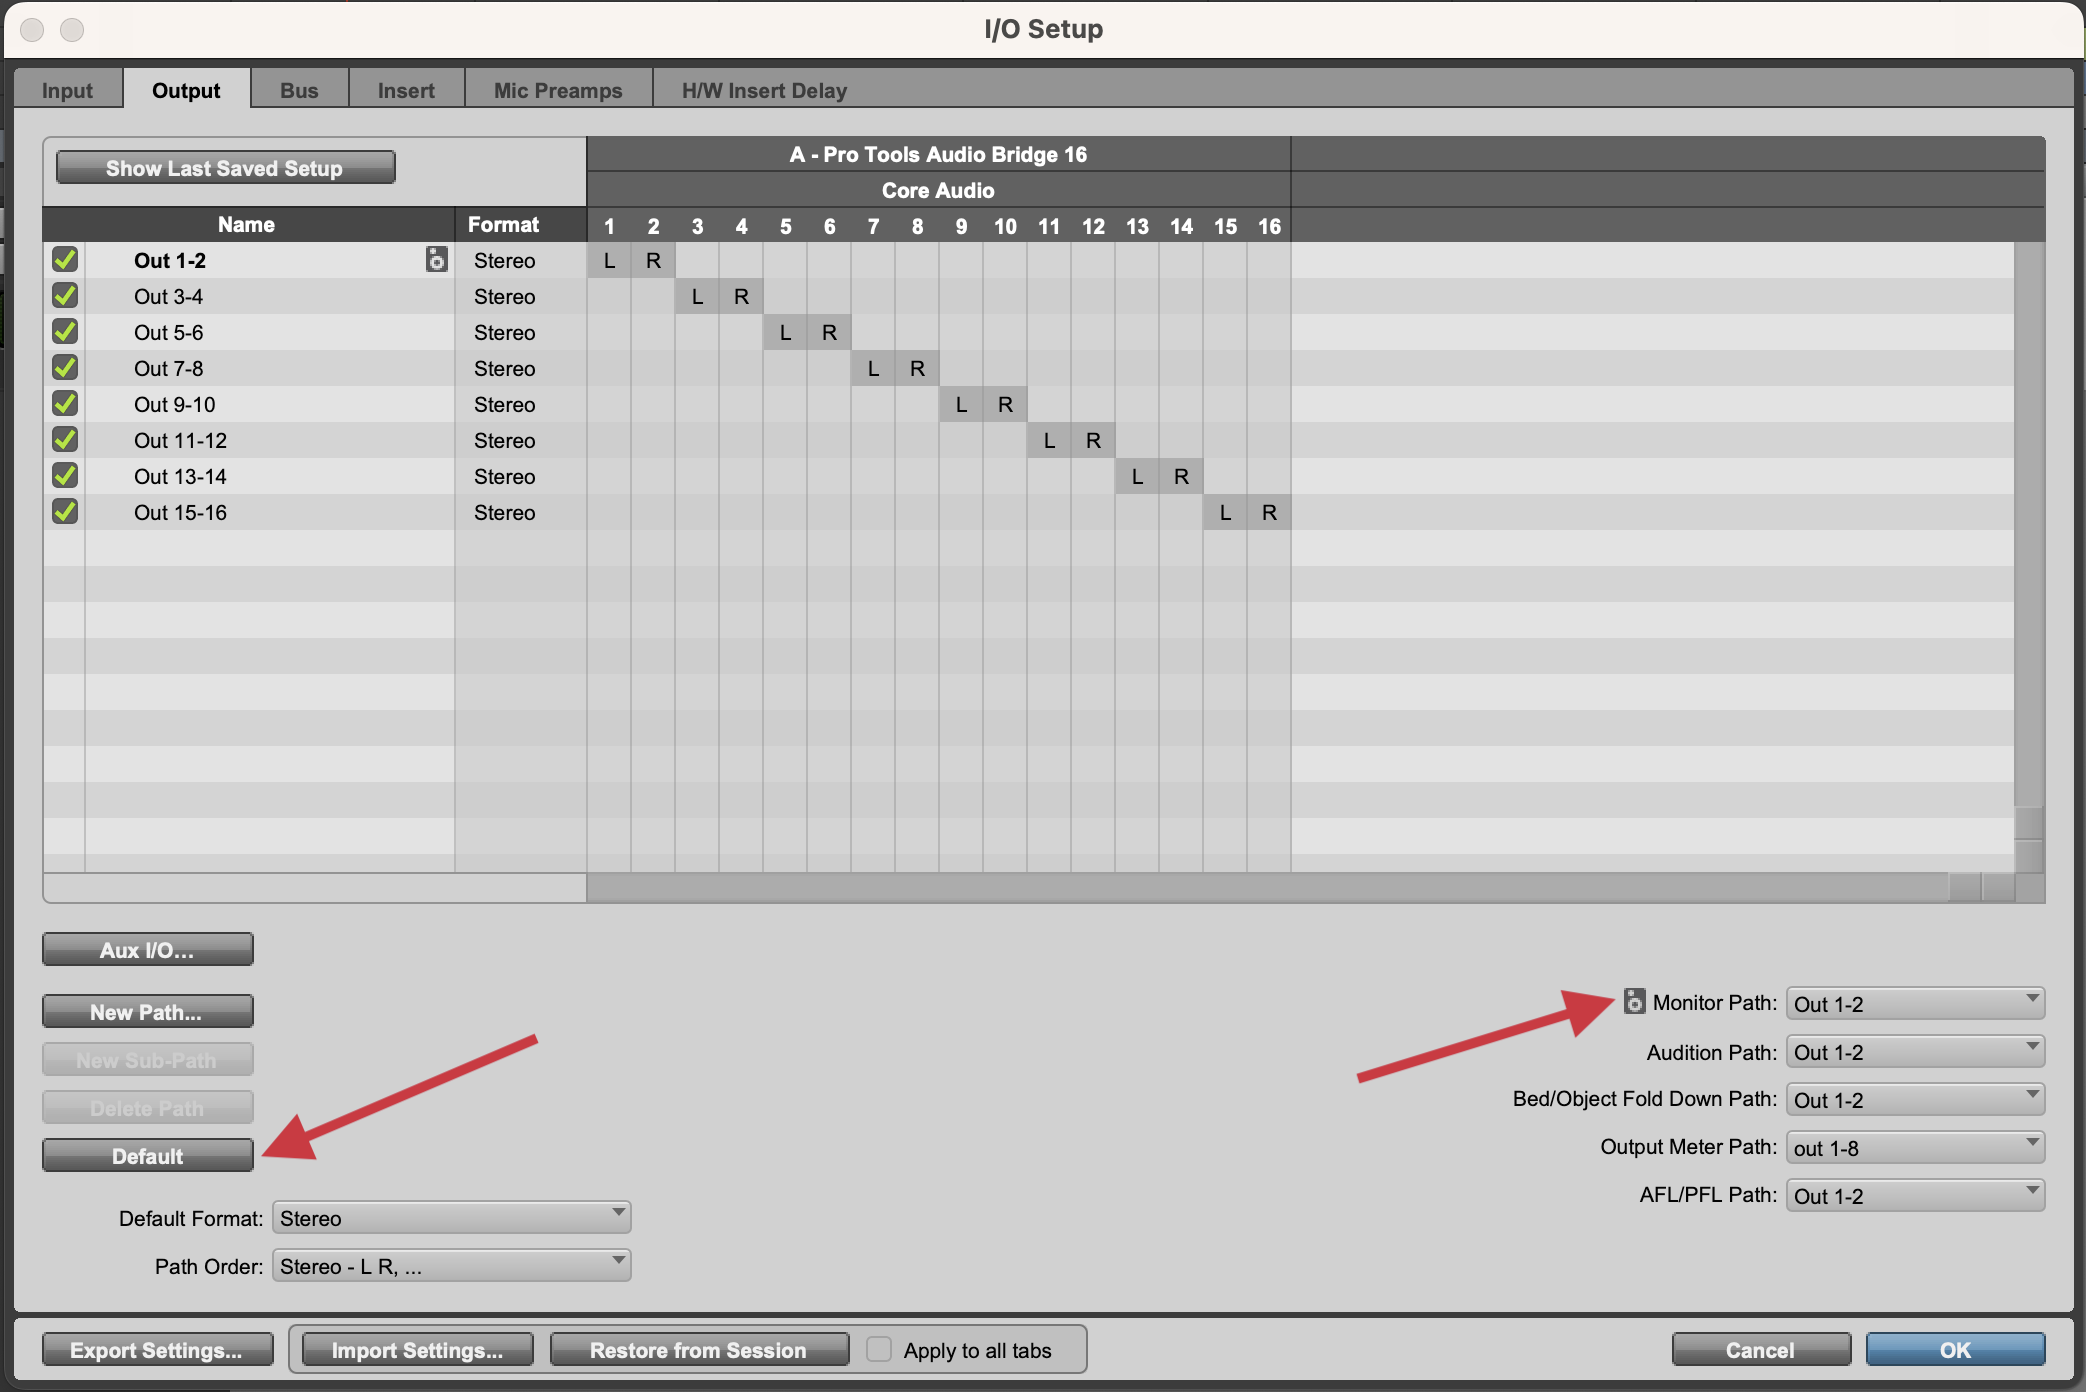
After selecting the new playback engine, navigate to the I/O Setup window by going to Setup > I/O. In general, the input and output tabs of the resulting window shouldn't need to changed after selecting a new playback engine. However, if you previously made changes to the inputs and outputs, or would like to set them to their default value for good measure, you can press the Default button under both the Input and Output tabs.
Alternatively, you can create your own I/O setup using the New Path button. In most scenarios this is unnecessary, but may be useful for troubleshooting purposes. To create a new input or output path, click the New Path button on the respective tab. You will then have several options, including number of paths, format, name, etc. Most workflows use stereo paths with automatically-created subpaths. You can create the new path by selecting your desired options, then clicking the Create button.
After the path(s) are created, you can move the gray box(es) to the desired input or output number listed at the top of the screen to map the paths to your audio device. If you have created a stereo path, you will need to click-and-drag both the left and right channels to their desired input or output.
You can also set the monitor path (or main output) of your session by selecting it from the dropdown menu on the bottom right of the Output tab. By default, this is usually set to Output 1 and Output 2, and this is typical for most sessions.
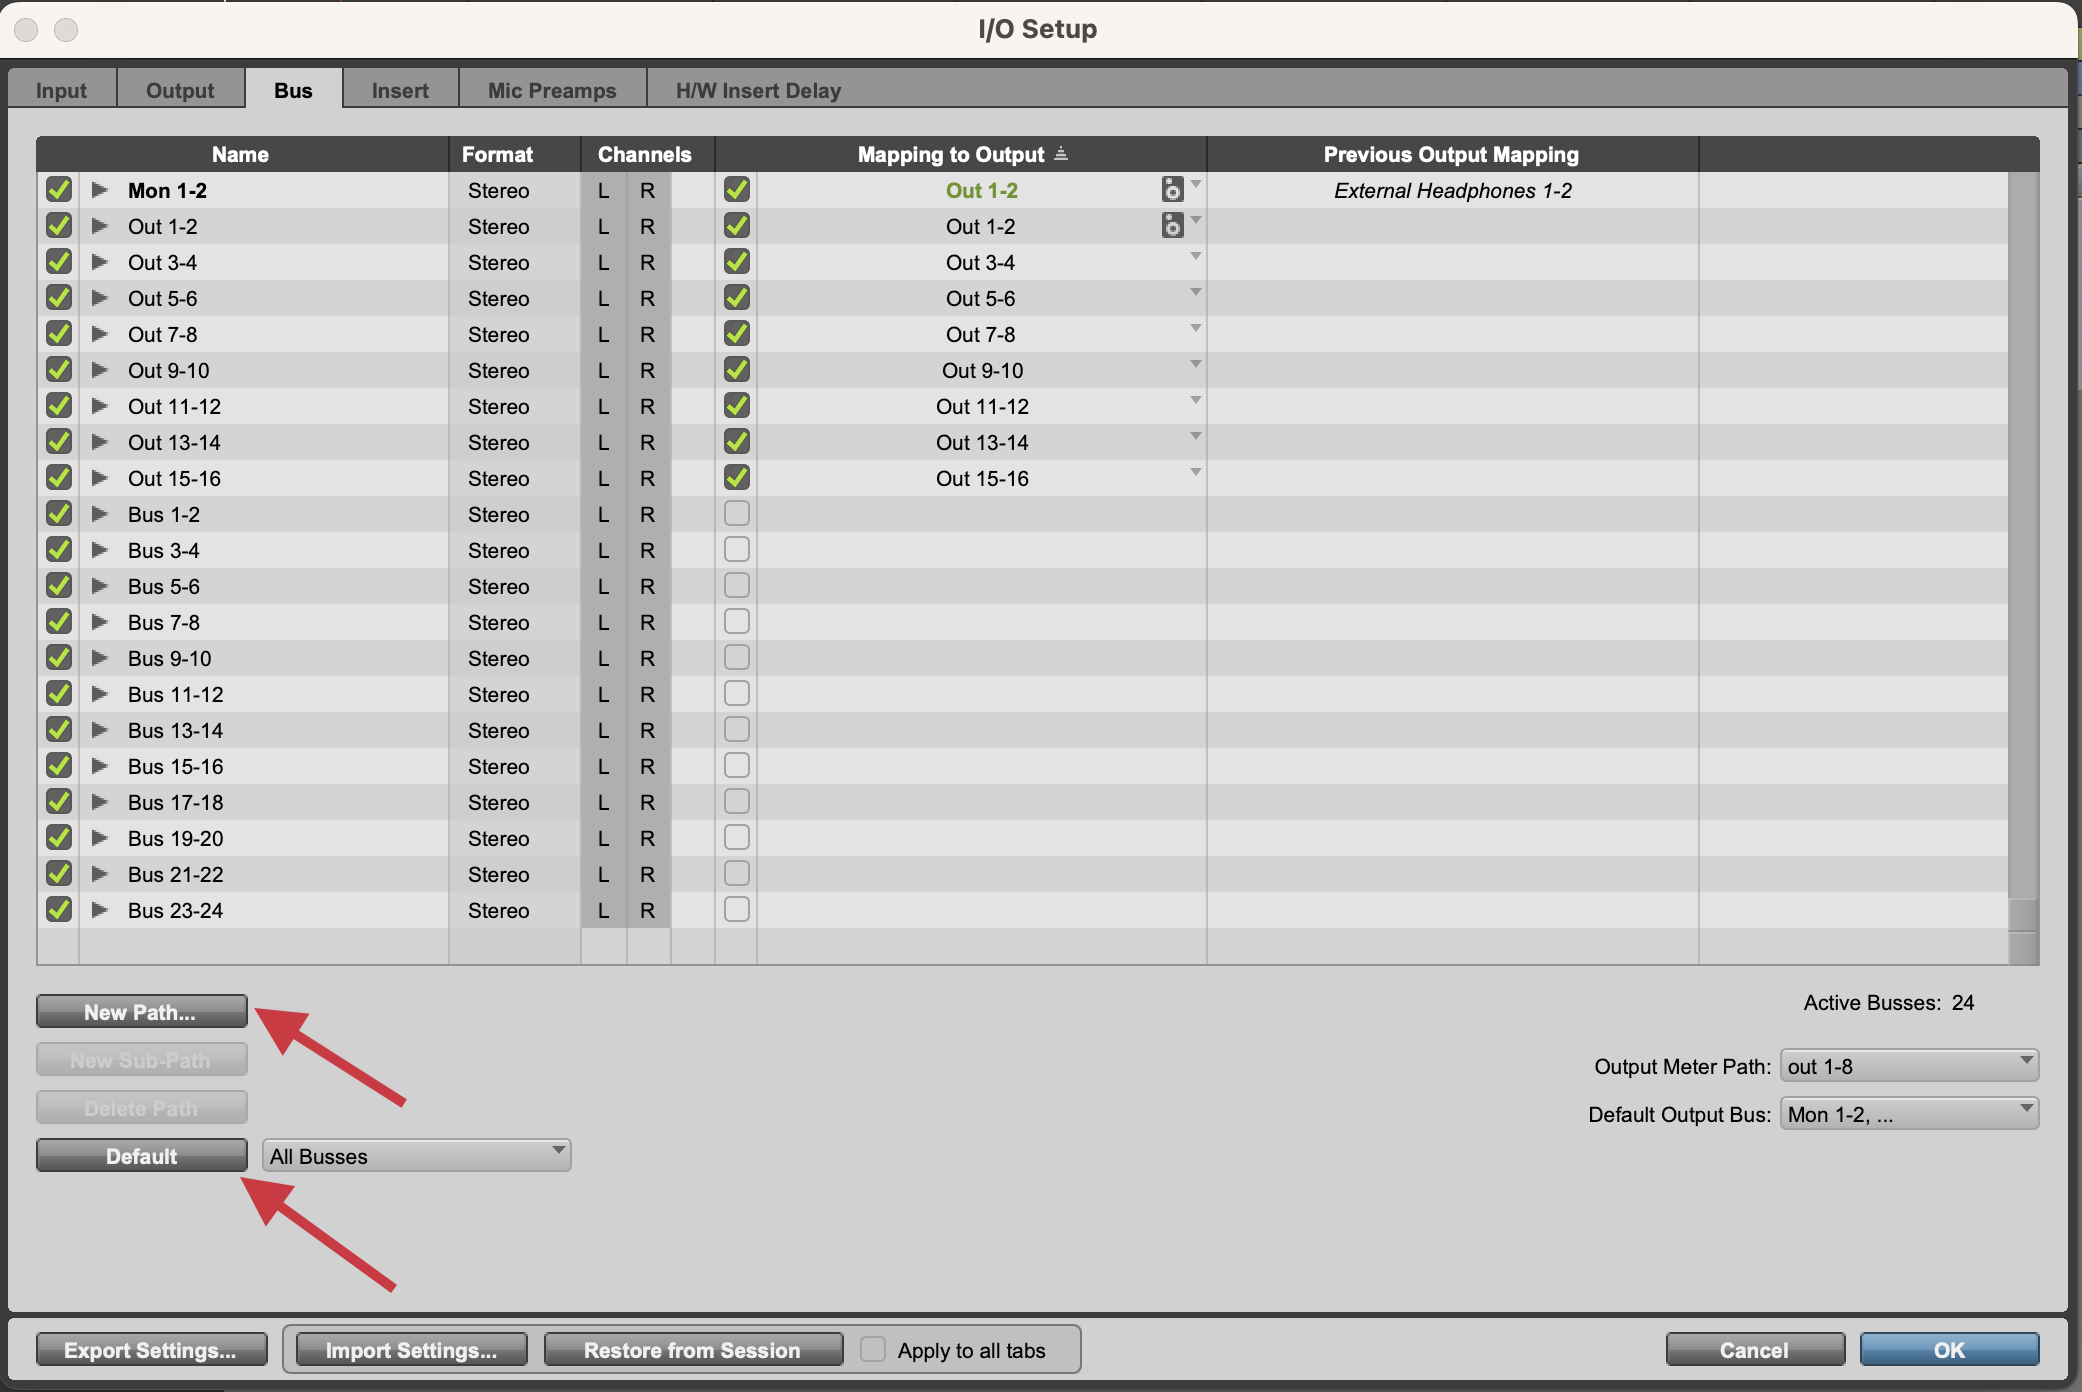
3. Set Busses
The Bus tab in the I/O Setup window handles all busses in Pro Tools, including internal busses and busses that are mapped to hardware outputs. Unlike the Input and Output tabs of the I/O Setup window, the Bus tab can easily become a mess when switching between sessions and playback engines, as the busses mapped to outputs are not automatically deleted by default. Thankfully, like the Input and Output tabs, this can be easily reset by using the Default button.
The Bus tab is one area where it is often necessary to create more internal busses using the New Path button. You can create an infinite amount of internal busses for routing inside Pro Tools, and it's not uncommon for sessions with complex routing to require the creation of more busses.
Busses that are mapped to outputs are often a point of confusion; essentially, these are busses that are intermediary busses between the output paths created in the Output tab and the physical outputs of your audio device. If there is not a bus mapped to an output for a specific output path, it will not be a selectable output for any tracks. For this reason, every output you have created in the Output tab needs a corresponding bus that is mapped to a physical output.
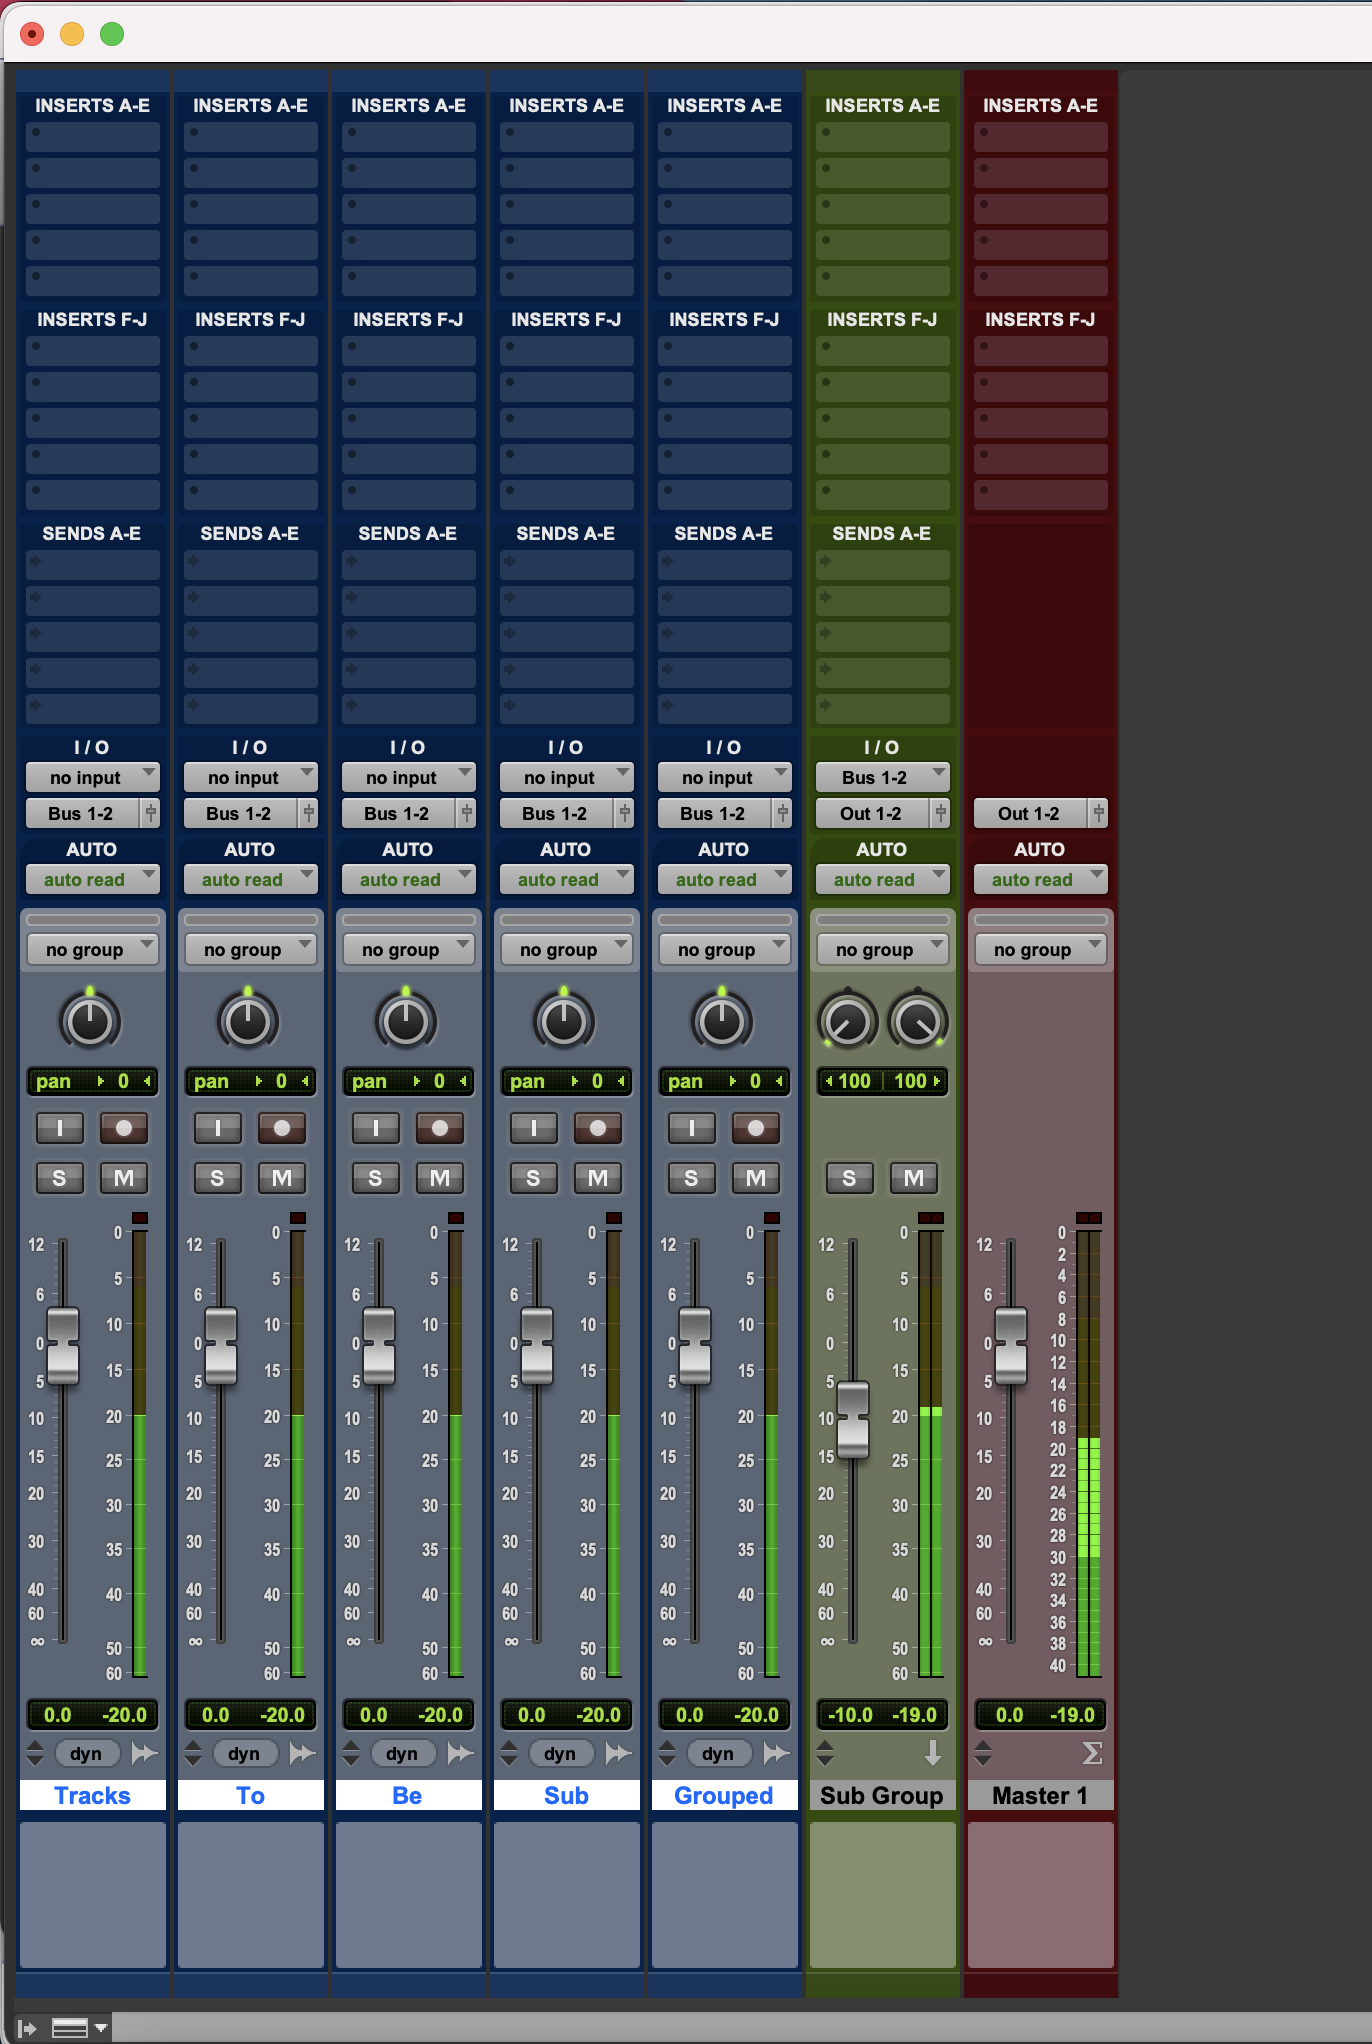
Once your I/O is set up, you can begin routing audio in your Pro Tools session. There are many ways to route audio within, into, and out of Pro Tools. Below are some examples of these scenarios with descriptions of how you would route them.
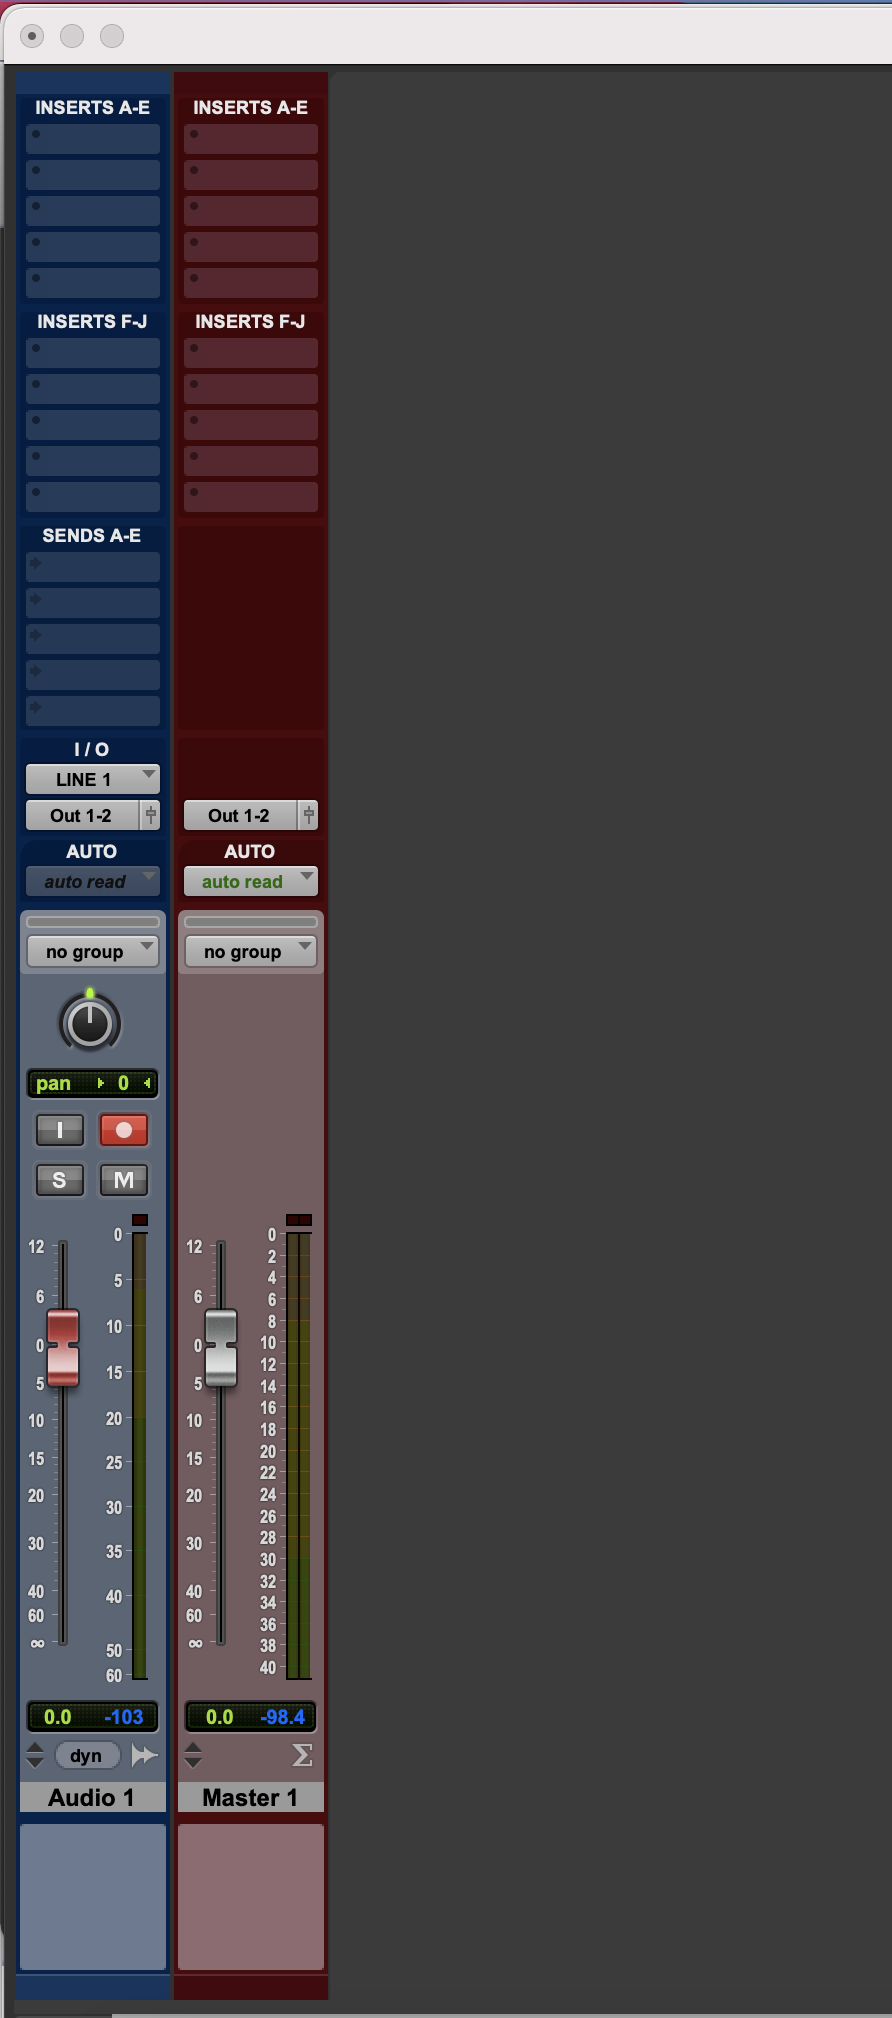
Single Track Basic Recording
In this scenario, you would use:
- Single Audio Track
- Input: The input that the mic/instrument is connected to
- For example, if your microphone is connected to Channel 1 on your audio interface, you would select Input 1. For Channel 2, you would select Input 2, etc.
- Output: Main Output path (for example, Output 1-2 on most interfaces)
- Input: The input that the mic/instrument is connected to
- Master Fader (Optional)
- Output: Main Output path
With this routing configuration, the audio goes into the audio track, through the Master Fader, and out your main output path.
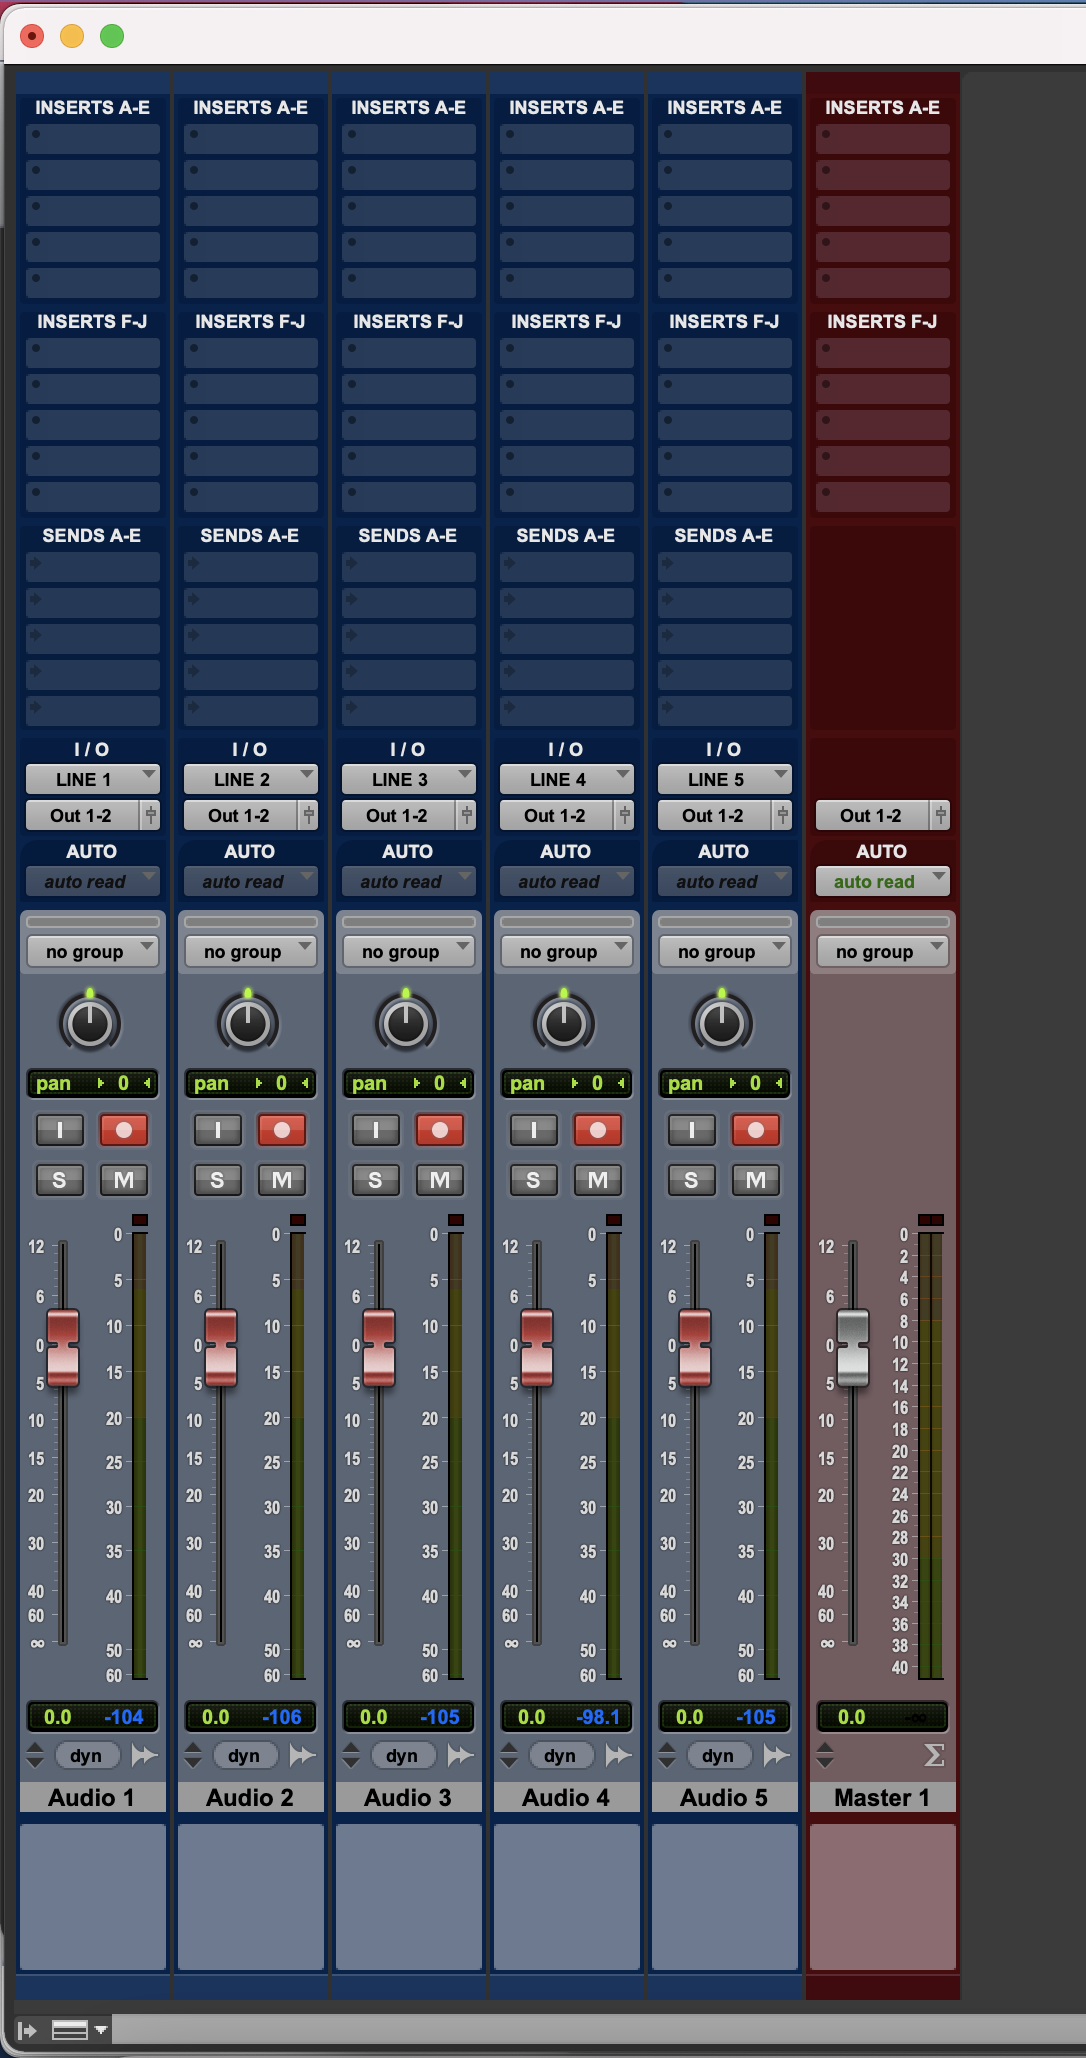
Multi-Track Basic Recording
In this scenario, you would use:
- Multiple Audio Tracks
- Inputs: Cascaded inputs that the microphones are connected to
- For example, select Input 1 for the microphone connected to Channel 1 on your audio interface; for Channel 2, select Input 2, etc.
- Output: Main output path (for example, Output 1-2 on most interfaces)
- Inputs: Cascaded inputs that the microphones are connected to
- Master Fader (Optional)
- Output: Main Output path
With this routing configuration, each individual signal goes through its own audio track, then every track is combined into and sent through the master fader. This combined signal is then sent out of your main output path.
Sub-Grouping
You can use auxiliary tracks (called Aux tracks in Pro Tools) and internal busses to create sub-groups of tracks that can be controlled on a single fader. To do this, you would use:
- Multiple Audio Tracks
- Inputs: Any
- Output: Internal Bus Output (for example, Bus 1-2)
- Sub-group (Aux Track)
- Input: Internal Bus Input used by audio tracks (for example, Bus 1-2)
- Output: Main Output path (for example, Output 1-2 on most interfaces
- Master Fader (Optional)
- Output: Main Output path
With this routing, each audio track is sent through and combined into its assigned sub-group, which is then fed to the Master Fader. The signal from the Master Fader is then sent out your main output path.
Effects Sends
You can use Aux tracks, internal busses, and track sends to create effects tracks that operate independently from the track feeding them. To do this, you would use:
- Audio Track
- Inputs: Any
- Send: Internal Bus
- Output: Any
- Effect Track (Aux Track)
- Input: Internal Bus Input used by audio tracks (for example, Bus 1-2)
- Output: Main Output path (for example, Output 1-2 on most interfaces
- Master Fader (Optional)
- Output: Main Output path
With this routing, each audio track is combined and sent into its assigned subgroup, which is then fed to the Master Fader. The signal from the Master Fader is then sent out your main output path.

Preparing for Recording
Now that your I/O and playback engine are set up, you will need to create tracks and route them properly.
- By default, newly-created Pro Tools sessions are blank. To add a new audio track for recording, navigate to Track > New, or press Command + Shift + N on Mac, or Control + Shift + N on Windows.
- In the resulting New Tracks dialogue, change the options in the dropdown menus to ensure the dialogue reads new Mono Audio Track in Samples. You can also choose to change the amount of tracks you are creating by changing the number next to Create, then rename the track(s) by changing the name next to Name.
- Click Create to create the new track(s).

There are specific scenarios where you would want to create a stereo track instead of a mono track, such as when recording the stereo output of a synthesizer. However, in any case that uses a single microphone or instrument input, you will need to create a mono track.
- If you did not rename the track(s) in the New Tracks dialogue, you can do so now by double-clicking the name of the newly-created track, entering a new name, then clicking OK.
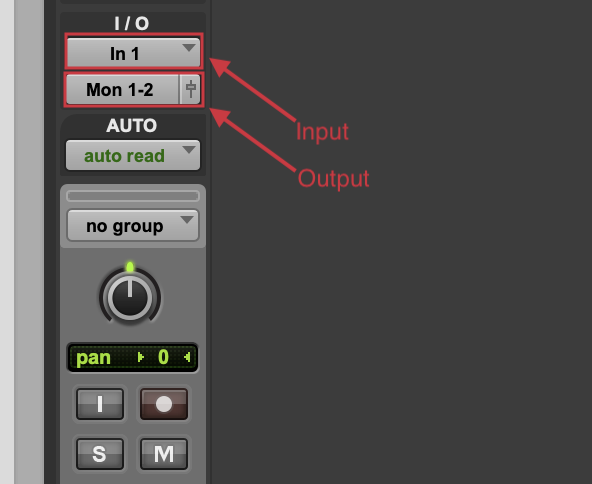
- Ensure the correct input and output are selected in the I/O section of your newly-created track. In most scenarios, the input of the track should correspond to the input that the microphone or instrument is plugged into on your interface, and the output should be set to your main output. To change the input or output, click the input or output name and select the proper source or destination from the dropdown list.
- If you are recording guitar and want to use an amp simulator such as AmpliTube, you should instantiate that on the track now. See the note below for instructions on how to do instantiate a plug-in.
How to Instantiate a Plug-in
How to Instantiate a Plug-in in Pro Tools
Plug-ins can be instantiated from either the Mix or Edit window in Pro Tools. In the example below, the Mix window will be used.
Note
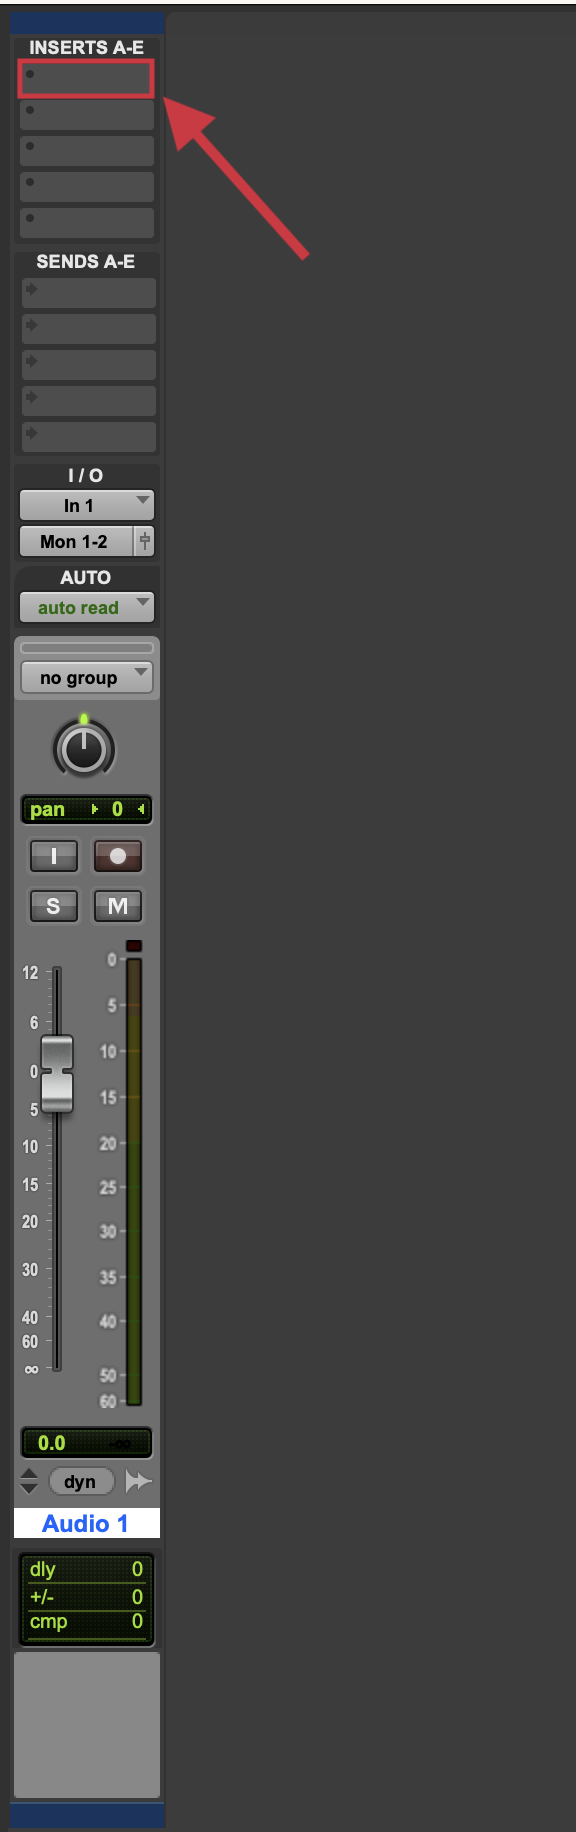
If you do not see the Inserts A-E view on the Mix or Edit window, select View at the top of the window, hover over Mix Window Views or Edit Window Views, then click Inserts A-E.
- Locate the track on which you want to instantiate a plug-in, then click one of the empty slots under Inserts A-E (or Inserts F-J).
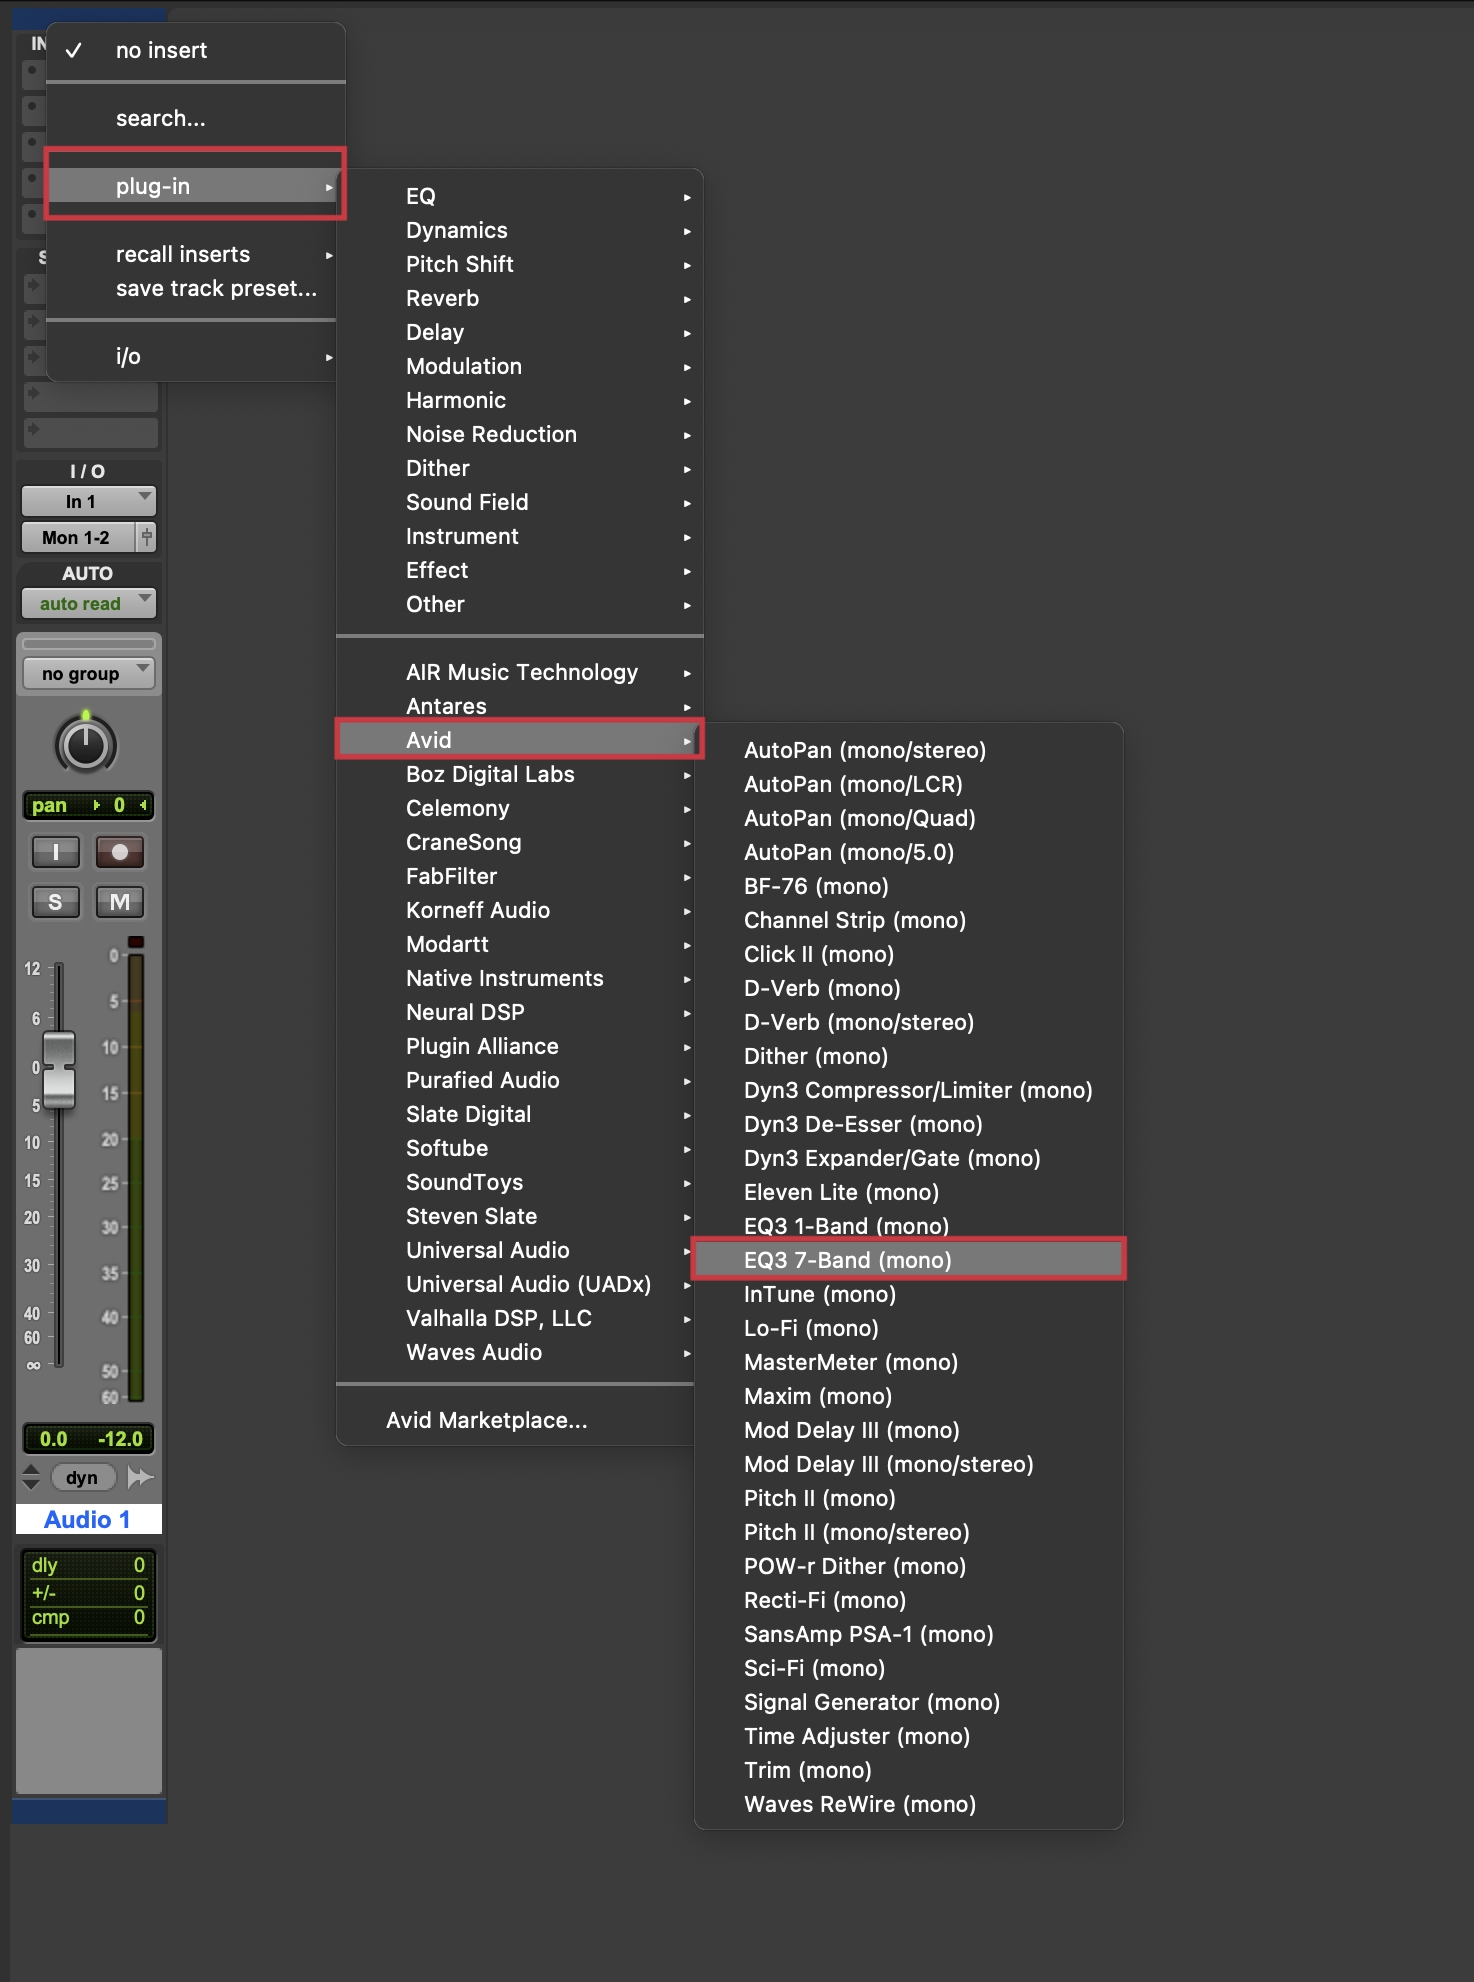
- Hover over the plug-in menu item; this will display your available plug-in categories and/or manufacturers (depending on your settings).
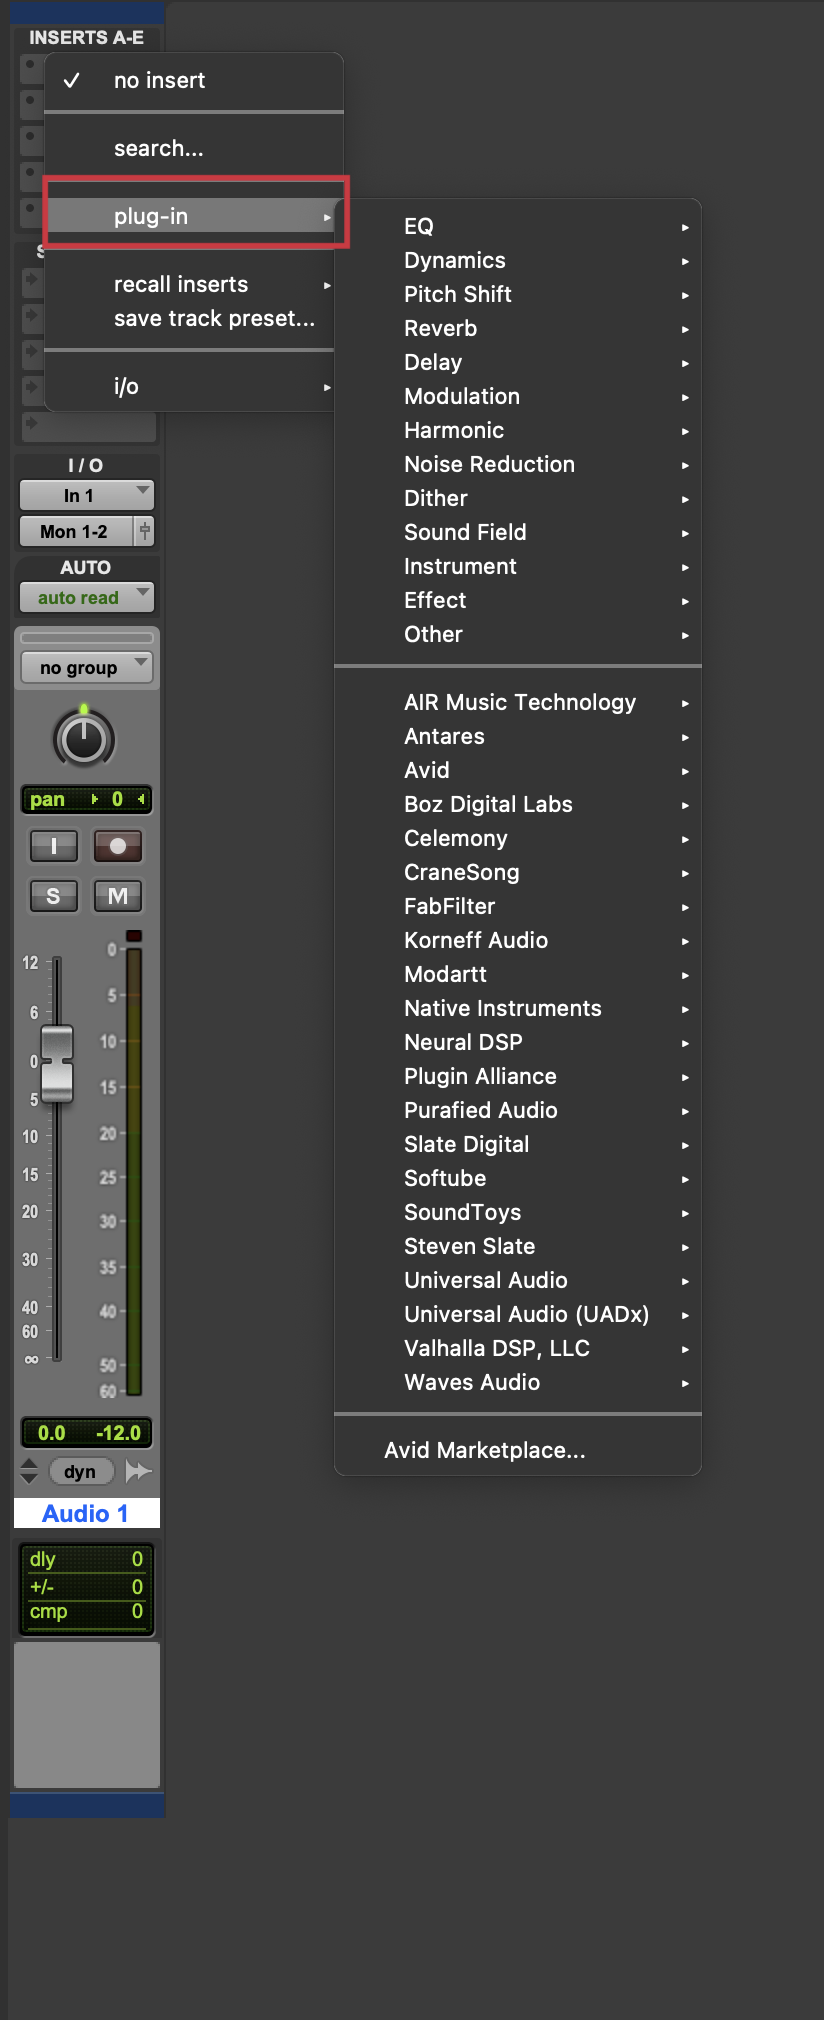
- Hover over a plug-in category or manufacturer to display the plug-ins available in that category. Click on a plug-in to instantiate it on the track, which will open its interface in a new window.
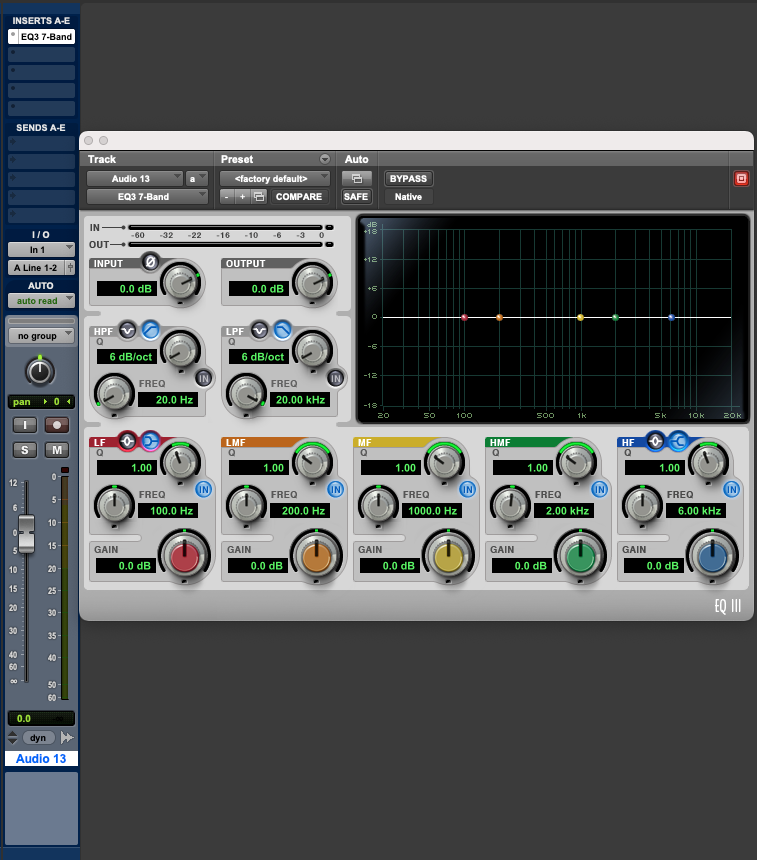
The plug-in has now been instantiated on your track. The plug-in window can be closed by pressing the X at the top left of the window, and re-opened by clicking the plug-in name on the track.
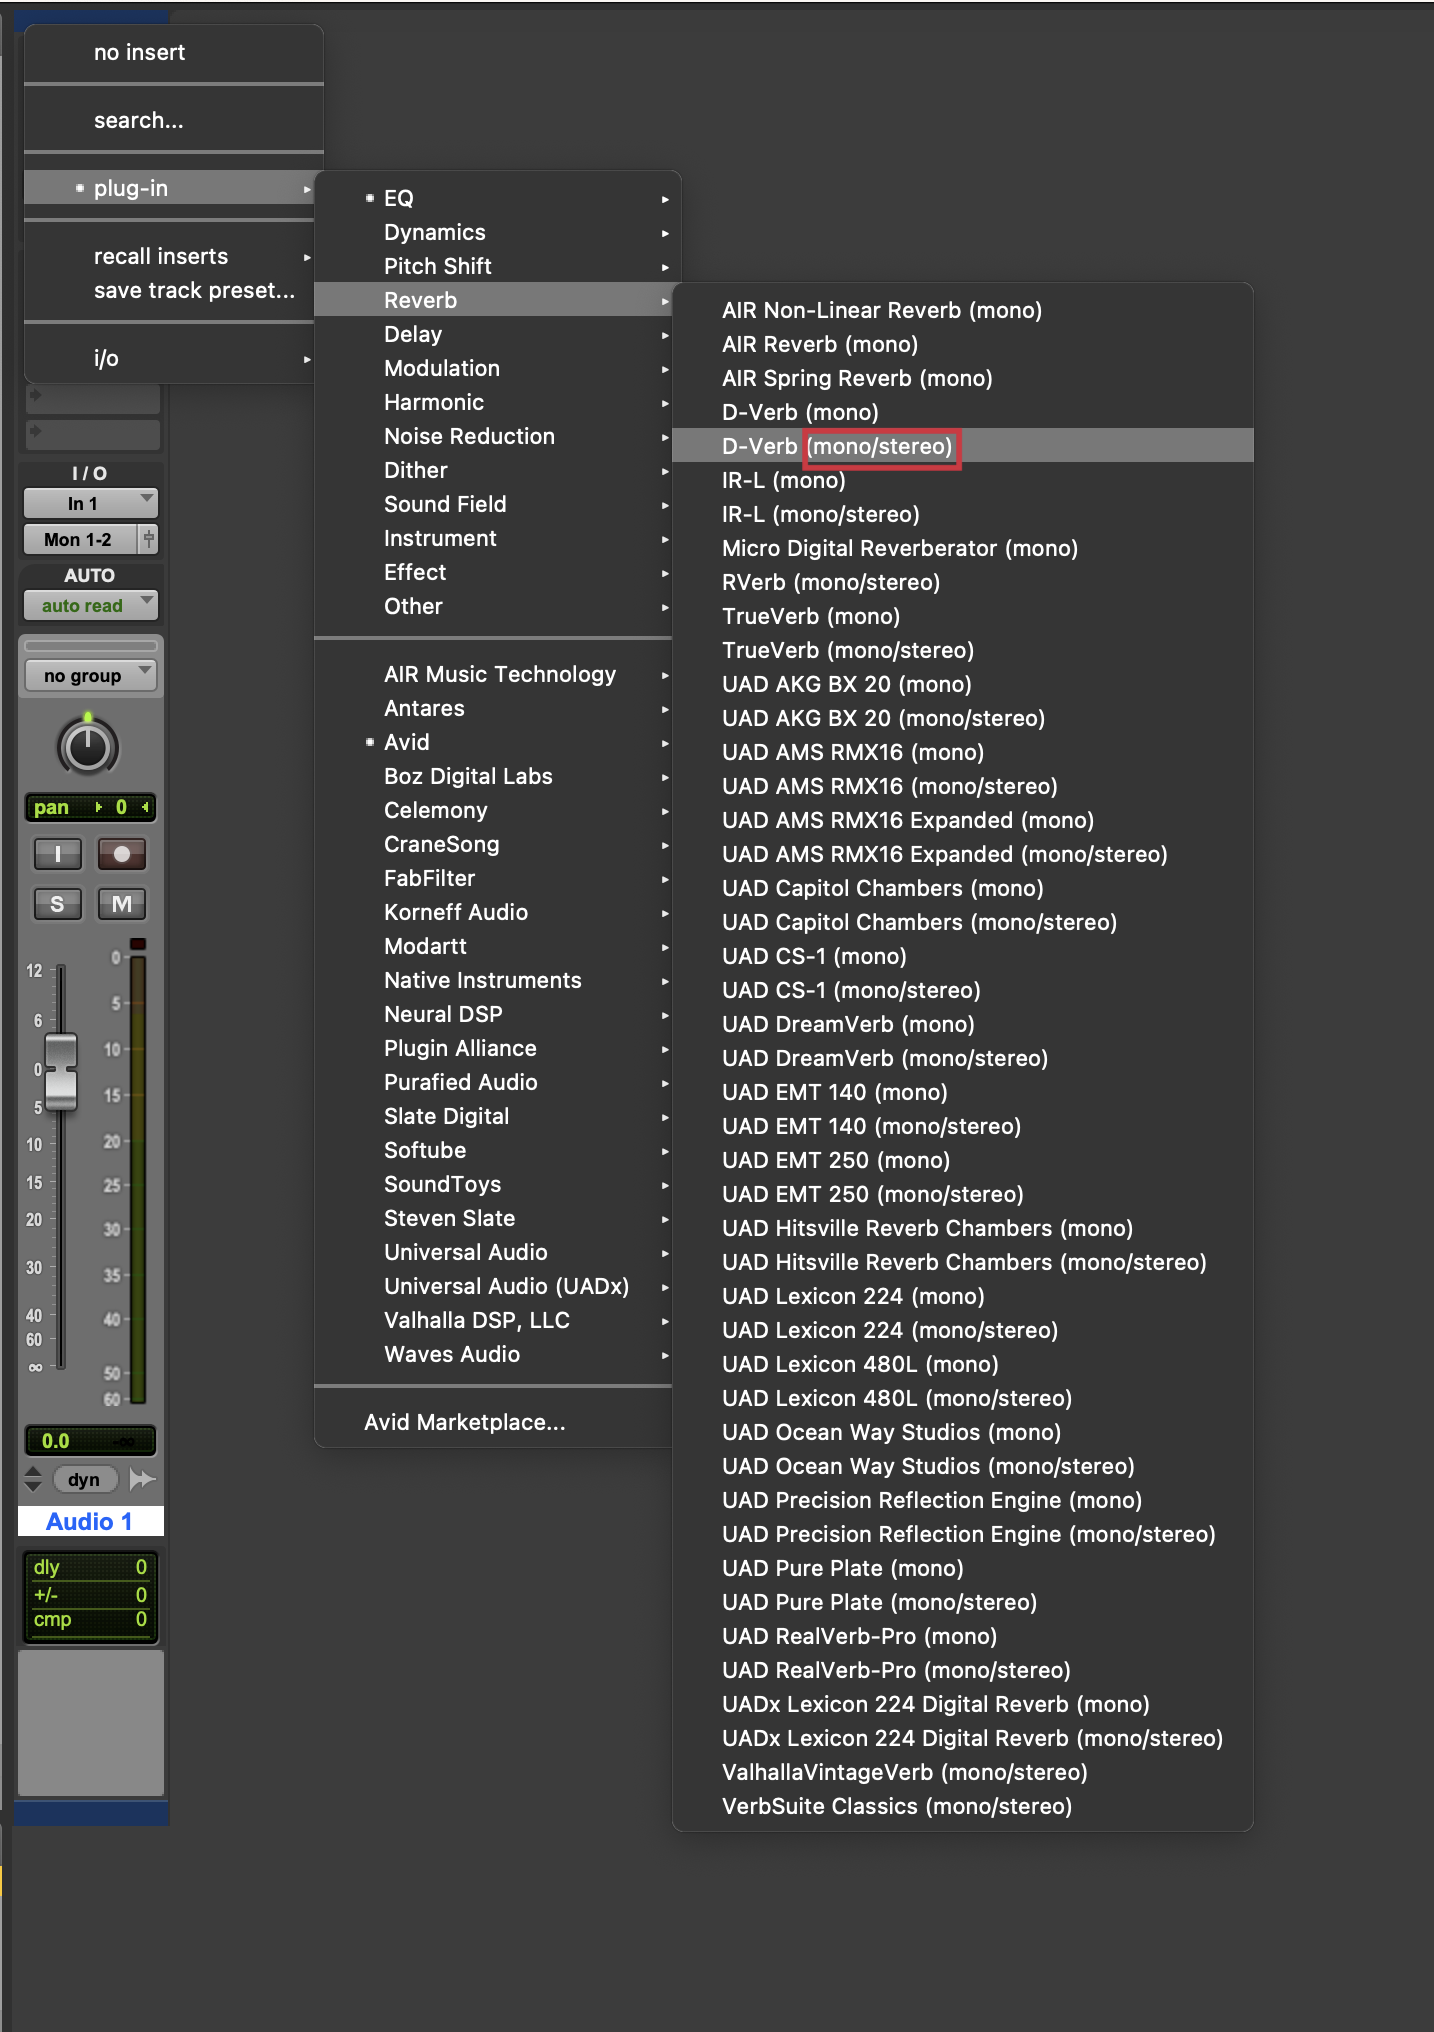
It is worth noting that some plug-ins, when instantiated on a mono track, will give the option to open a stereo version of the plug-in. This is denoted by the (mono/stereo) being present at the end of the plug-in name. Selecting this option on a mono track will convert the track to a stereo track. This option is mainly present on stereo effects, such as reverbs and delays; the example shown below is a stereo reverb.
- If you are recording over a backing track, import it using the instructions below.
How to Import an Audio File into Pro Tools
How to Import an Audio File into Pro Tools
- Open the Import Audio dialogue by clicking File > Import > Audio. Alternatively, press Command + Shift + I (Mac) or Ctrl + Shift + I (Windows).
- In the dialogue, navigate to and click the file you wish to import; it should appear in the Clips in Current File box.
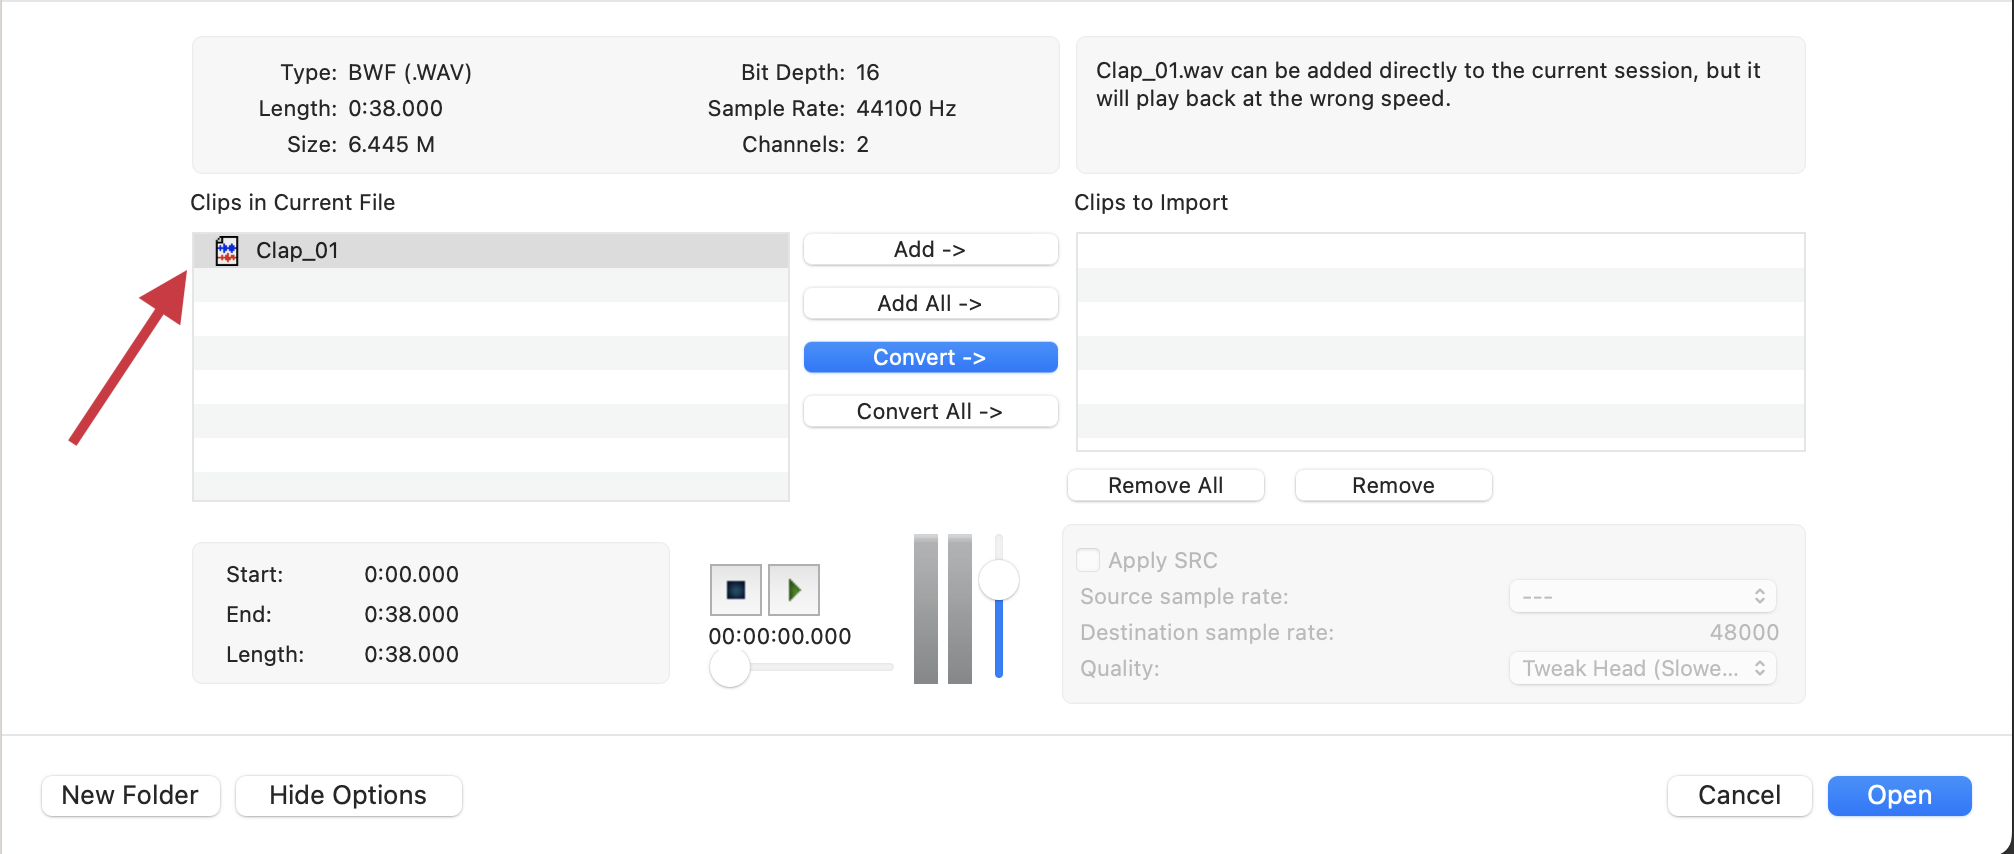
Depending on the type of file selected, you will be presented with different import options: Add, Copy or Convert, as well as each option with All added to it. In most cases, you will want to select Copy or Convert; both of these options will create a copy of the audio file and place it in the audio files folder of your Pro Tools session. If you select Add, the file will remain in its original location, which may present issues if you move your Pro Tools session to another machine.
- Select your desired import option; the file will then move to the Clips to Import box.
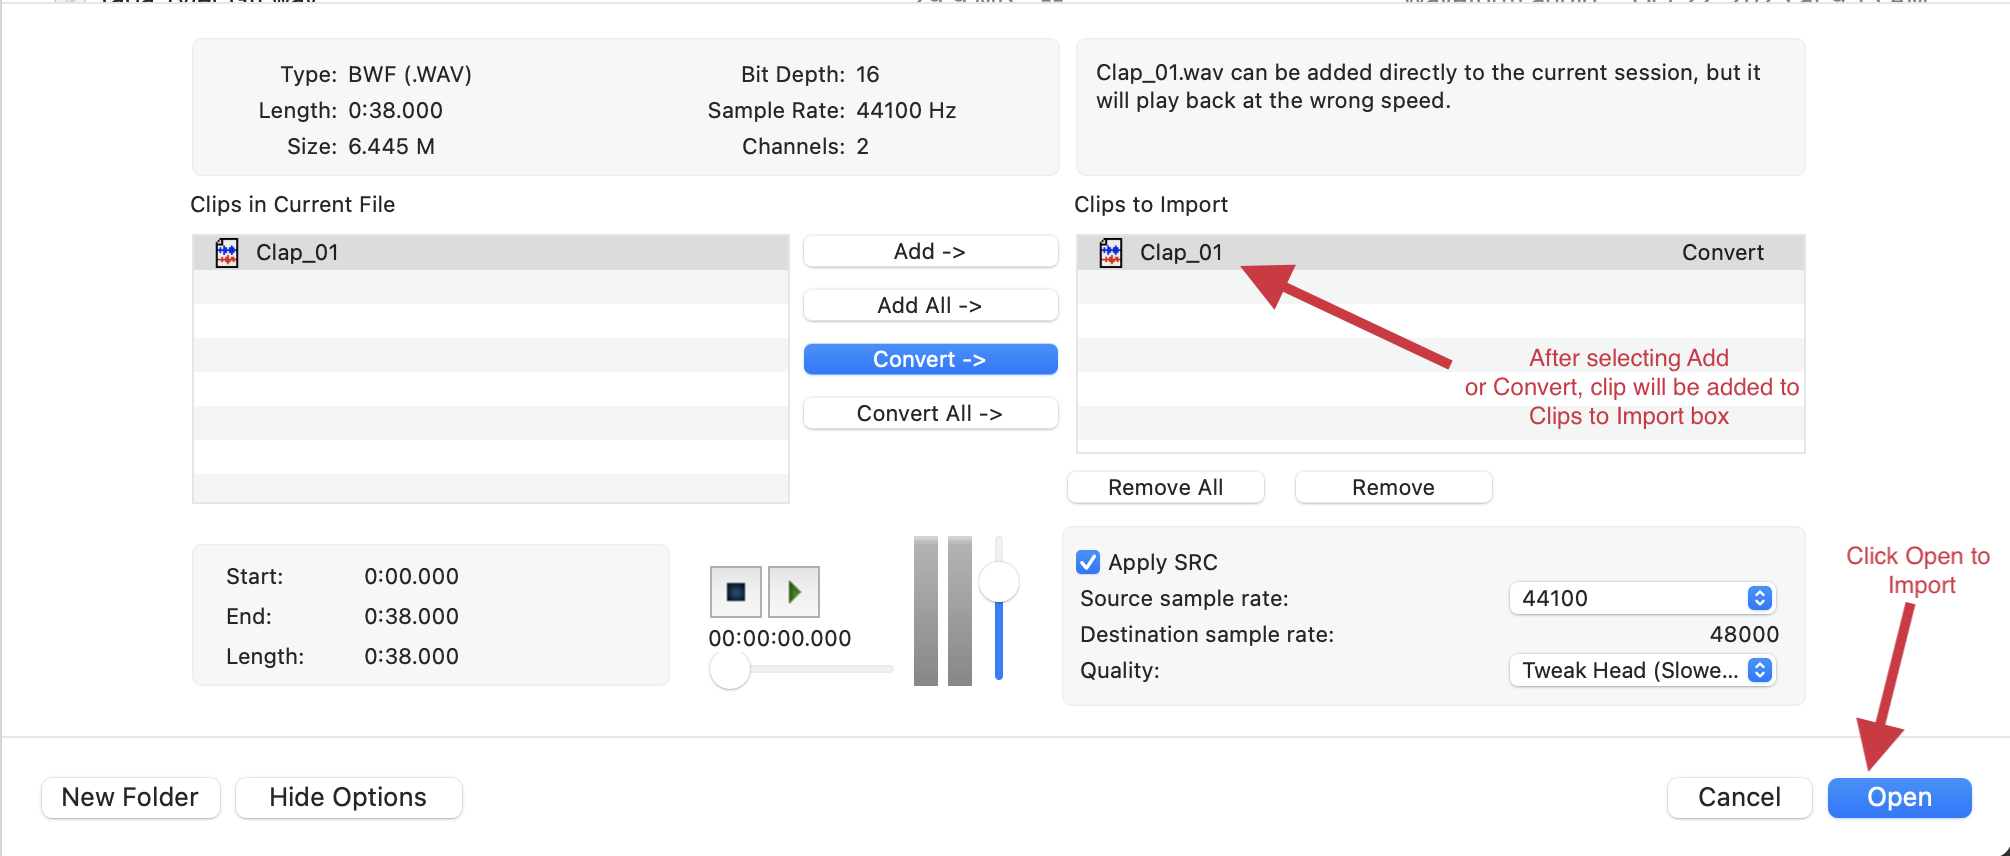
- Select Open; if you selected Convert or Copy, you will be prompted to choose a destination for the copied or converted file. In most cases, you will to add it to the session's Audio Files folder.
- You will then be prompted to either add the file to a new track or to the clip list, as well as the file's location in the session. In most instances, you will want to select New Track and Session Start.
Recording
Now that your session is prepared, you can begin recording.
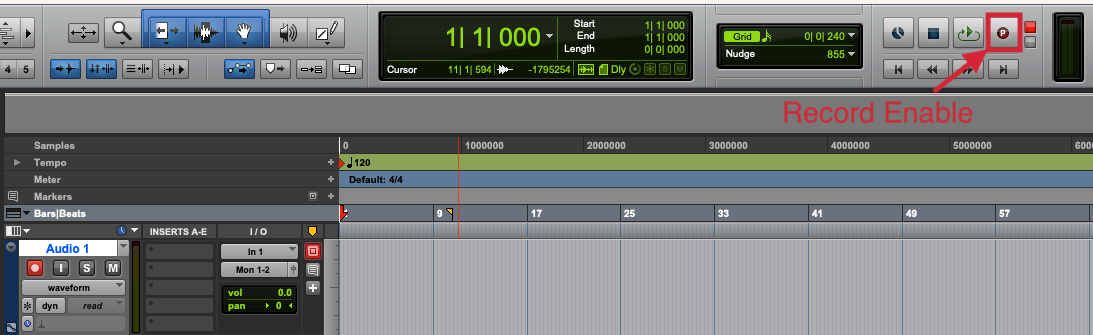
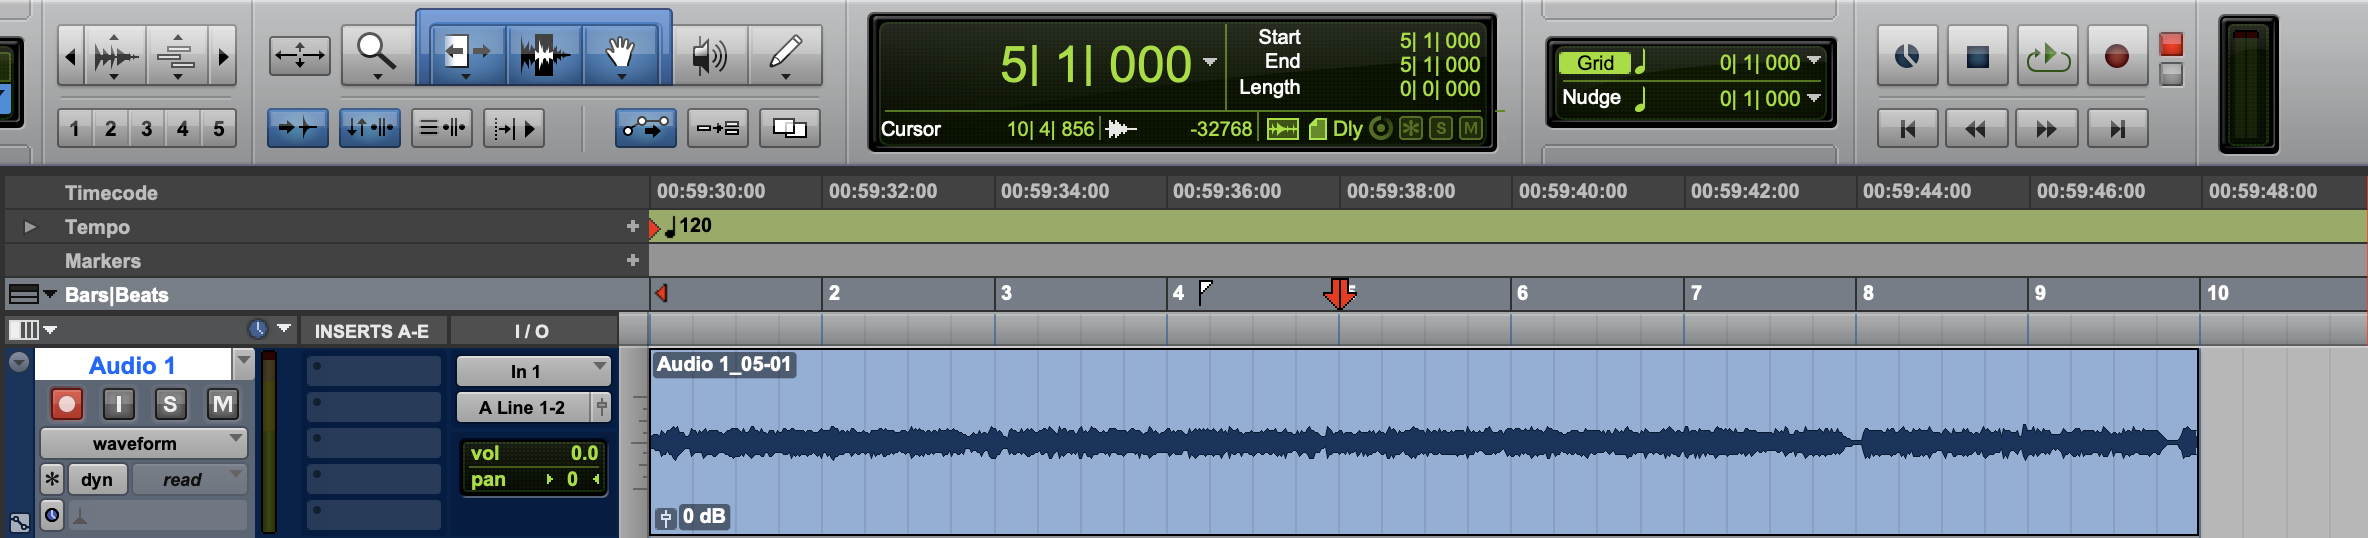
- Record-enable your track by pressing the track record enable button (the red square with white circle inside it). This record-enable button should blink red, indicating the track is armed for recording.
- Press the session record enable button in the transport area to record-arm the session.
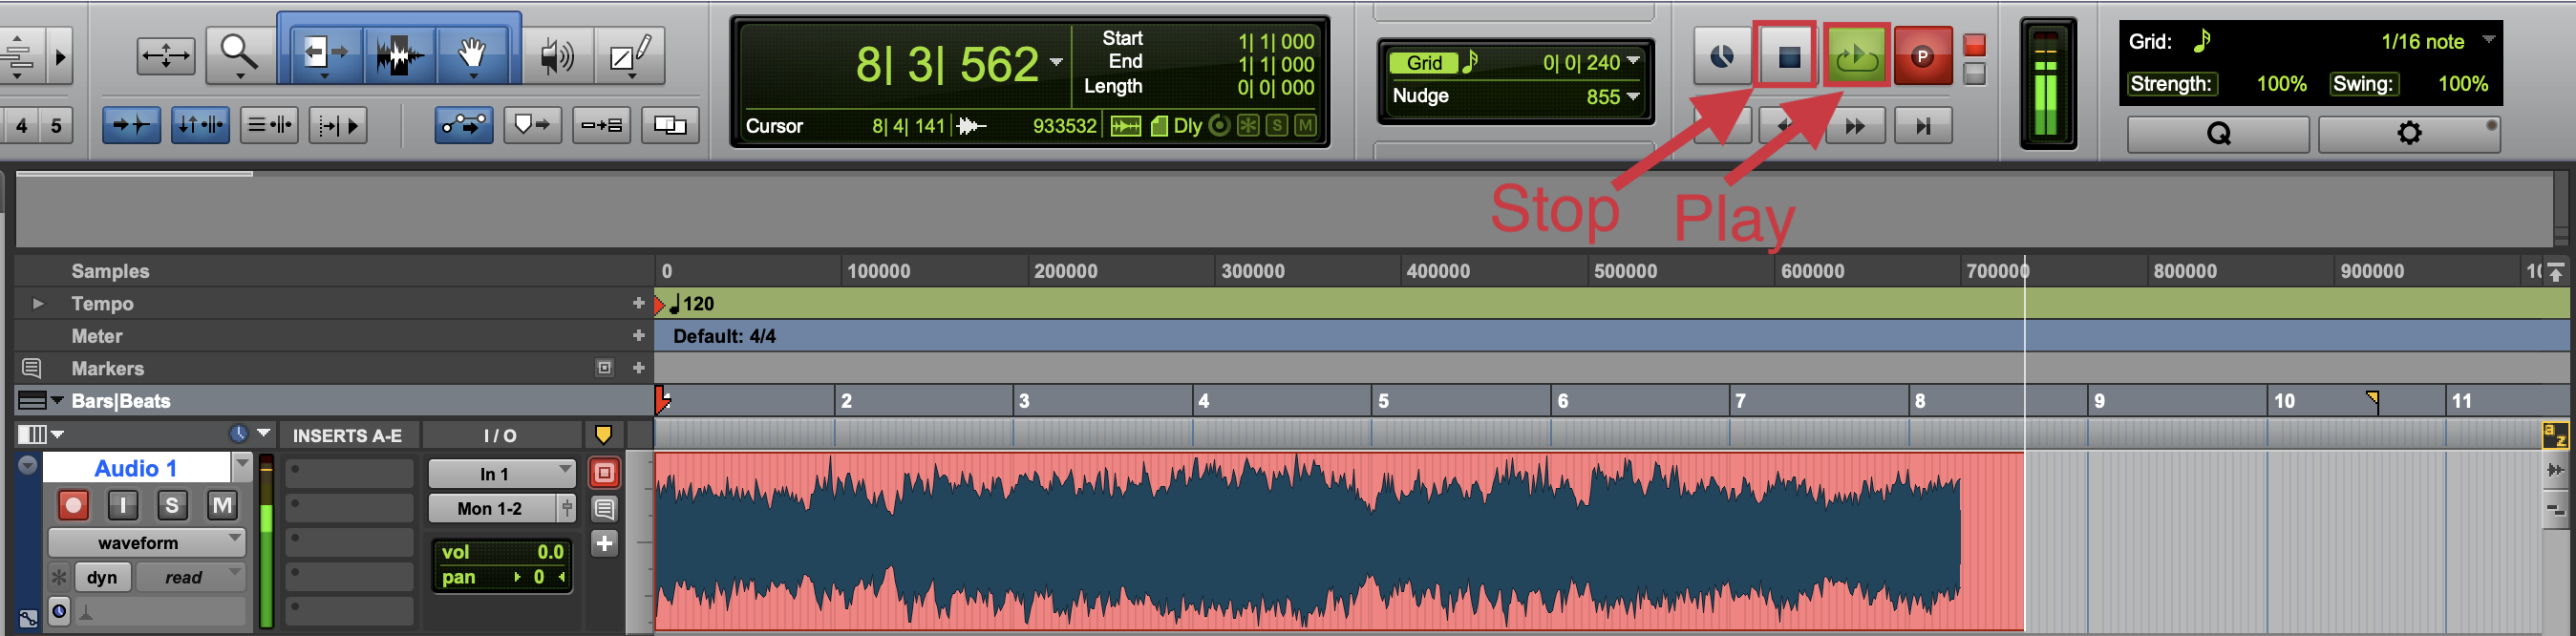
- To begin recording, press the space bar on your keyboard or the green play button in the transport. To stop recording, press the space bar again or press the stop button in the transport.
- After recording a clip, you can repeat the above steps to create and record to a new track. Once you have finished your recording, you can export your recording using the instructions below.
Bouncing an MP3 of Your Recording
How to Export an MP3 File from Pro Tools
Once you have finished a project in Pro Tools, you can export an MP3 version of your project by taking the steps below.
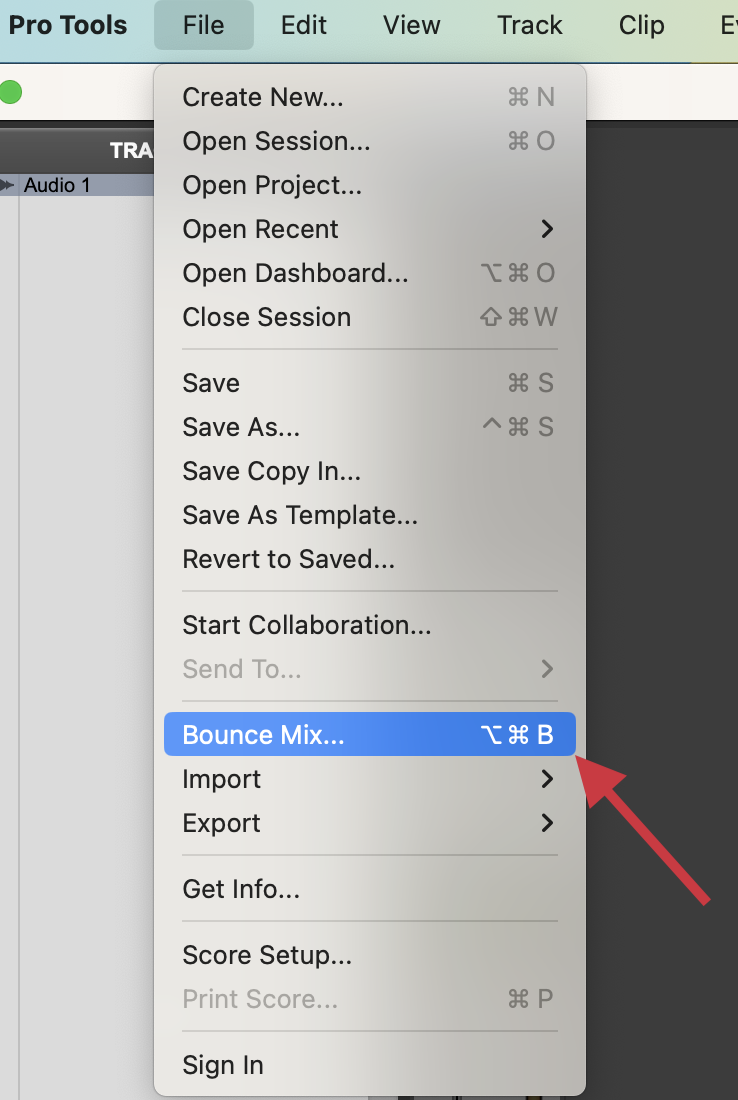
- Click File > Bounce Mix…
- The resulting window will have a variety of export options available; to simply export an MP3, ensure File Type is set to MP3. Most other settings can be adjusted to your preference, such as the File Name, File Location, and the Offline Bounce option.
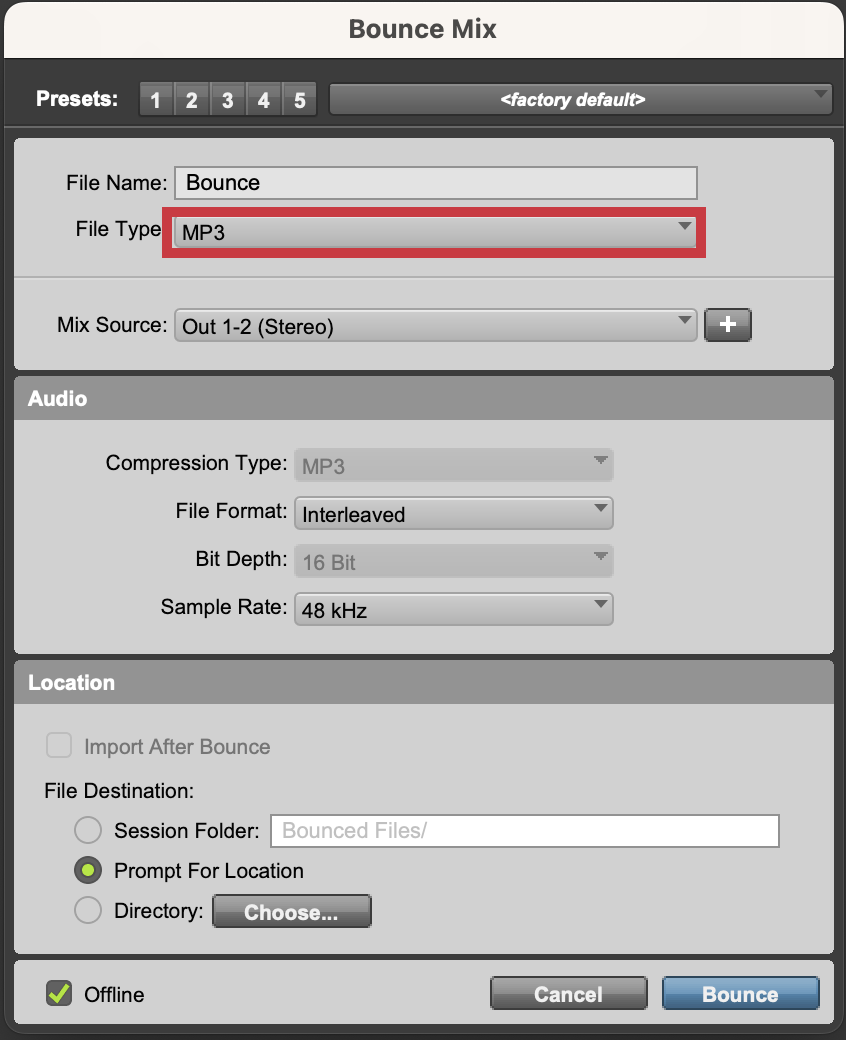
In most instances, you will want to have Offline checked in the Bounce Mix window. This will bounce the mix as fast as possible versus printing it in real time.
- Click Bounce.
- Once the file has finished bouncing, you can then find the resulting MP3 file by navigating to the location on your machine where you chose to save the file in Step 2.
Cubase
How to Record Multitrack Audio in Cubase
Creating Your Cubase Project
When you first open Cubase you'll see the Cubase Hub, which allows you to view templates, recently-opened projects, related news, and more. You can also create a new project from the Hub window. Take the following steps to create your project:
A Note About Creating New Projects
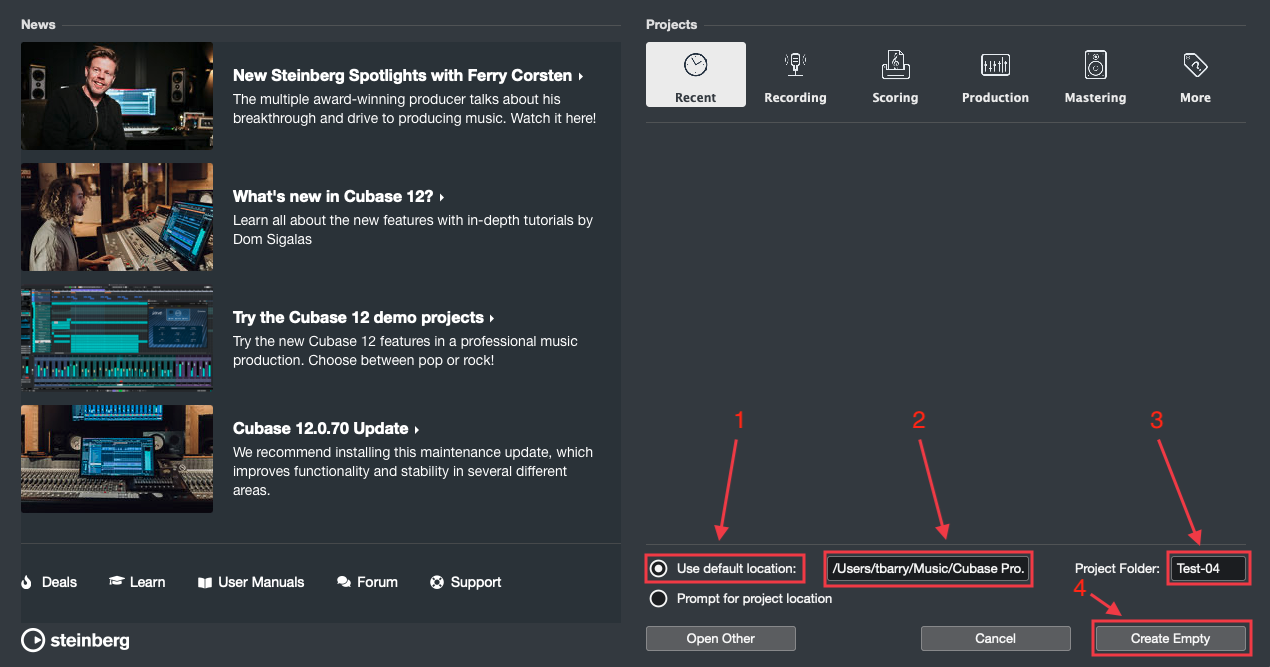
In the Cubase Hub, there are two options regarding where to create a new project—Prompt for project location (which is the default), and Use default location. For the purposes of this tutorial, we'll be selecting Use default location. If you select Prompt for project location, the initial steps will be slightly different.
- Select Use default location at the bottom of the Cubase Hub.
- If you want to change the default location, click in the text area next to Use default location, navigate to the folder you'd like to use instead, and click Open.
- Click in the text area next to Project Folder, and name your project folder. Note that this names the project folder, but not the project itself—you'll still need to name the project once you save it.
- Click Create Empty to create your project.
I/O Setup
Once you have your Cubase project created, you'll want to make sure your I/O is set up correctly. For the purposes of this tutorial, we'll assume you are using an audio interface, but you can also take similar steps if you are using your built-in microphone and/or speakers.
- Click on the Studio menu and select Studio Setup.
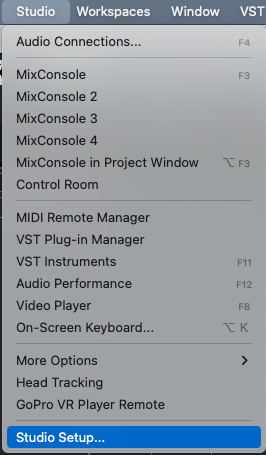
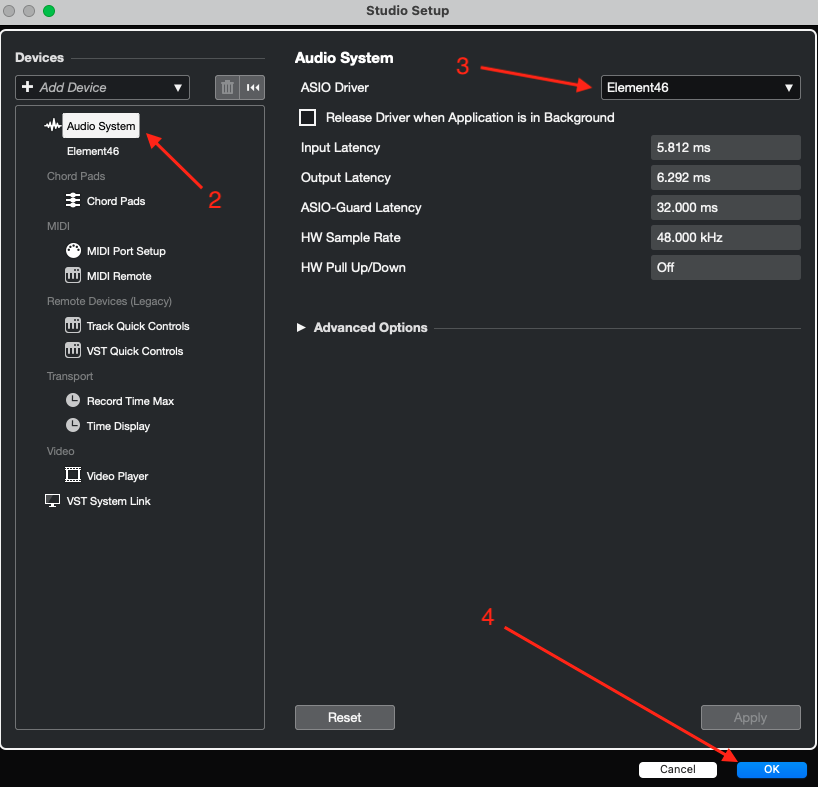
- On the left-hand side of the Studio Setup menu, select Audio System.
- In the ASIO Driver drop-down menu, select your audio interface.
- Click OK to close the Studio Setup menu.
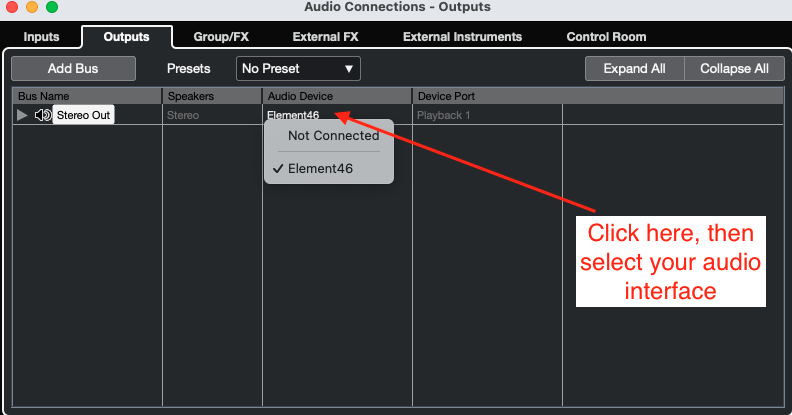
- Click on the Studio menu and select Audio Connections.
- Click the Outputs tab. You should see a single stereo output called Stereo Out.
- Click in the Audio Device column for the Stereo Out row, and then select your audio interface. Note: If you want to set up other outputs you can do that by clicking the Add Bus button, though you won't need to for the purposes of this tutorial.
- Click the Inputs tab. You should see a single stereo input called Stereo In.
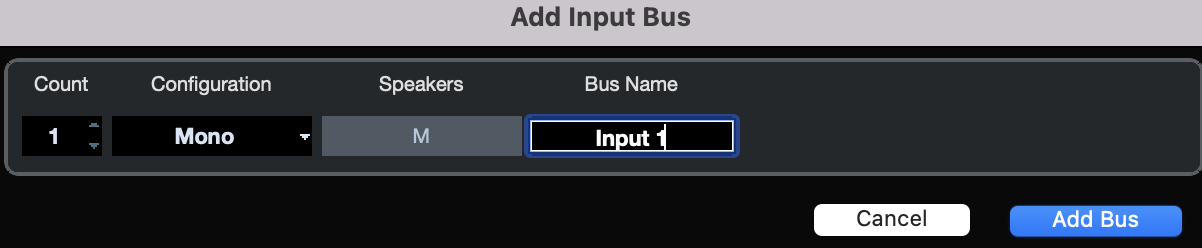
- Click the Add Bus button, which will open the Add Input Bus window.
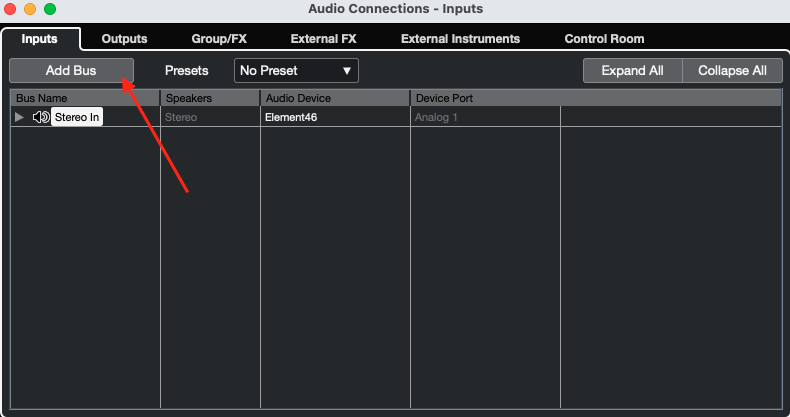
- Leave all the values at their default, click in the Bus Name field, type an appropriate name for the bus (ex. Input 1), then click Add Bus.
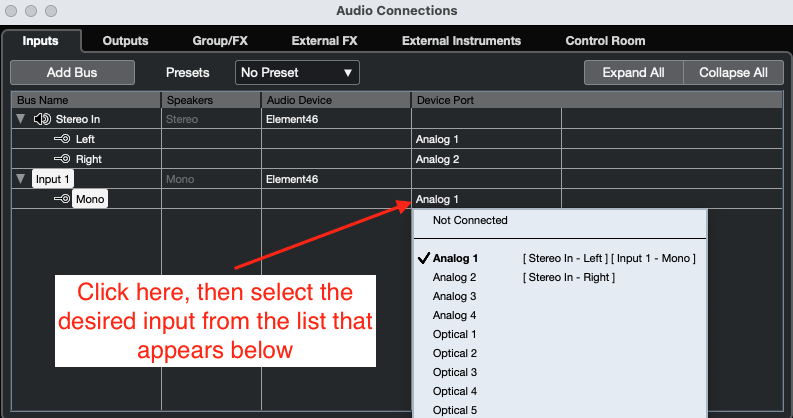
- You should now see a new entry in the Inputs tab of the Audio Connections window with the name you chose. Click in the Device Port field corresponding to the new entry and select the input on your interface that you want that bus to use. For example, if you named the bus Input 1, you'll probably want to select Analog 1 (or something similar).
- If you want to set up additional inputs, repeat steps 9-11 for each input. When you've set up all the inputs you plan to use, close the Audio Connections window.
Preparing to Record
Now that your interface is selected, and you have created your input bus (or busses), you'll need to prepare your project before starting to record.
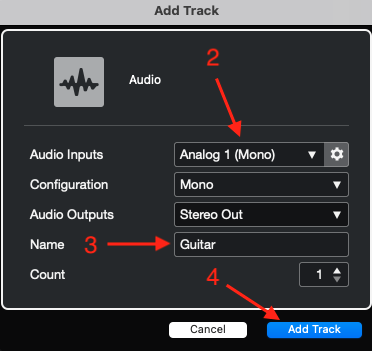
- Click on the Project menu, then select Add Track > Audio.

- Set the Audio Input to the bus you created in Step 10 (of the I/O Setup section above) corresponding to the input on your interface where your guitar/microphone is connected. If you followed along exactly with the example, this will be Analog 1.
- Name the track appropriately by entering text into the Name field. For example, if you'll be recording guitar, you might want to name the track Guitar.
- Once you are happy with the selections, click the Add Track button.
- If you plan to record with a backing track, follow the steps for Importing Audio in the collapsible menu below. Otherwise, continue to the next step.
Importing Audio
How to Import an Audio File in Cubase
A Note about Track Configuration
The following steps assume you are importing a stereo backing track into your Cubase project, and that you don't already have the track created in Cubase that you want the imported audio on. If you have already created the track, you can skip to Step 4. If you are importing a mono audio track the steps will be similar, but in Step 2, you'll select Mono instead of Stereo.
- Click the Project menu and select Add Track > Audio.
- Set the Configuration to Stereo—note that the Audio Input will also change, but that isn't important, as we'll be importing audio for this track, rather than recording.
- Name the track appropriately—something like Backing Track—and then click the Add Track button.
- Click the File menu, then select Import > Audio File.

- Navigate to the file you'd like to import, select it, and then click Open.
- You'll then be prompted with some import options. We'd recommend selecting Copy File to Project Folder, as well as Sample Rate underneath Convert to Project Settings.
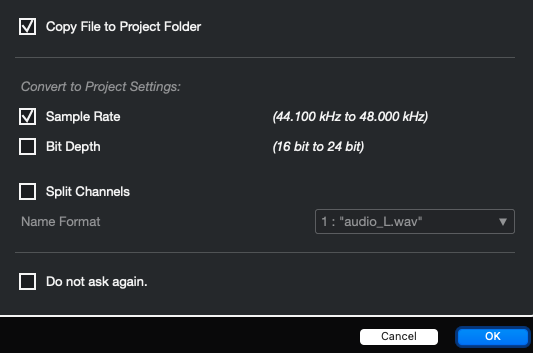
- Click the OK button to import the audio file.
After importing the audio file, your backing track will be record-enabled (the record-enable button on the track will be red), since it was the last track that was created. Click the Record Enable button on the track in order to turn that off.
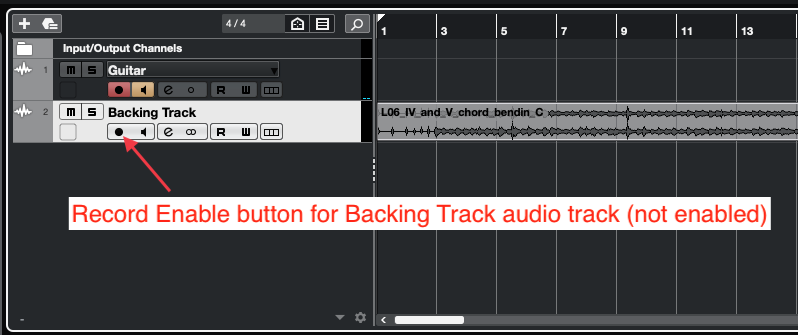
- Record enable your Guitar track (or whatever track you plan to record on), by clicking the Record Enable button for that track. When the track is record-enabled, the button with be red.
- While you can record onto your Guitar track now, you won't be able to hear the input of the track until you enable input monitoring. If you are using a microphone as your input source, make sure you are monitoring with headphones, and that your speakers are turned off, in order to avoid feedback. Once you've done that, click the Monitor button on the Guitar track to enable input monitoring.

- At this point, you may wish to instantiate a plug-in, such as AmpliTube, on your audio track. In that case, follow the steps in the collapsible menu below.
Instantiating a Plug-In
How to Instantiate a Plug-in in Cubase
You can instantiate a plug-in on any kind of track or grouped tracks in Cubase (audio, instrument, effect, master, etc.). In the following steps, we'll use AmpliTube 5 as an example, and instantiate it on an audio track.
- Make sure you have the Left Zone showing. If it's not already showing, you can hit Command+Option+L to reveal it.
- Select the Inspector tab at the top of the Left Zone, and the Track tab at the bottom of the Left Zone.
- Click the name of the track you wish to instantiate the plug-in on to select the track.
- In the Left Zone, click on Inserts to reveal the available insert slots.
- Click on an empty insert slot, navigate to the plug-in you want, then click on it to instantiate it. You'll find AmpliTube 5 under Distortion.
Recording
You are now ready to record! This section will utilize functions in the transport section of Cubase. You can find the transport at the bottom of your main project window, or you can open it independently by clicking on the Transport menu, then selecting Transport Panel.
- Click the Record button in the transport to start recording.
- When you are done recording, hit the space bar, or the Stop button in the transport to stop recording.
- If you aren't happy with your recording, click on the region you just recorded to select it, then hit the delete key on your keyboard to remove it. Then, click the Go to Previous Marker/Zero button in the transport to return the transport to the beginning of the project. Otherwise, you can move forward. Repeat steps 1-3 as many times as needed.
Exporting your Project as an MP3 file
How to Export an MP3 File from Cubase
Once you have finished a project in Cubase, you may want to export the project as an MP3 file. To export your audio from Cubase, take the following steps:
- Select the range you'll be exporting by setting the Left Locator and Right Locator positions in the transport. You'll likely want the Left Locator to be set to the beginning of the project, and the Right Locator to be a value shortly after your last region ends. Alternatively, you can set the range by clicking and dragging the Right Locator to the desired end point, as shown below.
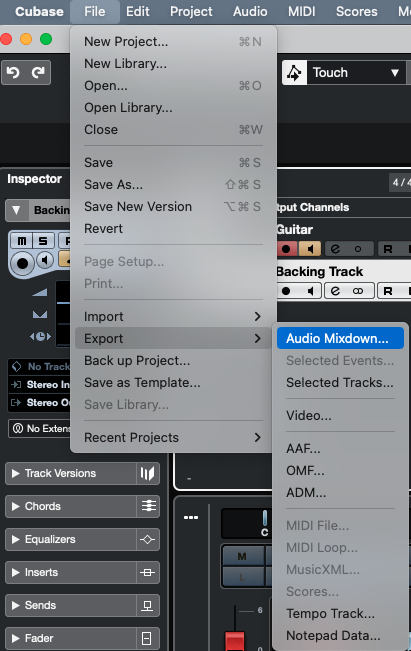
- Click on the File menu, then select Export > Audio Mixdown.
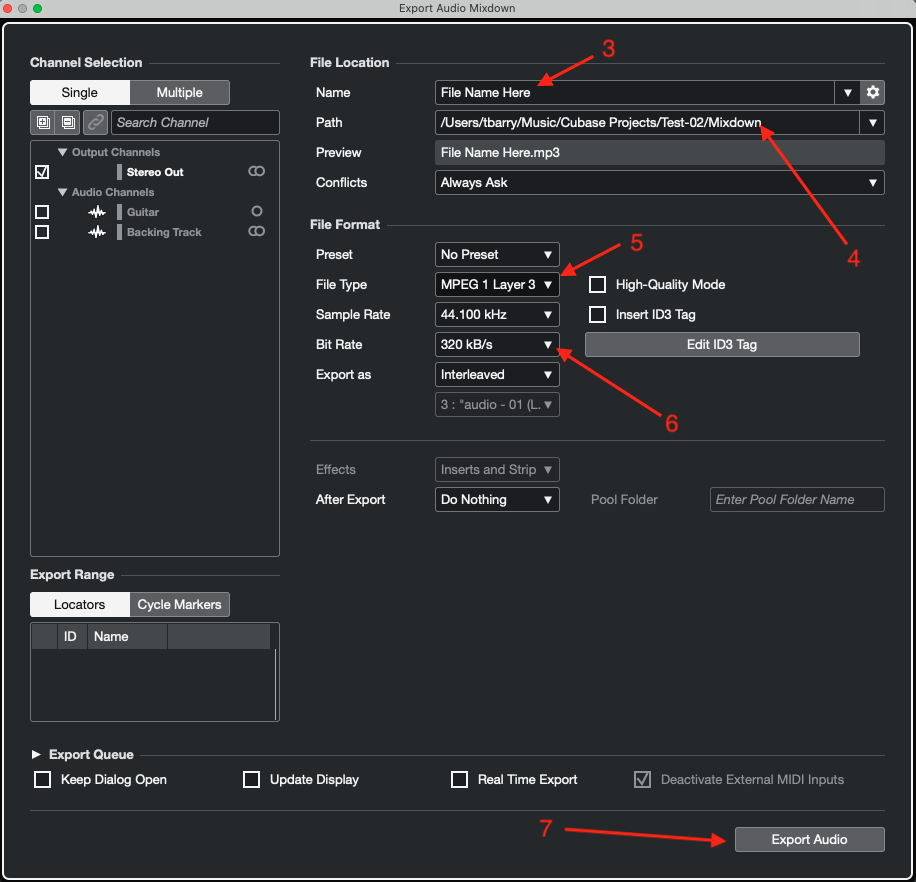
- Name your file by entering the desired name in the Name field.
- If you want to change the location where the file will be saved, click on the Path field, then navigate to and select a new location.
- Make sure the File Type is set to MPEG 1 Layer 3.
- Set the Bit Rate to 320 kB/s.
- You may want to change other settings, but this won't be necessary in most scenarios. Click the Export Audio button when you are happy with your selections.
- Once the file has finished exporting, you can then find the MP3 file by navigating to the location on your machine where you chose to save the file in Step 4.
GarageBand
How to Import and Record Over a Backing Track in GarageBand on Mac
Creating a New Project and Setting up I/O
Important Note Regarding Feedback
If you are using a microphone to record your performance, you will need to use headphones in order to avoid feedback.
To begin your project:
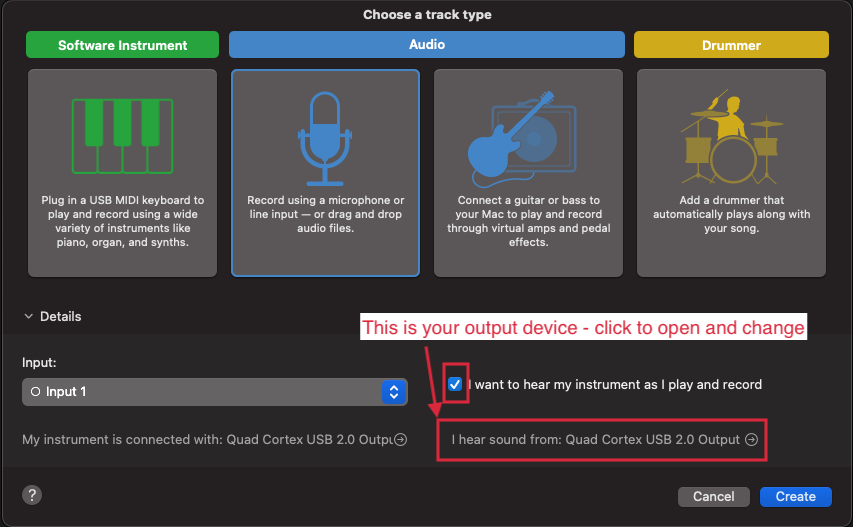
- Open GarageBand and select Empty Project, then click Choose.
- Click the microphone icon if you plan to record from an audio input. Select this even if you are recording a guitar connected directly to your interface with an instrument cable.
- Click on the Details dropdown arrow.
- Check the box beside I want to hear my instrument as I play and record.
- Click Create to create your project.
Next, it's important to identify the elements of the track header, which will help to clarify their function.
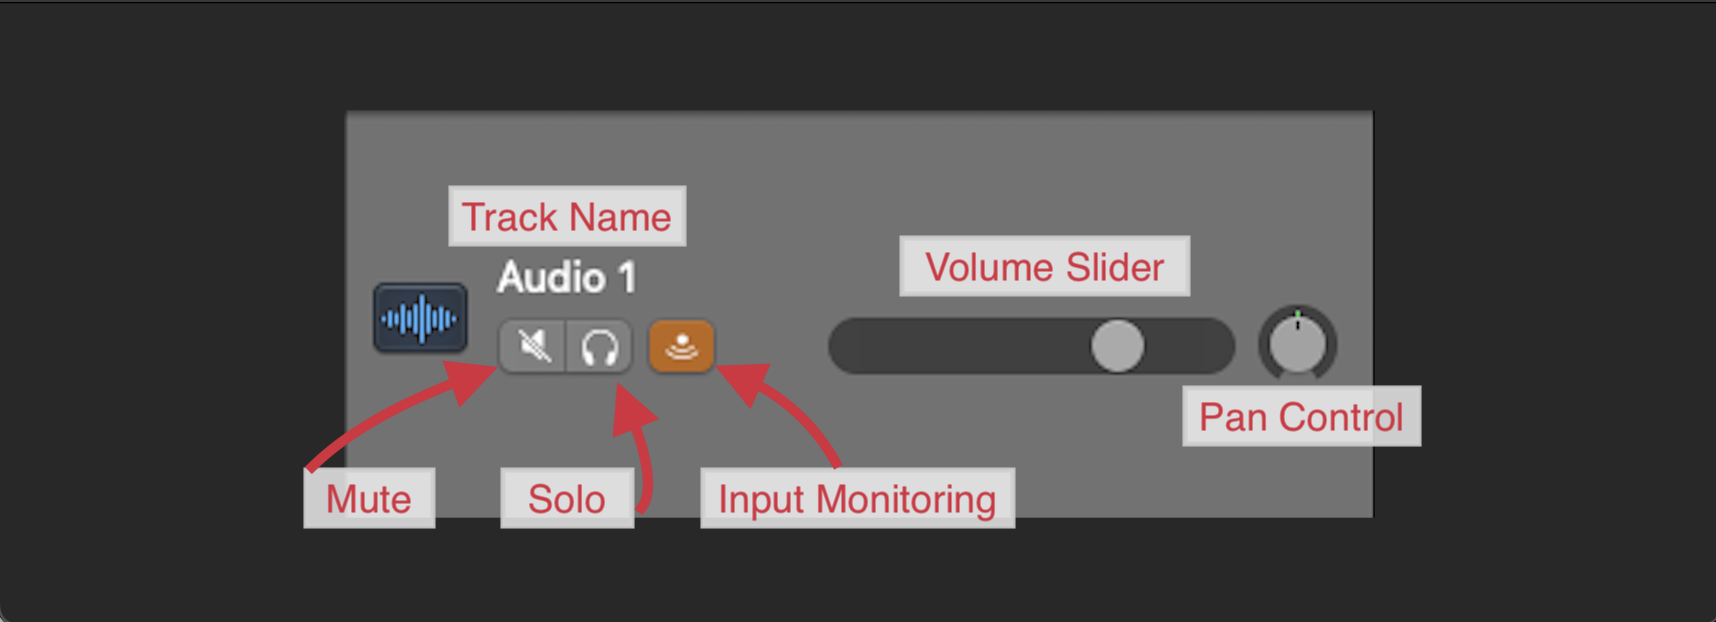
- Track Name: This is to help identify the track you are working on.
- Mute: Use this button to silence the selected track.
- Solo: This will isolate the selected track so that you hear only its contents.
- Input Monitoring: When enabled, this allows you to hear the track through your headphones as you record. In the vast majority of scenarios, you will want to keep this enabled. This will be enabled already if you selected the I want to hear my instrument as I play and record option earlier.
- Volume Slider: Use this slider to adjust the volume of the track.
- Pan Control: Use this to adjust the your track's position in the stereo image.
Instantiating Plug-ins
If you are recording guitar, and would like to add a plug-in such as AmpliTube to your audio track, take the following steps:
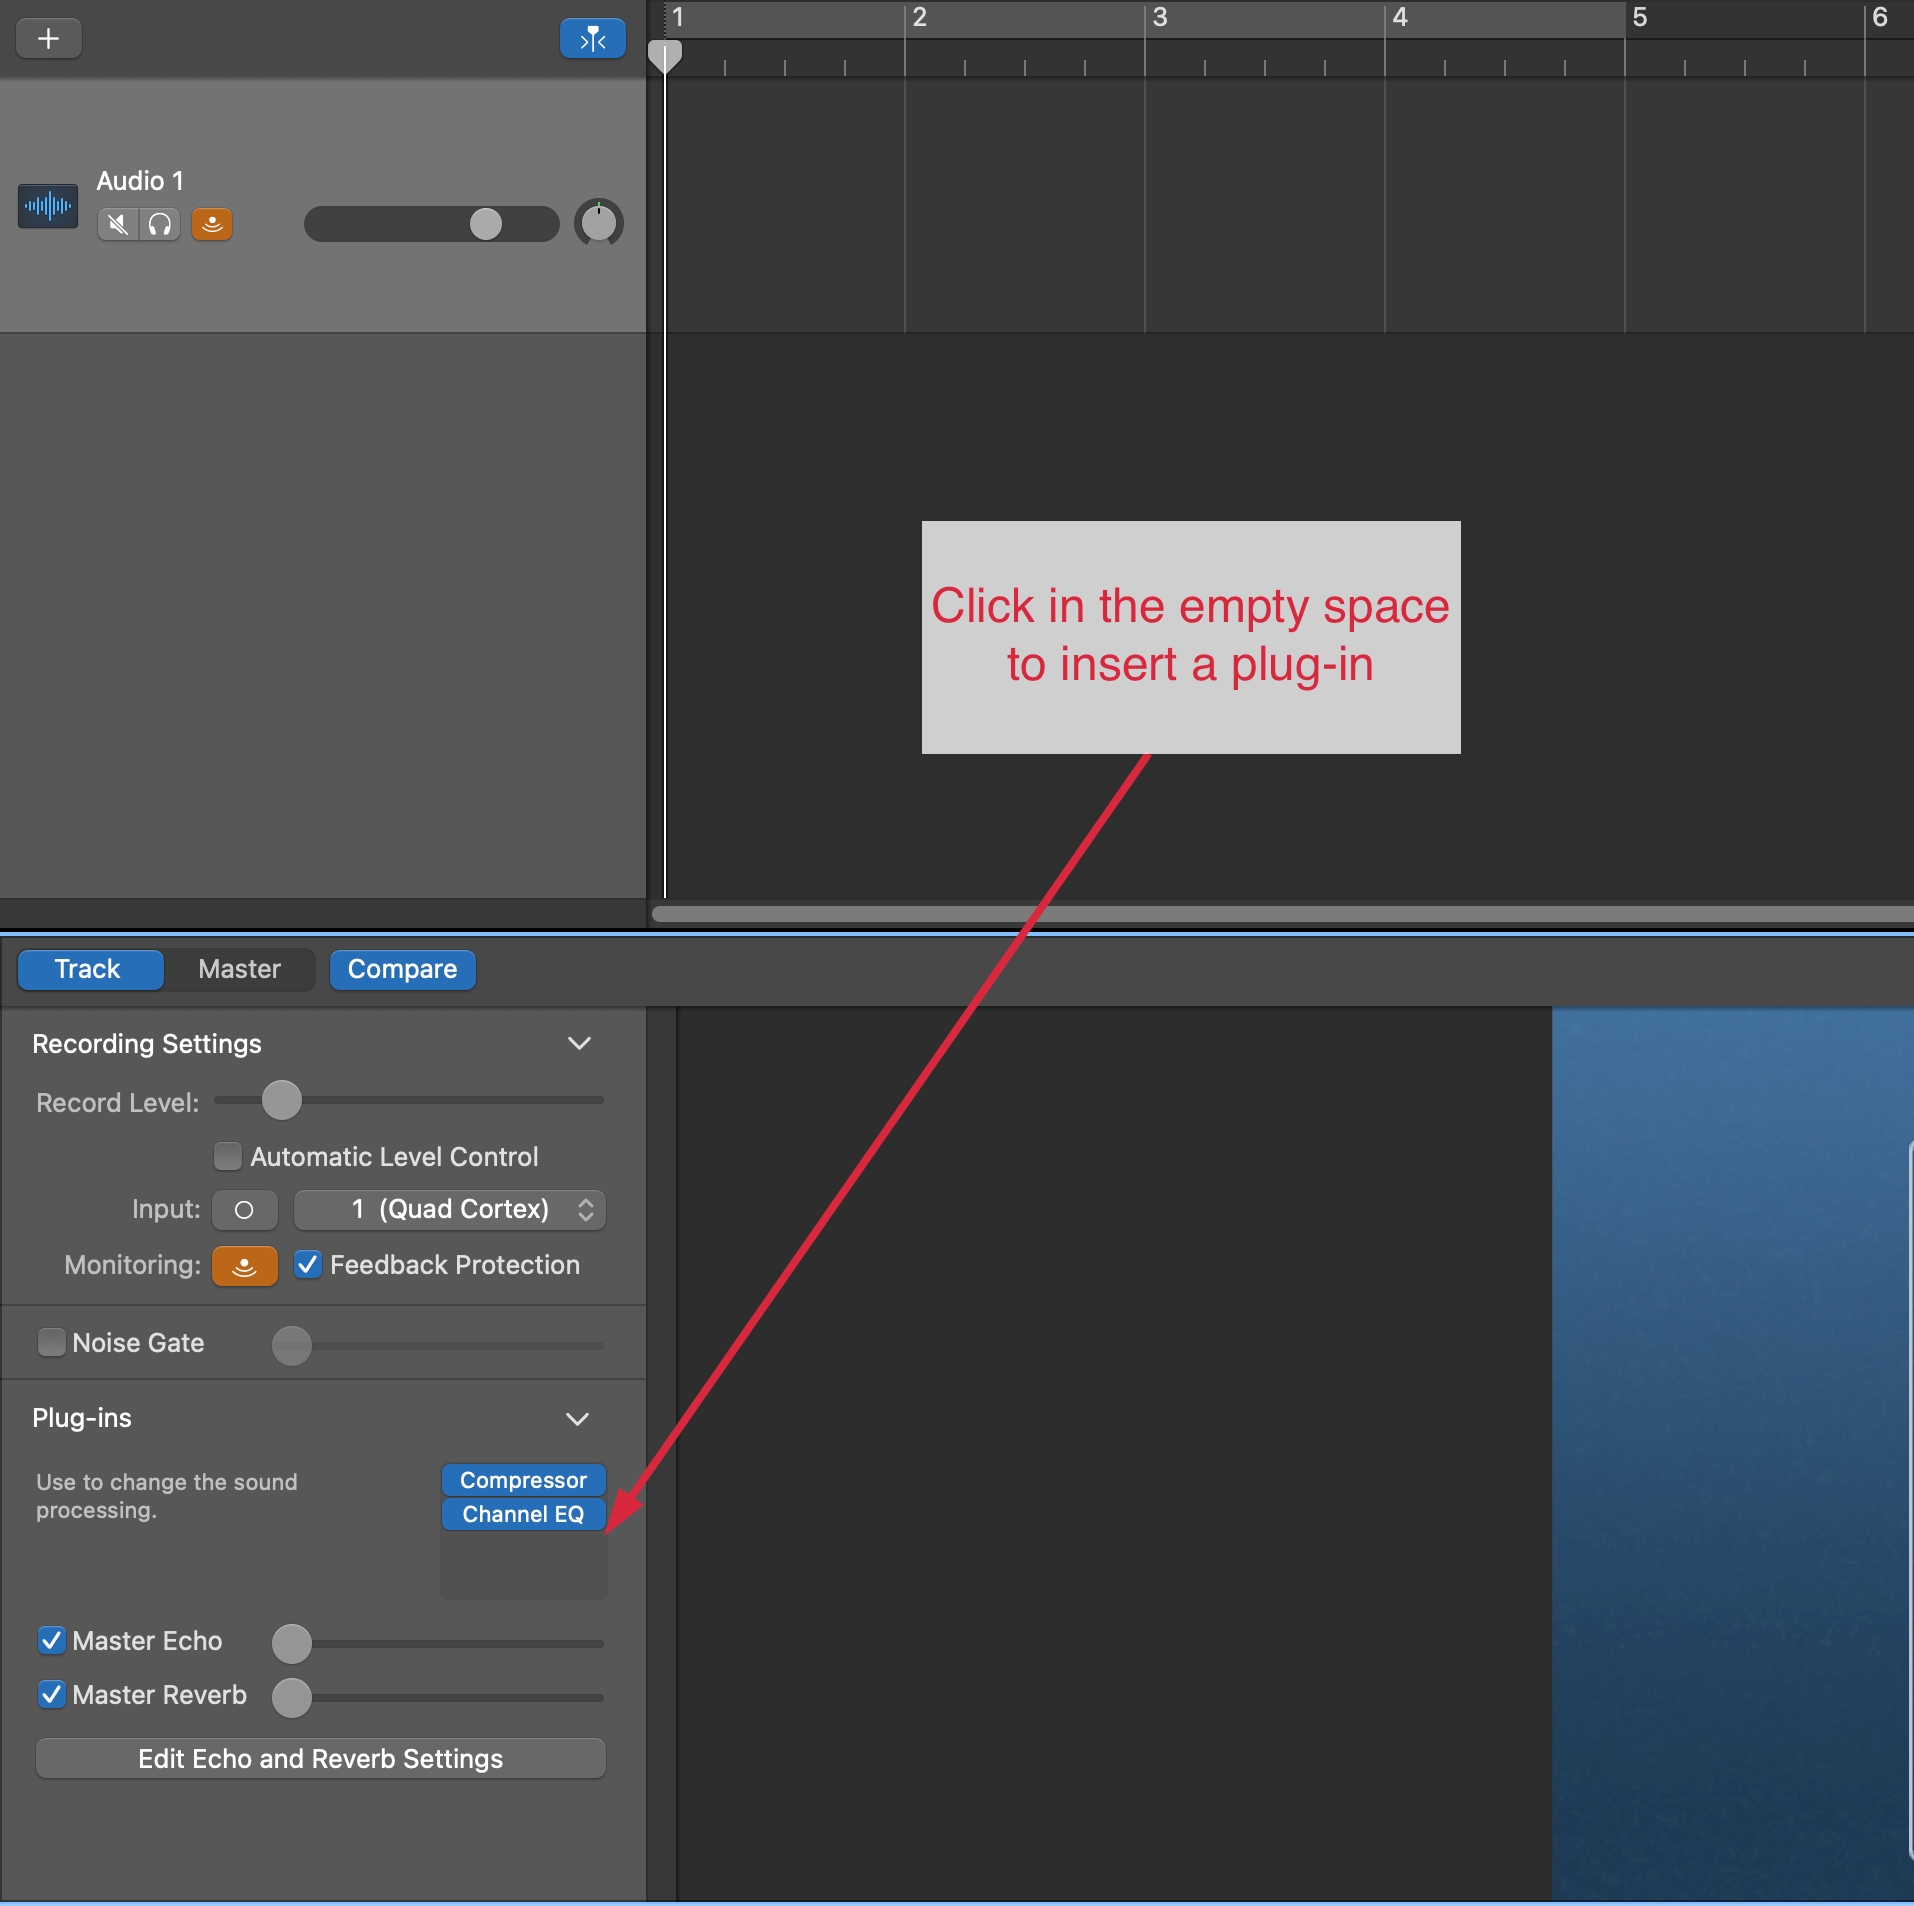
- Click on the track header of the track on which you wish to instantiate a plug-in.
- Under the Recording Settings section, click the arrow to expand the Plug-ins section.
- By default, GarageBand may load a Compressor and Channel EQ plug-in; click in the empty space below them to see the list of plug-ins available to you.
- Click on the desired plug-in to add it into your track—note that clicking on the left side of the plug-in name will either activate (blue) or deactivate (gray) the plug-in on your track.
Importing Audio and Recording
Next, import your backing track into GarageBand. The program will automatically create a new track for any files dragged into the main window. To import your backing track by dragging:
- Open a Finder window on your computer.
- Ensure the window is on top of your GarageBand window.
- Locate the downloaded backing track on your computer.
- Drag and drop the backing track from the Finder window into GarageBand.

To record over the backing track, ensure that the audio track you are recording to is selected by clicking on the track header, then press either the R key on your keyboard (for record) or the red recording circle in the transport bar.
To end your recording, you can press the Space Bar key on your keyboard or click the Stop square icon in the transport bar. You can delete any recordings by clicking on the audio region (the actual recorded waveform) and then using the Delete key on your keyboard.
Exporting Your Recording
Once you are happy with your recording, you can export it by doing the following:
- In the top menu bar, navigate to Share > Export Song to Disk.
- In the subsequent dialogue box, name your track, and choose the save location for the file.
- Within the audio options, selecting the highest quality MP3 option is recommended for most Berklee Online assignment submissions.
- Click Export.
A Note on Exporting and Saving
Please note that when you export your audio, you will still need to save your project, which is the GarageBand file. This is useful in case you need to come back and make any adjustments, such as changing your volume levels, re-recording a section, adding new sections or instruments, and so forth. To save the project, navigate to File > Save, or press Command + S on your keyboard.
Audacity
How to Import and Record Over Backing Track in Audacity
You will need:
- a Windows/Mac computer
- audio interface
- microphone, if using an acoustic instrument or voice
- any cables required to connect an electronic instrument such as electric guitar, digital piano, or synthesizer
- headphones or studio monitors (headphones required if using a microphone)
- Audacity software (free download)
- backing track for your assignment, downloaded from your course
Setting up Your Audio Device
First, check that Audacity has your input and output settings correctly selected.
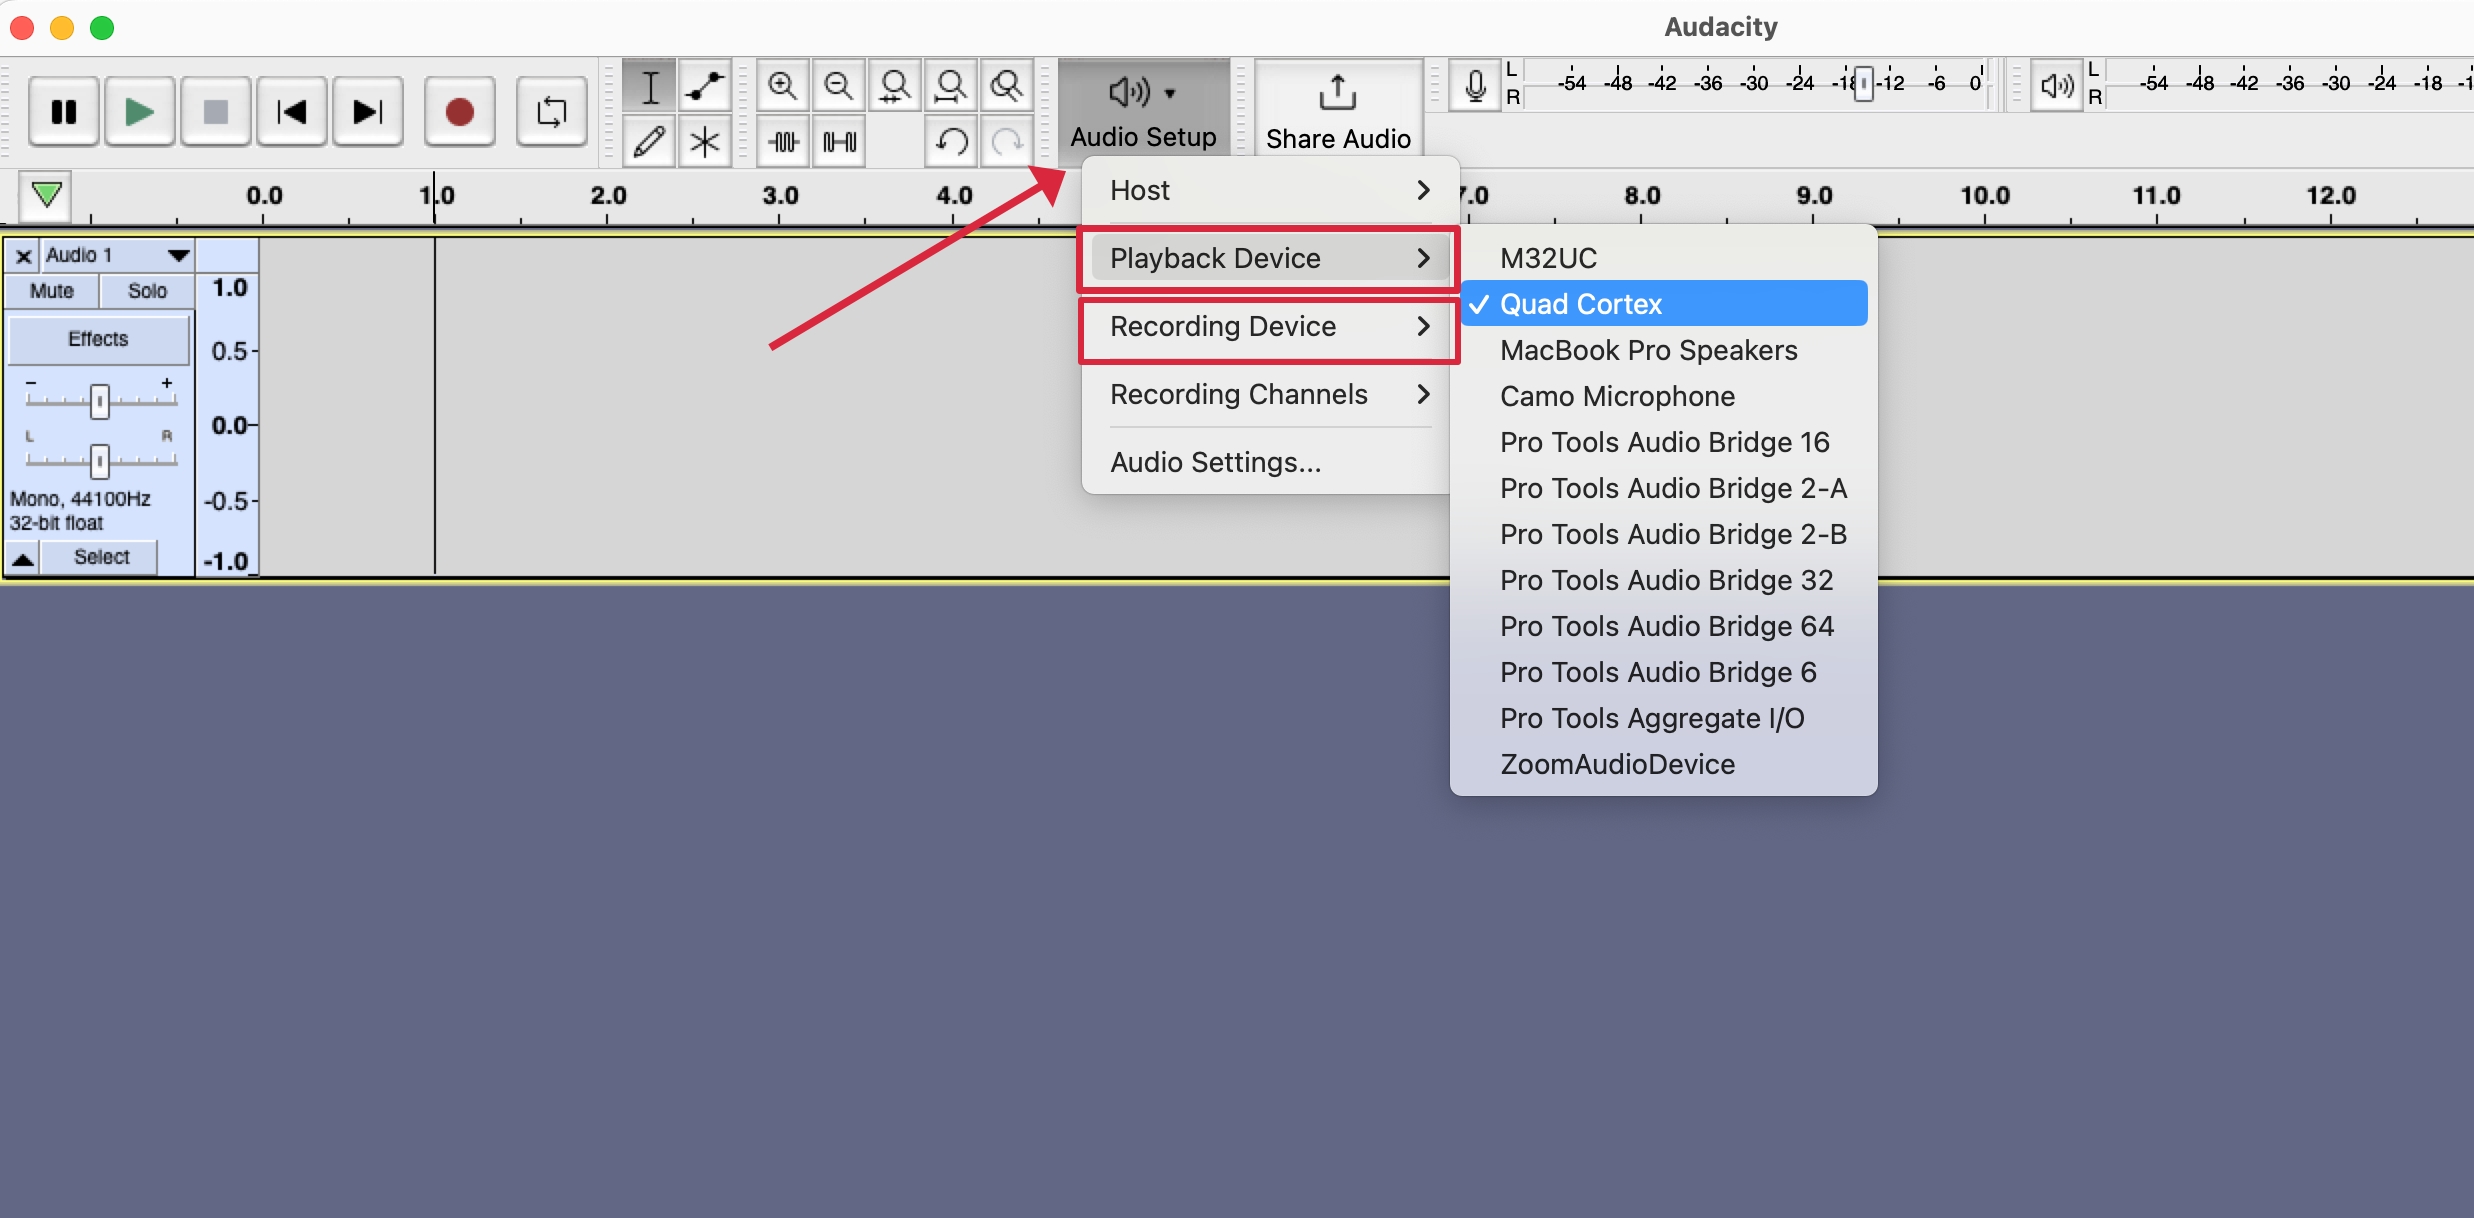
- Click on the Audio Setup button located on the main screen in Audacity.
- Select where you want to hear audio from under Playback Device.
- Select where you want your audio to come into Audacity under Recording Device.
Importing Your Backing Track
Next, you will need to import your backing track into Audacity:
- Open Audacity on your computer.
- Locate the backing tack on your computer, then drag and drop it into the main Audacity window. Alternatively, you can navigate to File > Import > Audio, and then locate the file on your computer.
Checking Audacity's Recording Setup
In order to have Audacity record in the expected way, you may need to check the recording settings; otherwise you may not hear the backing track while recording, or your recording may continually jump to the end of the track. See the section directly below if you need to check these settings.
How to Stop Audacity Jumping to the End of a Track When Recording
How to Stop Audacity Jumping to the End of a Track When Recording
Audacity's default behavior is very linear, in that when you record a track, then go back and try to rerecord a section, it will always assume that you want to record onto the end of your existing audio. There are a few ways around this.
The most simple way to do this is to ensure that you have Mono Recording selected from the Recording Channels dropdown menu. This should be automatically selected if you chose to create a new mono track to record onto (Tracks > Add New > Mono Track).
However, if you're working with a stereo track, the following method may be necessary. First, you can delete all audio on a track that you recorded, which will then add space for Audacity to allow you to record onto the track. However, if you wish to keep the take or track that you recorded, you can also tell Audacity to record onto a new track, or overdub. This will allow you to record multiple tracks of audio, which you can compile afterwards if necessary. If you do opt to use this method, you will want to mute the previously recorded tracks so that you do not hear all the recordings playing at once.
To do this, you can press Shift + R to start a new recording, which will add a new track every time you record. Alternatively, you can change the default behavior to create a new track every time you record by pressing R on it's own:
- Navigate to Audacity > Preferences > Audio on Mac, or
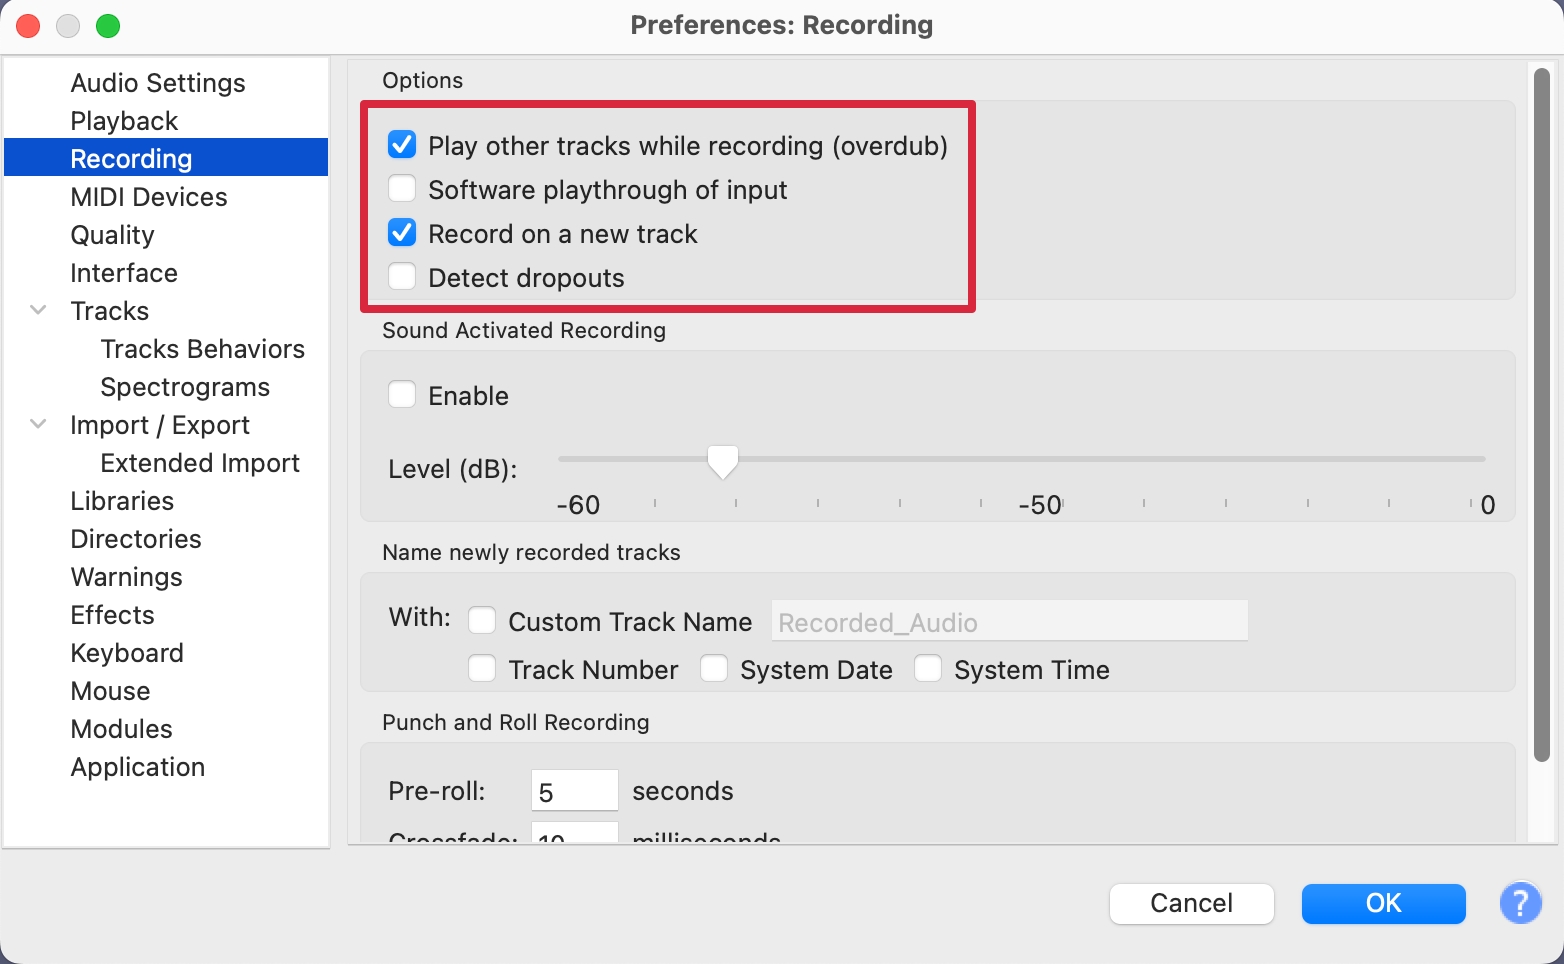
Now when you press the R key to record, Audacity will create a new track each time you do so.
Recording Your Audio
Assuming that your hardware is configured correctly, you can record alongside your backing track by performing one of the following actions:
- Press R on your keyboard.
- Press the red Record icon at the top of the Audacity transport bar.
- From the top menus, select Transport > Recording > Record.
Each of these options will instantly start recording, and you should be able to hear your backing track as you perform. Once you have completed your recording you can press the Space Bar to stop recording, or press the black Stop icon from the transport bar.
If you are unhappy with your recording, move your cursor into the top section of the region and you will see it change to a hand icon. Click to select your region, then use the backspace button to delete.
Alternatively, you can click the X icon on the whole track, as Audacity will simply create a new track each time we record. This is the expected behavior as long as you have set your recording settings as shown in the section above.
Exporting Your Project as an MP3
How to Export an MP3 File from Audacity
Once you have finished a project in Audacity, you may want to export the project as an MP3 file. To do that, take the following steps:
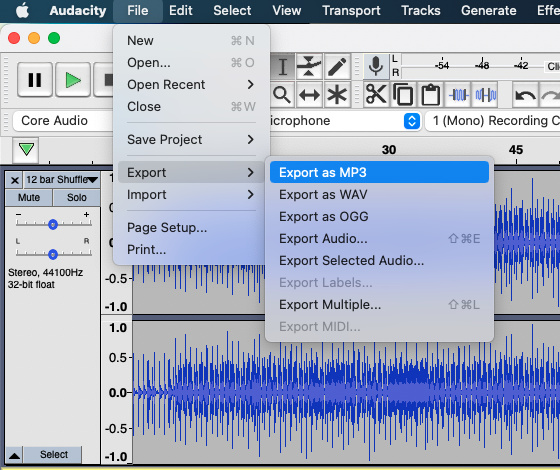
- In the Audacity menu, click File, select Export, and then click Export as MP3.
- In the following window, name the file, select a location to export the file, then click Save.

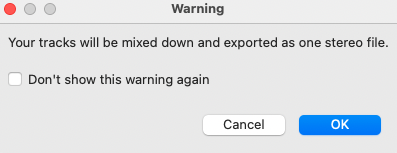
- You may see a warning stating, Your tracks will be mixed down and exported as one stereo file. If you see this warning, click OK, as this is the intended result. In order to avoid this warning in the future, check the box next to Don't show this warning again before clicking OK.
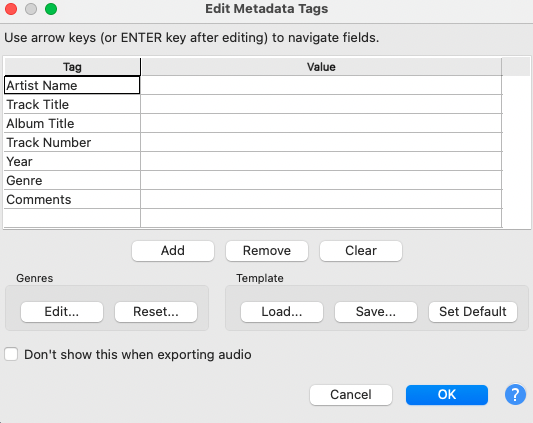
- You may also be prompted to enter or edit metadata tags. You can choose to enter these or not. In order to avoid being prompted to enter metadata tags in the future, check the box next to Don't show this when exporting audio before clicking OK.
- Once the export is complete, you can find the MP3 file by navigating to the location on your machine where you chose to save the file in step 2.
A Note on Latency
Depending on your setup, you may have issues with latency in Audacity. If this is the case, please see this article on how to correct latency in Audacity
Reason
How to Record Multitrack Audio in Reason
Configuring Audio Preferences/Settings
- Open the Reason Preferences menu and then click the Audio tab. You can open the Preferences menu on macOS by clicking Reason in the top left corner of your screen and then Preferences. On Windows, click Edit and then Preferences. Note that in newer versions of macOS, Preferences may be referred to as Settings instead.
- Select your audio interface (or built-in audio device) from the Audio Device drop-down menu.
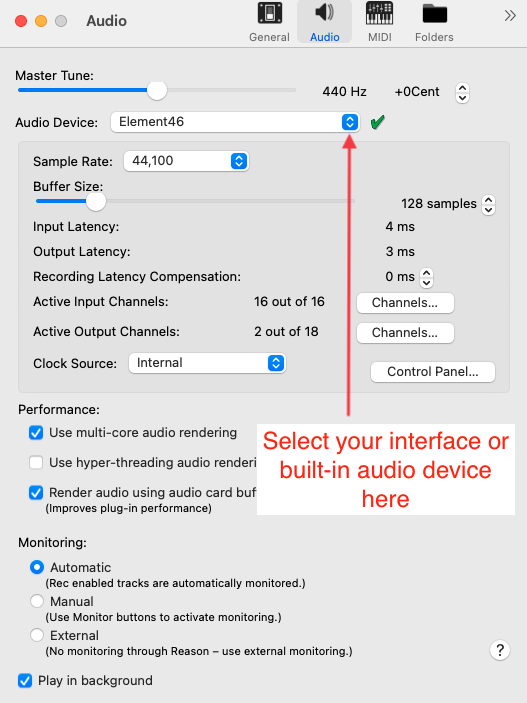
- This is also a good opportunity to check your Buffer Size and change it if necessary. The lower your buffer size, the less latency you will get. It's worth noting that you may experience audio issues, such as distortion or digital noise, if your buffer size is too low. We'd recommend starting at 128 samples and adjusting as needed from there.
- Note: You can also set Sample Rate, Active Input and Output Channels, and adjust Recording Latency Compensation, Monitor settings, and more from this menu.
- Close the Preferences menu.
Preparing Your Session for Recording
If you won't be recording with a backing track, skip to step 4 below. Otherwise import your backing track by following the instructions in the first 3 steps.
How to Import an Audio File in Reason
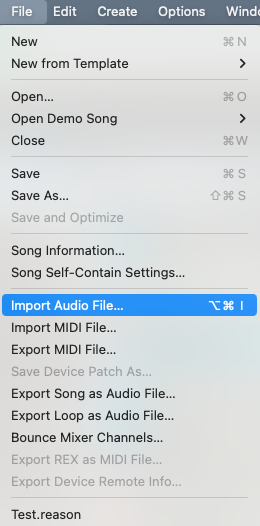
- Click on the File menu and select Import Audio File.
- Within the Reason browser, navigate to and click on the file you'd like to import.
- Click Import at the bottom right corner of the browser to import the audio file. If you didn't already select an audio track, this will create a new track for the imported audio.

- Create a new track by clicking the Create menu, then choosing Create Audio Track.
- On your new audio track, click the In button, select either Mono Input or Stereo Input, then the appropriate input channel(s). If you are recording a mono instrument, like voice or guitar, select mono input. Note: if you are using a microphone as your input source, make sure to use headphones and have your speakers off in order to avoid feedback.
- If you are recording guitar and want to use an amp simulator, such as AmpliTube, instantiate that on the new track now. See the collapsed note at the bottom of this section for instructions on how to do that.
- By default, Reason is set to record in Loop mode with a four-bar loop. This is often not preferable, so if you want to change that behavior, you can either turn Loop mode off by pressing the L key on your keyboard, or adjust the loop length by changing the Right Locator value in the transport.
- The metronome, also known as the “click,” is also on by default. Press the C key on your keyboard to turn the metronome off (or back on).
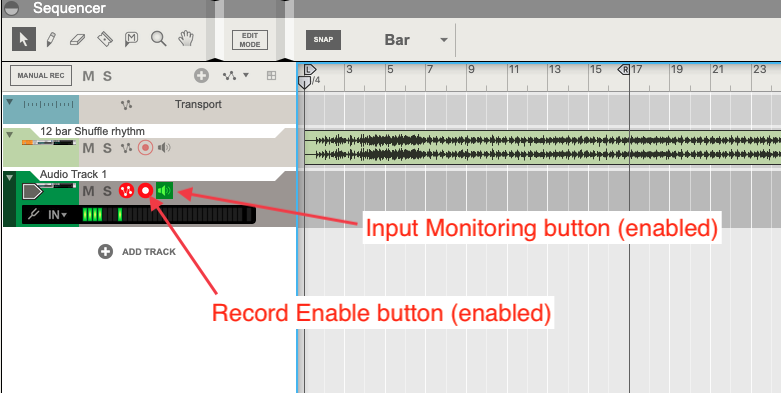
- If you followed all the steps listed above in order, then your second audio track will be record-enabled with input monitoring on. In order to record, you will need to have a track record-enabled, and in order to hear the input of the track, you will need to have input monitoring enabled on that track. See the screenshot below for the locations of those buttons.
How to Instantiate a Plug-in
How to Instantiate a Plug-in in Reason
You can instantiate a plug-in on a mix channel, audio track, or instrument track in Reason. In the following steps, we'll use AmpliTube 5 as an example, and instantiate it on an audio track.
- Select the track where you want to instantiate the plug-in by clicking it.
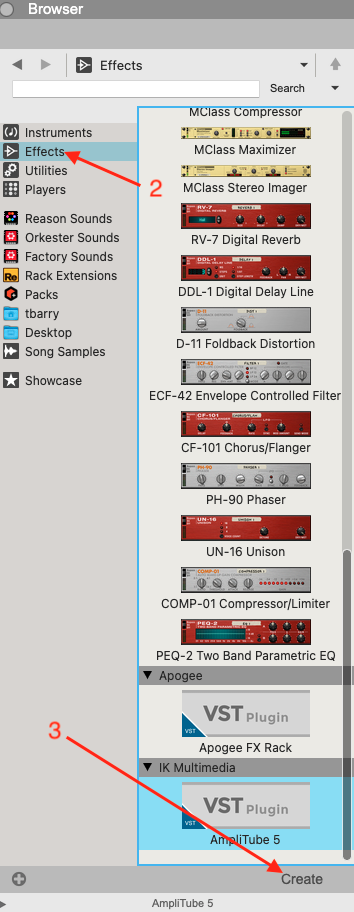
- Click on Effects in the Reason browser, then scroll to find the plug-in you want to add. Reason's built-in effects will be listed first while third party plug-ins are listed under the name of their manufacturer. AmpliTube 5 will be available under IK Multimedia.
- Double-click on the plug-in name in the Reason browser, or click on it once and then click the Create button, to add the plug-in to your selected track.
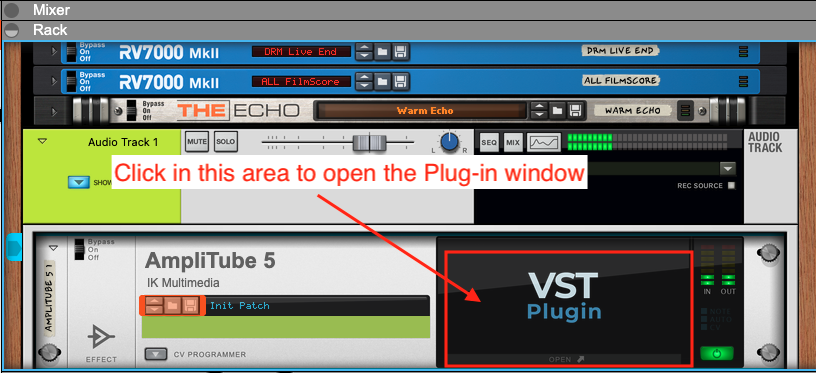
- To open the plug-in window, click VST Plugin within the Rack view.
Recording
Now you are ready to record!
- Click the Record button in the transport section to start recording.
- When you've finished recording, hit the Stop button in the transport section to stop recording.
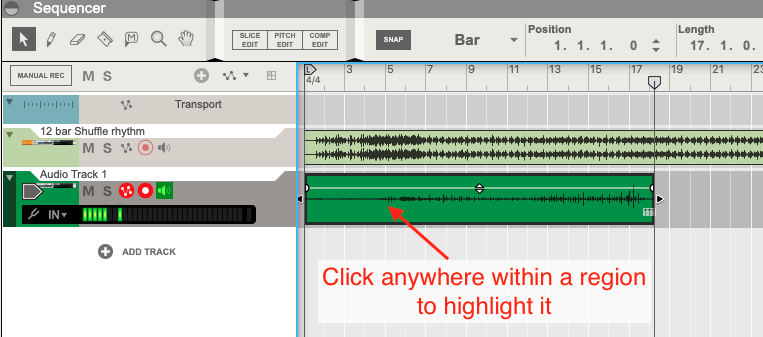
- If you are happy with your recording, you can proceed to the next section. If you aren't happy with the recording, click on the region you just recorded to select it, then hit the Delete key on your keyboard to delete the region.
- Hit the Stop button in the transport section to return the transport to beat 1 of bar 1.
- Repeat steps 1-4 as many times as needed until you are happy with your recording.
Exporting Audio from Reason
Once you have finished a project in Reason, you may want to export the project as an MP3 file. To do that, take the following steps:
How to Export an MP3 File from Reason
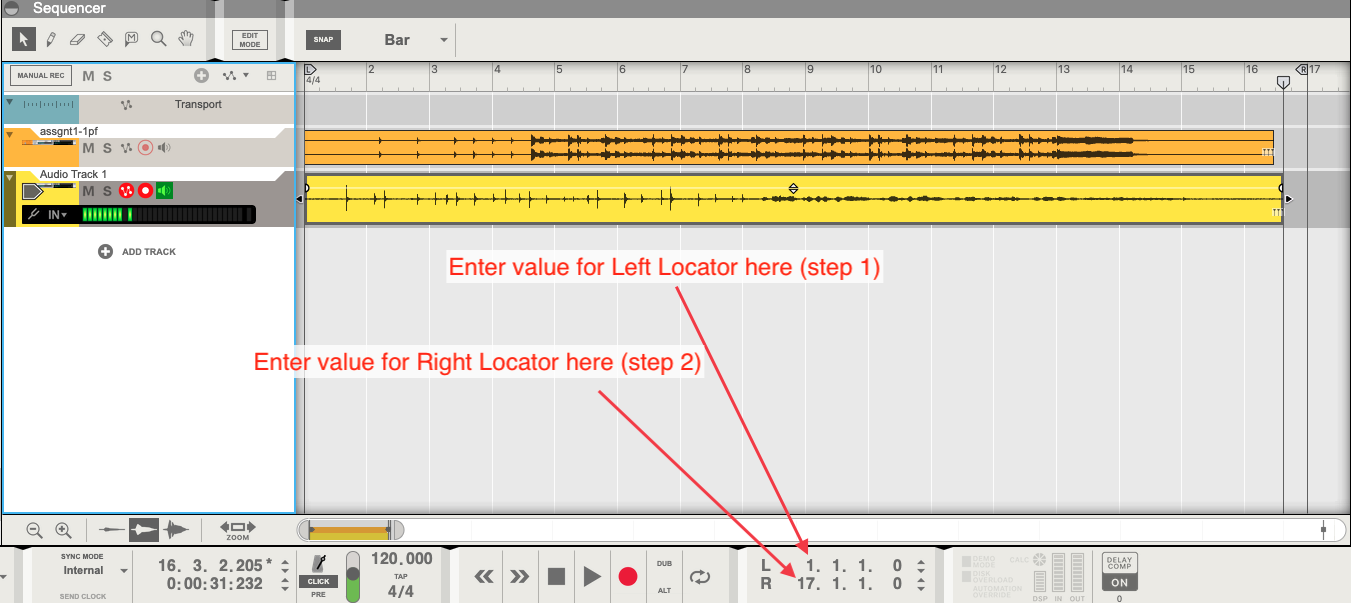
- Set the Left Locator to the beginning of the song. It will be there by default if you haven't changed it. To ensure this is the case, click the number just to the right of the L in the transport section, enter 1, then hit the enter/return key.
- Set the Right Locator to the point you want the song to end. Click the number to the right of the R in the transport section, enter the bar number where you want the song to end, then hit the enter/return key.
A Note about Moving Locators
As an alternative to the two steps above, you can also click and drag the locaters to the desired positions from within the sequencer area of Reason.
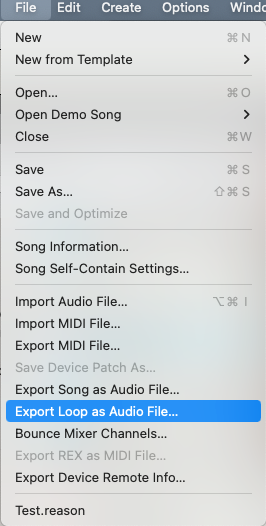
- Click File > Export Loop as Audio File.
- Name the file.
- Select a location to save the file.
- Make sure the value in the Format dropdown menu is MP3 File.
- Click Save.

- Once the file has finished exporting, you can then find the MP3 file by navigating to the location on your machine where you chose to save the file in step 5.
