In order to synchronize audio and video you will need:
- Video file
- Audio file
- Video editing software
In terms of video editing software, iMovie is recommended for macOS, and Shotcut is recommended for Windows, as both are free options and contain all features required to synchronize your audio and video. Please note that Shotcut is also available for macOS.
If you need further instruction on how to record your audio, please refer to the article Advanced Method: How to Record Video and Multitrack Audio of Your Performance along with a Backing Track.
A Note on Using the Built-in Recorder
An alternative to the process described in this article is to record your performance along with the backing track as a single audio track. While that doesn't achieve the same audio quality, doing so allows you to use the built-in video recorder in BOCCE, and also doesn't require any additional software (aside from a basic media player). Click here for instructions on the simple method of recording video of your performance along with a backing track
Adding Your Video to the Editing Software
- Open your video editing software.
- Locate the saved video and audio in your computer's file browser.
- Import your video and audio by dragging them into the timeline.
Detaching and Removing Camera Audio
At this point, it's very likely that your video will have audio captured from your camera. In order to achieve the best possible results, detach and mute your camera's audio, so that you can only hear the file exported from your DAW.
In iMovie:
- Right click on your video file on the timeline.
- Click Detach Audio.
- Alternatively, select your video by clicking on it, then press command + option + B on your keyboard.
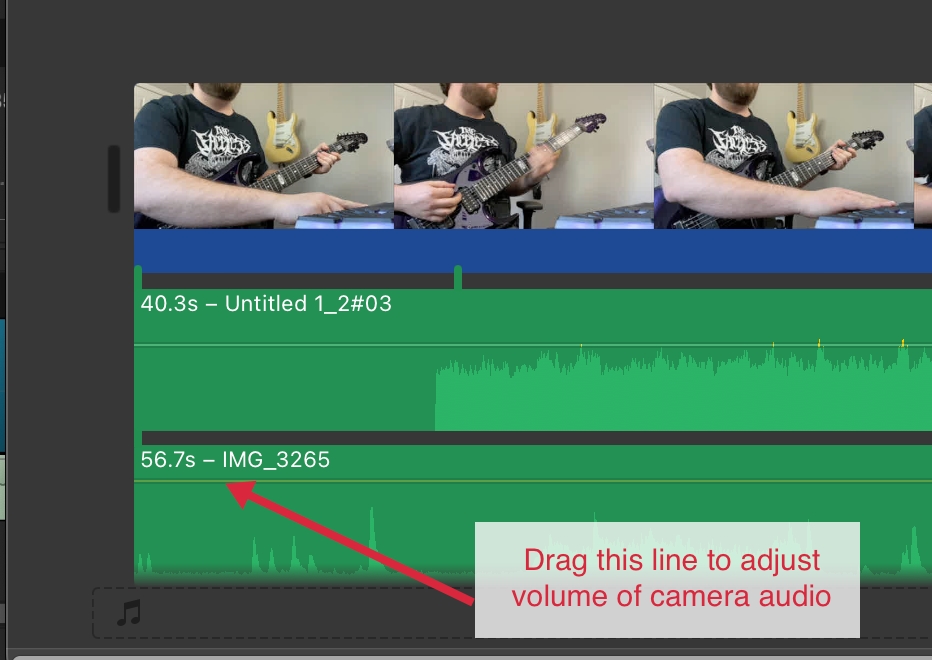
- Move the volume slider on the region to 0%. Do not delete the track as we will use it for aligning.
In Shotcut:
- Right click on your video file on the timeline.
- Click Detach Audio.
- In the newly created A1 audio track, click on the speaker icon to mute.

Aligning Audio with Video
Now you must align the audio from the exported MP3 from your DAW with the audio from the camera audio. This is where having a loud transient at the start of your recordings helps, similar to how a director uses a clapperboard on a movie set.
- Locate the loud transient on both audio tracks, remembering that we have the audio muted from your original camera recording.
- Align the exported high quality MP3 recording so that the transient matches up with the transient on the camera audio.
- Press play on your video to ensure that what you hear matches up with what you see.
You may need to zoom your timeline in order to accurately get the transients matched up. In iMovie, use command = to zoom in, and command - to zoom out. You can also use the timeline zoom slider, located in the upper right section of the timeline. In Shotcut, you can simply use the - or = keys with no modifier needed.
Removing the Transient Audio
Once you have aligned everything and are happy with both visual and audio components, you will want to remove the audio of the transient used to align everything, so that it is not present in your final exported video file.
In iMovie:
- Click on your audio region to select it.
- Move your cursor over the start of the audio region where you will see two arrows appear.
- Click and drag to remove the desired section of audio from being played.

In Shotcut:
- Move your cursor to the start of the audio track; you will see two arrows.
- Click and drag to adjust where the audio track will begin.
Exporting
Once you are happy with your end result, you must export your movie for submission in your assignment.
In iMovie:
- Click File > Share > File.
- Enter a name for your file in the File dialog window.
- Click Next and choose a save location for your file.
- Click Save.
In Shotcut:
- Click File > Export > Video. Alternatively you can press command + E (macOS) or control + E (Windows).
- Choose a name and save location for your movie.
- Click Save.
- Shotcut will render and save the video, and its output can be seen in the top-right portion of the screen, labeled Jobs.
