Configuring I/O and Settings
Before recording, you will need to set up your session's I/O and playback engine.
How to Set Up I/O for Basic Recording in Pro Tools
Setting up I/O in Pro Tools, while simple, can be daunting for someone unfamiliar with the software. You can take the following steps in most cases to ensure Pro Tools' I/O and routing is properly set up, as well as to troubleshoot any issues.
1. Select the Correct Playback Engine
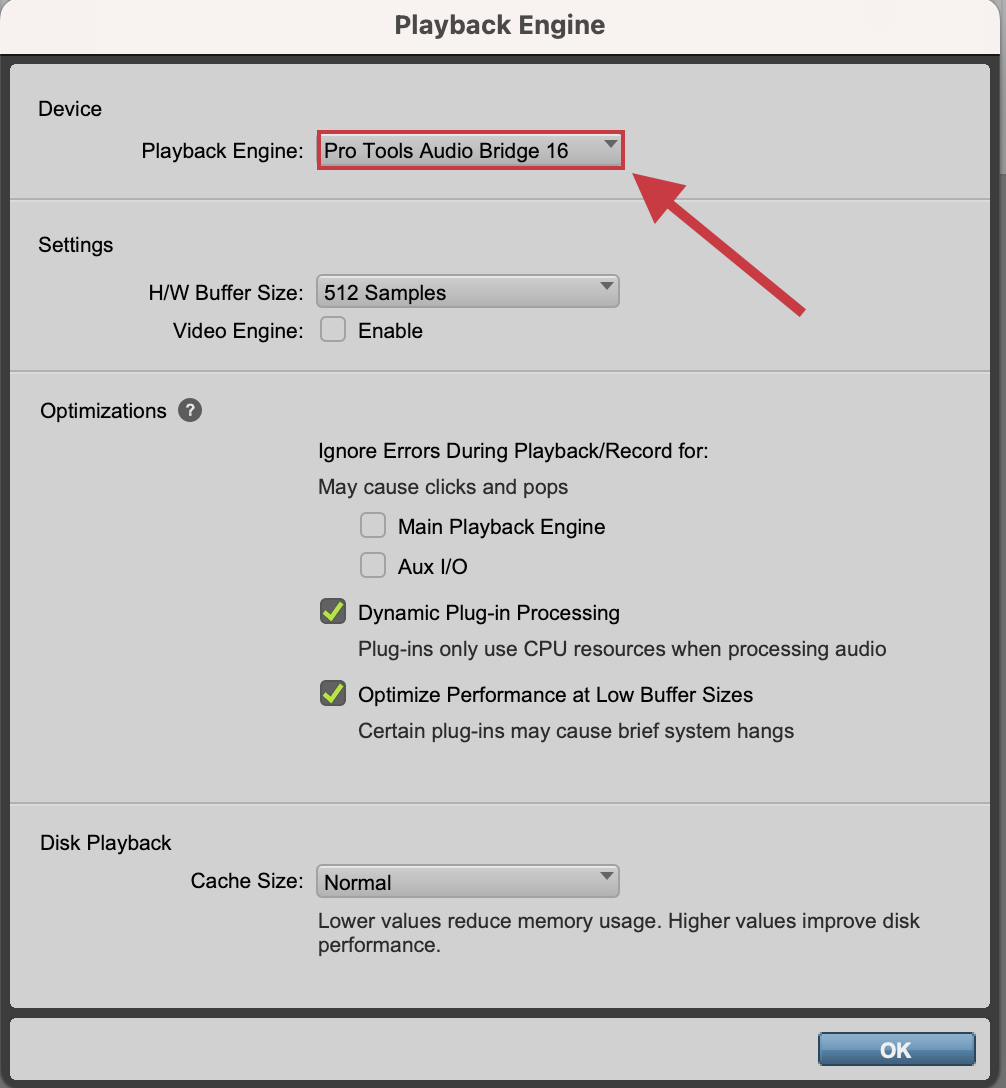
Whether you are using your built-in computer speakers, audio interface, or another audio device, you will need to ensure Pro Tools is communicating with your desired playback device. To do this, navigate to Setup > Playback Engine after starting Pro Tools and opening a session. In the resulting window, select your desired playback engine from the dropdown menu next to the Playback Engine field, then click OK. If the playback engine has changed, Pro Tools will close and reopen the current session.
You can also perform this action by holding down the N key on your keyboard while Pro Tools is starting up.
2. Set Inputs and Outputs
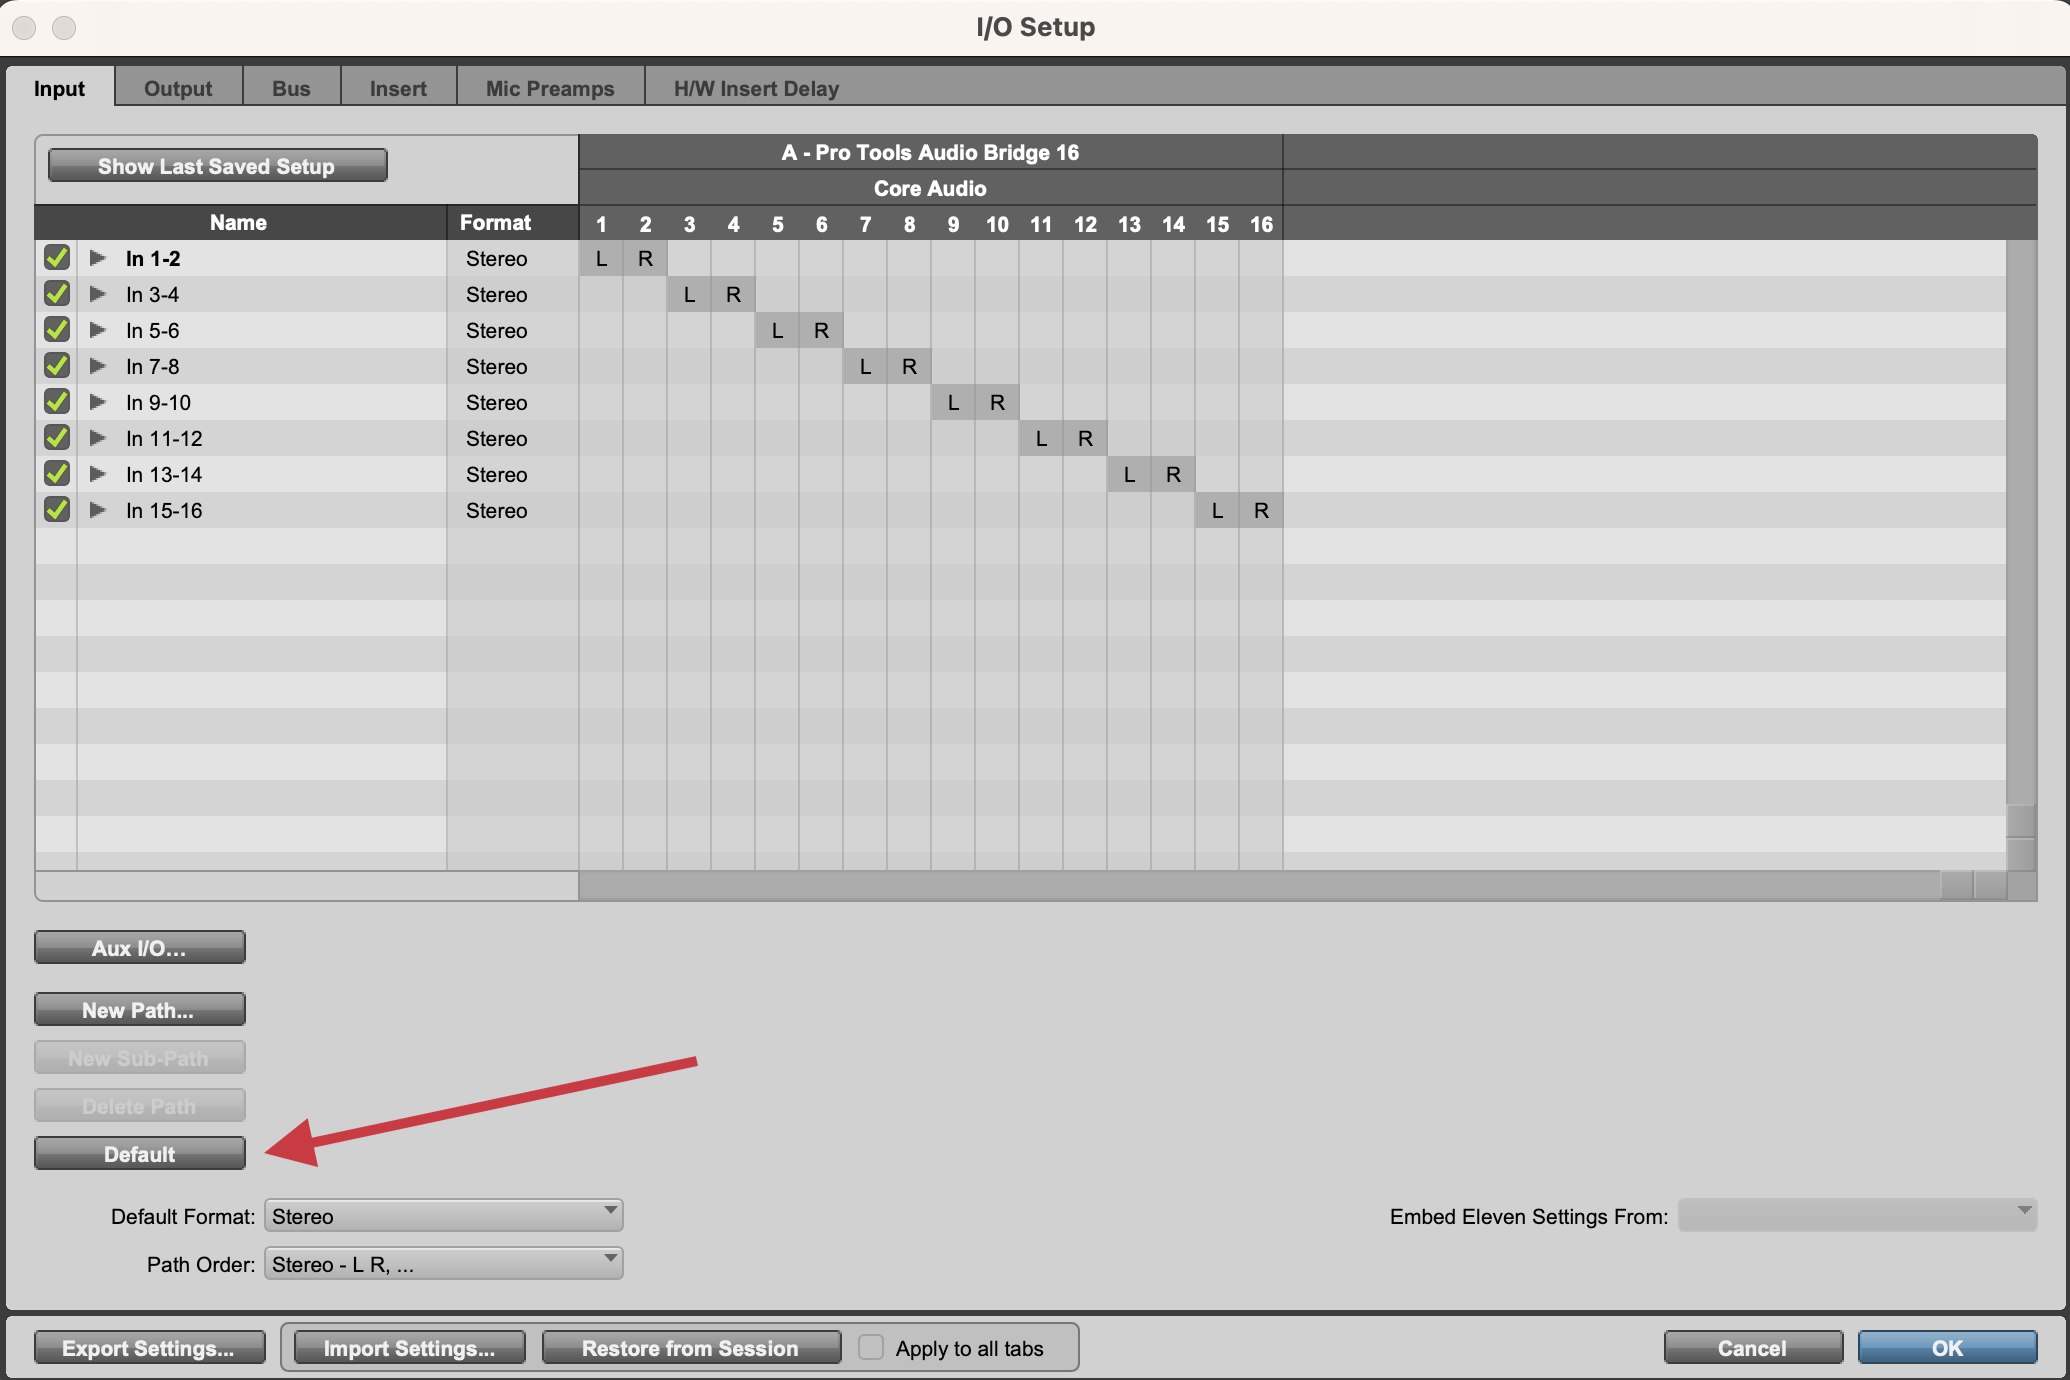
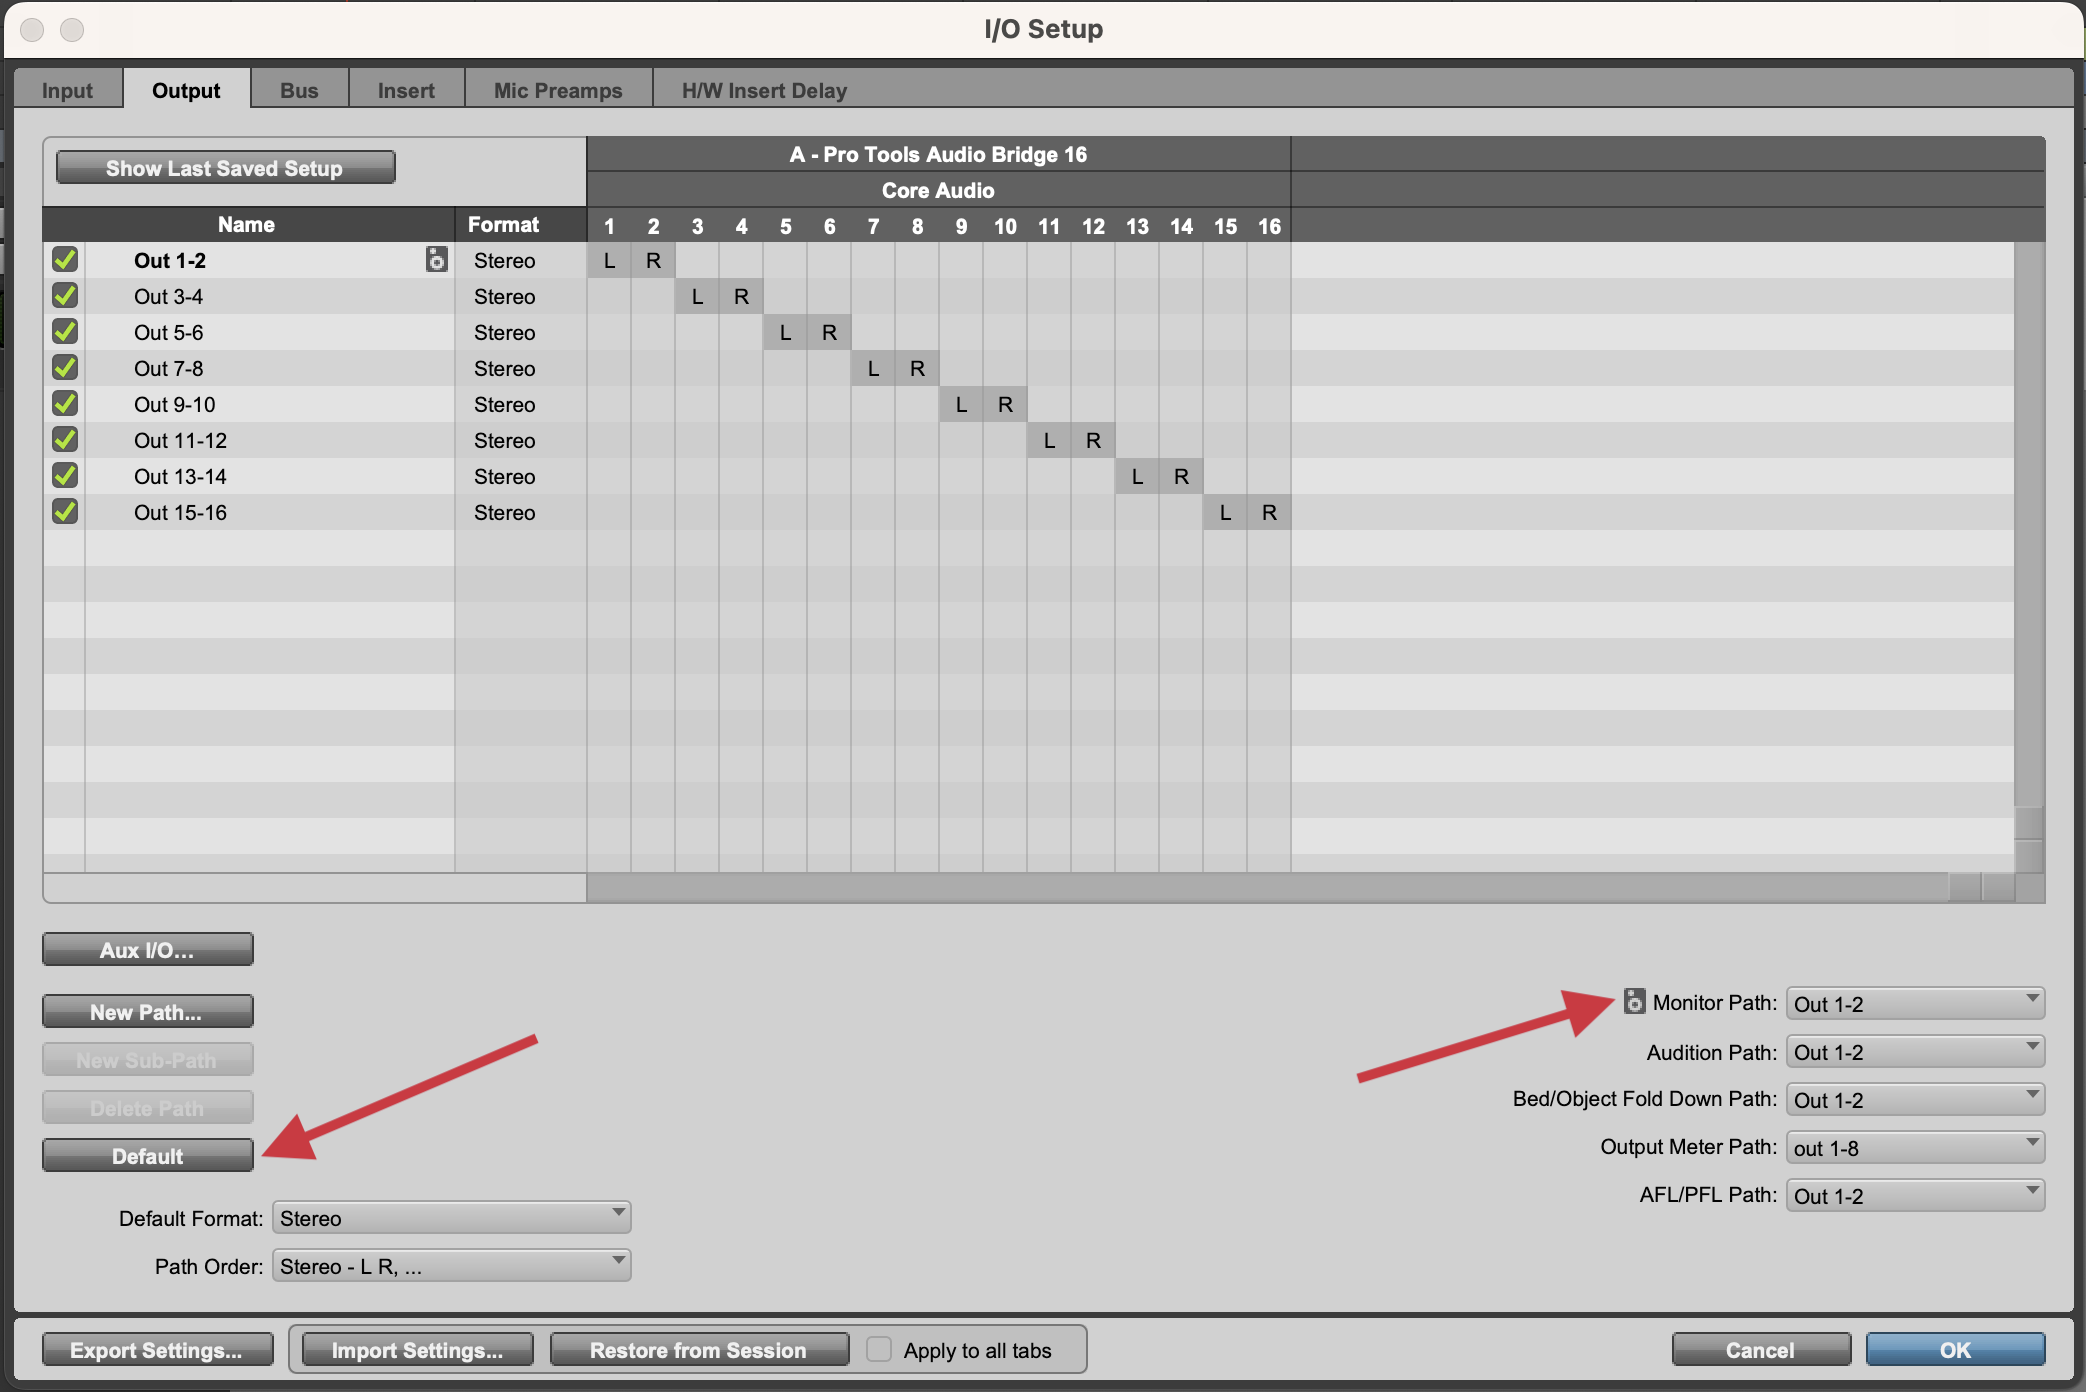
After selecting the new playback engine, navigate to the I/O Setup window by going to Setup > I/O. In general, the input and output tabs of the resulting window shouldn't need to changed after selecting a new playback engine. However, if you previously made changes to the inputs and outputs, or would like to set them to their default value for good measure, you can press the Default button under both the Input and Output tabs.
Alternatively, you can create your own I/O setup using the New Path button. In most scenarios this is unnecessary, but may be useful for troubleshooting purposes. To create a new input or output path, click the New Path button on the respective tab. You will then have several options, including number of paths, format, name, etc. Most workflows use stereo paths with automatically-created subpaths. You can create the new path by selecting your desired options, then clicking the Create button.
After the path(s) are created, you can move the gray box(es) to the desired input or output number listed at the top of the screen to map the paths to your audio device. If you have created a stereo path, you will need to click-and-drag both the left and right channels to their desired input or output.
You can also set the monitor path (or main output) of your session by selecting it from the dropdown menu on the bottom right of the Output tab. By default, this is usually set to Output 1 and Output 2, and this is typical for most sessions.
3. Set Busses
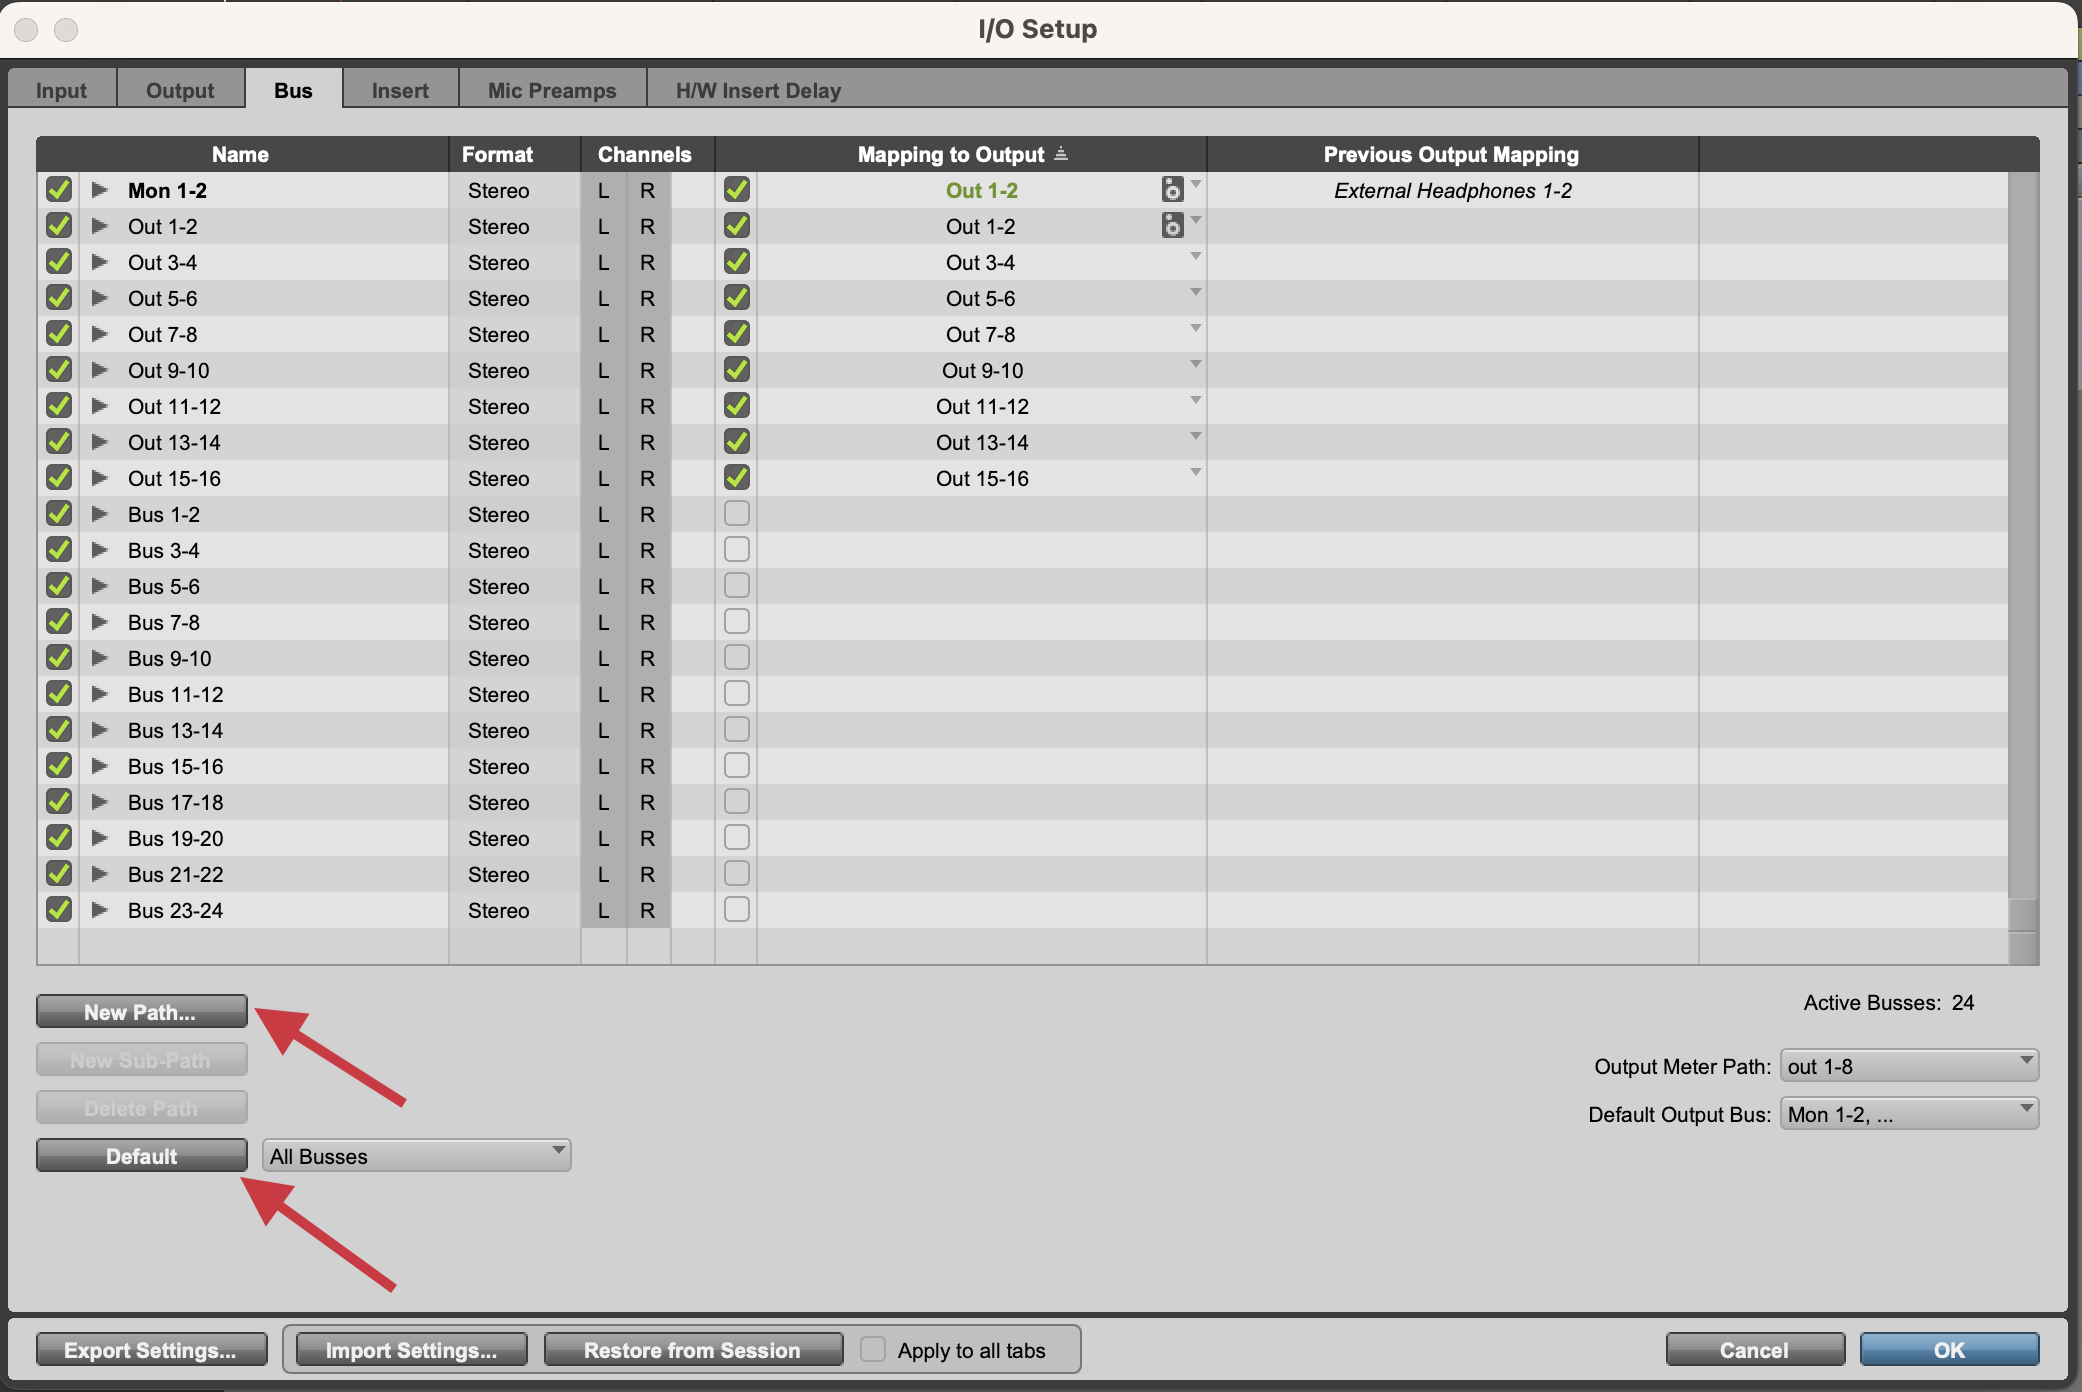
The Bus tab in the I/O Setup window handles all busses in Pro Tools, including internal busses and busses that are mapped to hardware outputs. Unlike the Input and Output tabs of the I/O Setup window, the Bus tab can easily become a mess when switching between sessions and playback engines, as the busses mapped to outputs are not automatically deleted by default. Thankfully, like the Input and Output tabs, this can be easily reset by using the Default button.
The Bus tab is one area where it is often necessary to create more internal busses using the New Path button. You can create an infinite amount of internal busses for routing inside Pro Tools, and it's not uncommon for sessions with complex routing to require the creation of more busses.
Busses that are mapped to outputs are often a point of confusion; essentially, these are busses that are intermediary busses between the output paths created in the Output tab and the physical outputs of your audio device. If there is not a bus mapped to an output for a specific output path, it will not be a selectable output for any tracks. For this reason, every output you have created in the Output tab needs a corresponding bus that is mapped to a physical output.
Once your I/O is set up, you can begin routing audio in your Pro Tools session. There are many ways to route audio within, into, and out of Pro Tools. Below are some examples of these scenarios with descriptions of how you would route them.
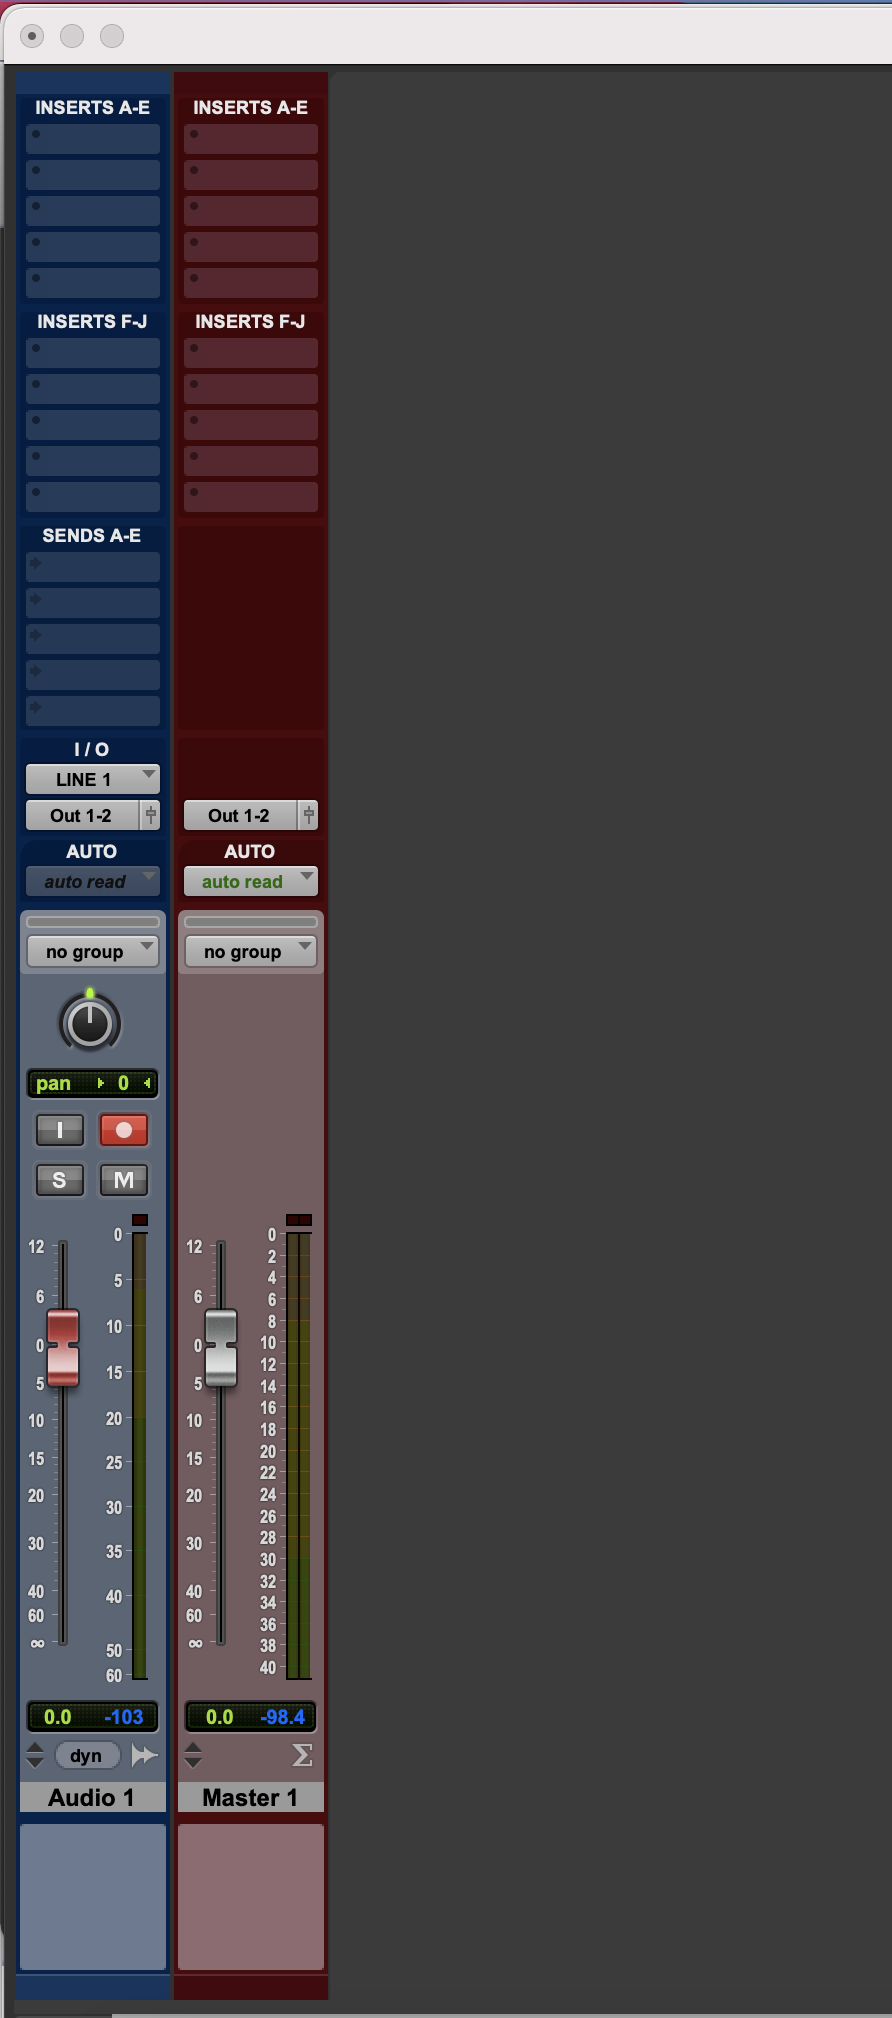
Single Track Basic Recording
In this scenario, you would use:
- Single Audio Track
- Input: The input that the mic/instrument is connected to
- For example, if your microphone is connected to Channel 1 on your audio interface, you would select Input 1. For Channel 2, you would select Input 2, etc.
- Output: Main Output path (for example, Output 1-2 on most interfaces)
- Input: The input that the mic/instrument is connected to
- Master Fader (Optional)
- Output: Main Output path
With this routing configuration, the audio goes into the audio track, through the Master Fader, and out your main output path.
Multi-Track Basic Recording
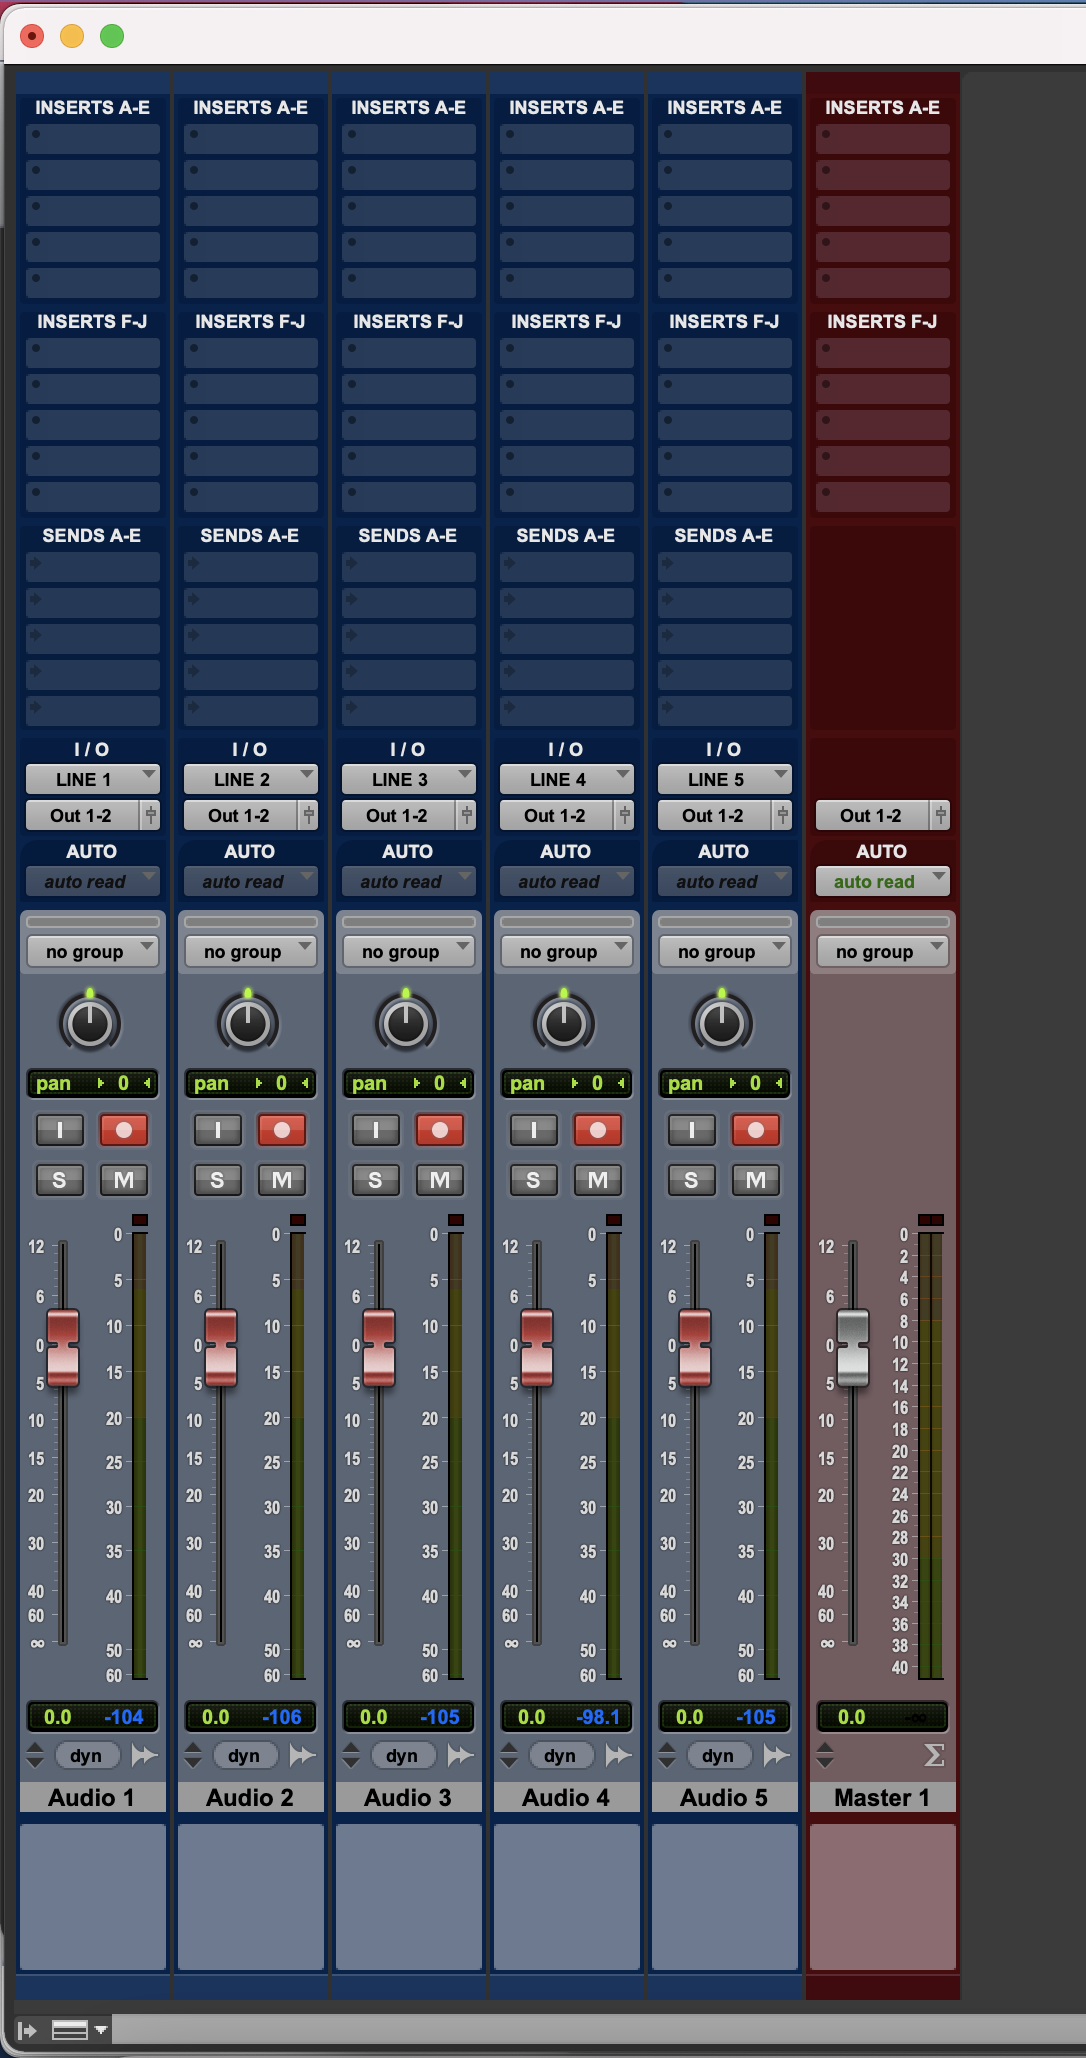
In this scenario, you would use:
- Multiple Audio Tracks
- Inputs: Cascaded inputs that the microphones are connected to
- For example, select Input 1 for the microphone connected to Channel 1 on your audio interface; for Channel 2, select Input 2, etc.
- Output: Main output path (for example, Output 1-2 on most interfaces)
- Inputs: Cascaded inputs that the microphones are connected to
- Master Fader (Optional)
- Output: Main Output path
With this routing configuration, each individual signal goes through its own audio track, then every track is combined into and sent through the master fader. This combined signal is then sent out of your main output path.
Sub-Grouping
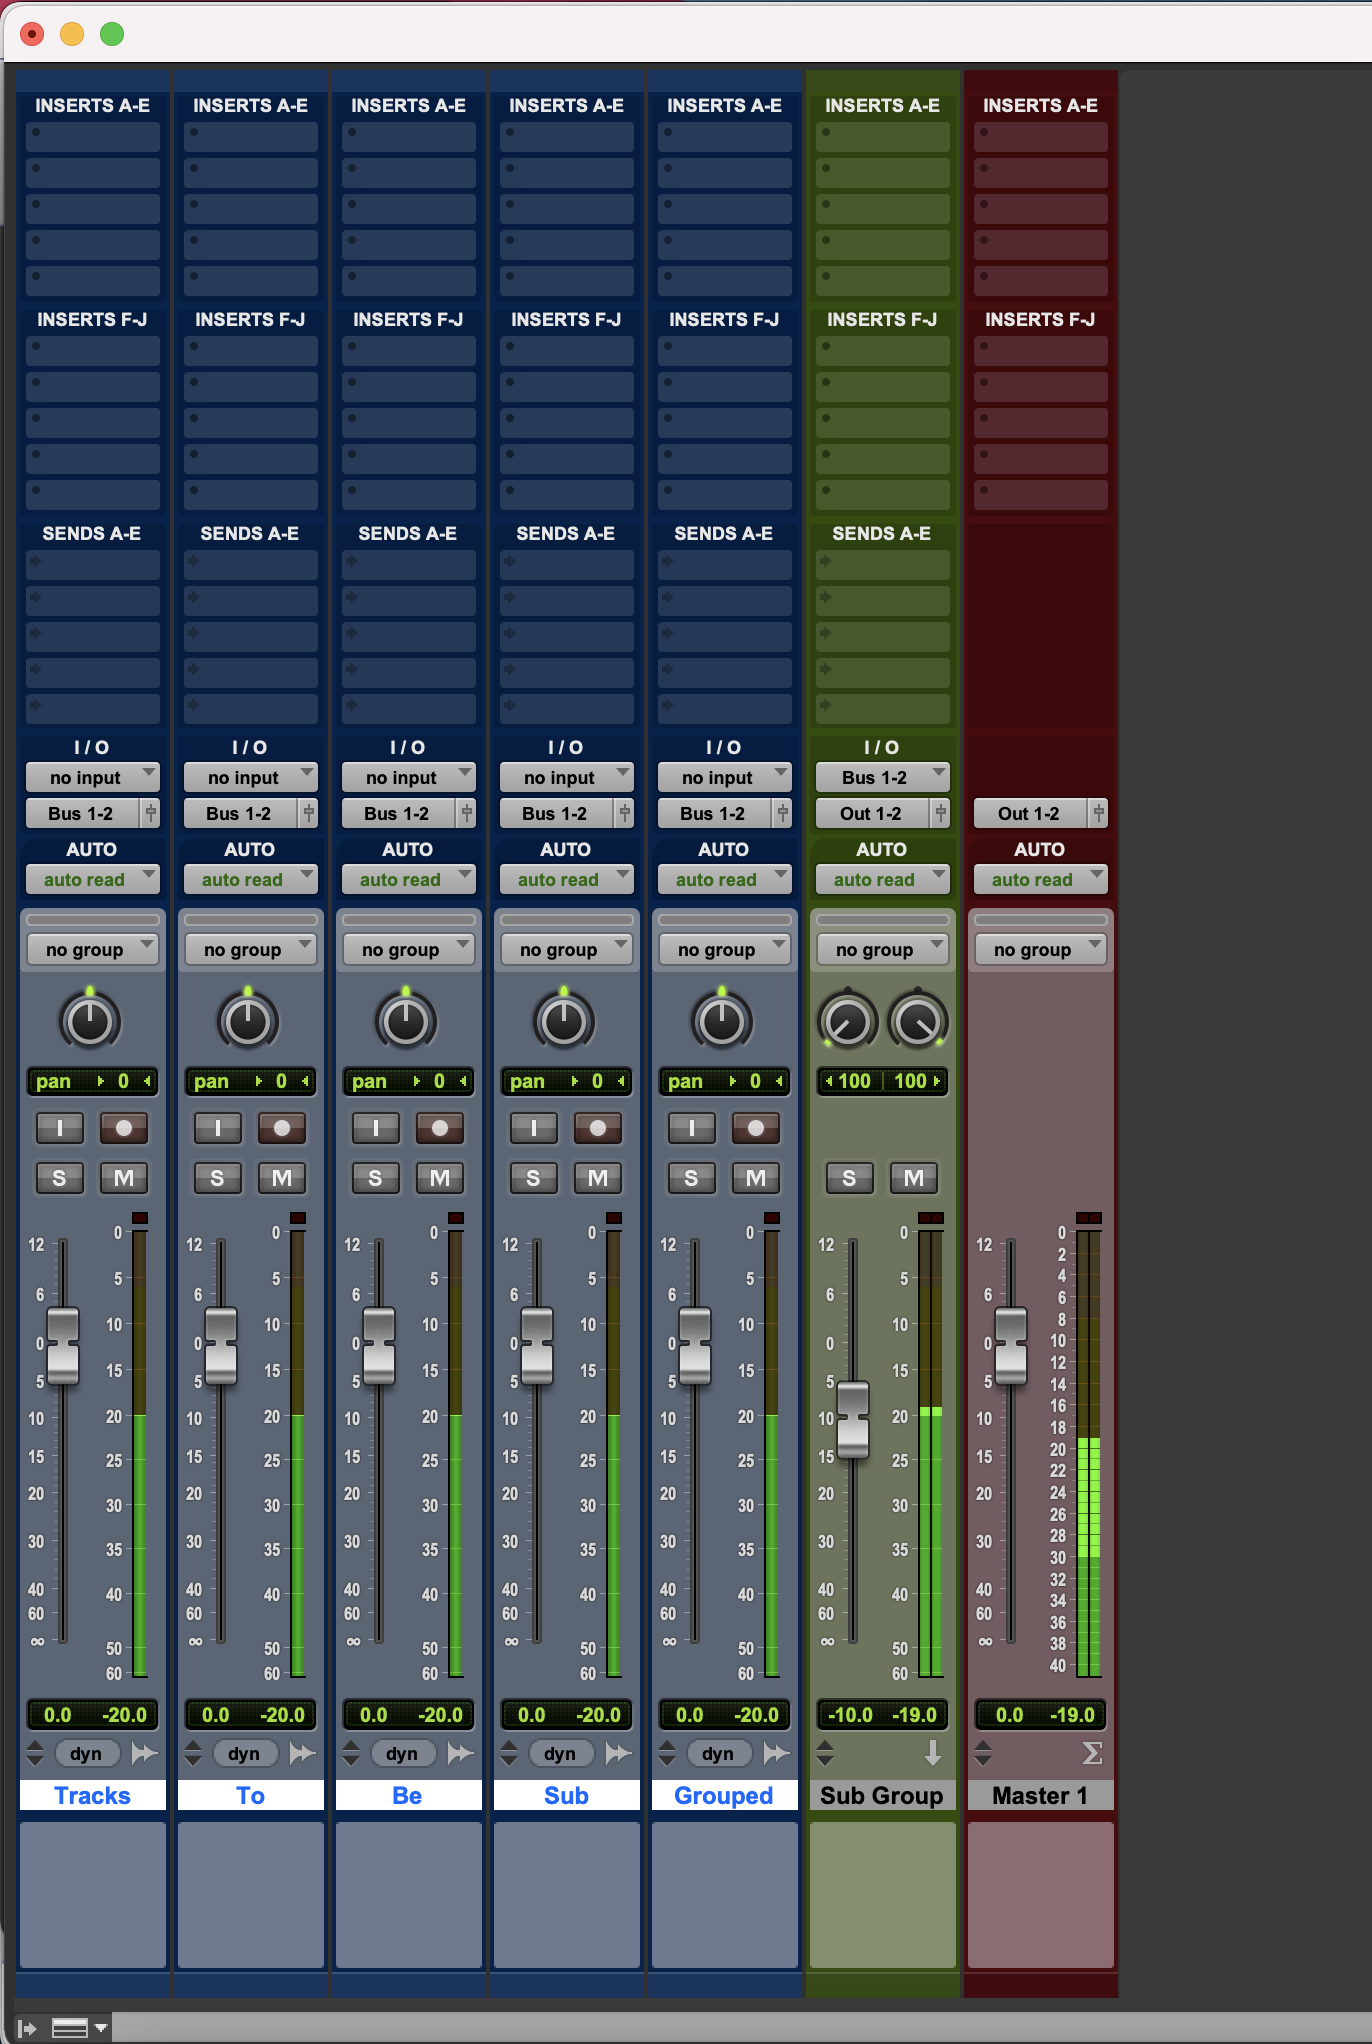
You can use auxiliary tracks (called Aux tracks in Pro Tools) and internal busses to create sub-groups of tracks that can be controlled on a single fader. To do this, you would use:
- Multiple Audio Tracks
- Inputs: Any
- Output: Internal Bus Output (for example, Bus 1-2)
- Sub-group (Aux Track)
- Input: Internal Bus Input used by audio tracks (for example, Bus 1-2)
- Output: Main Output path (for example, Output 1-2 on most interfaces
- Master Fader (Optional)
- Output: Main Output path
With this routing, each audio track is sent through and combined into its assigned sub-group, which is then fed to the Master Fader. The signal from the Master Fader is then sent out your main output path.
Effects Sends
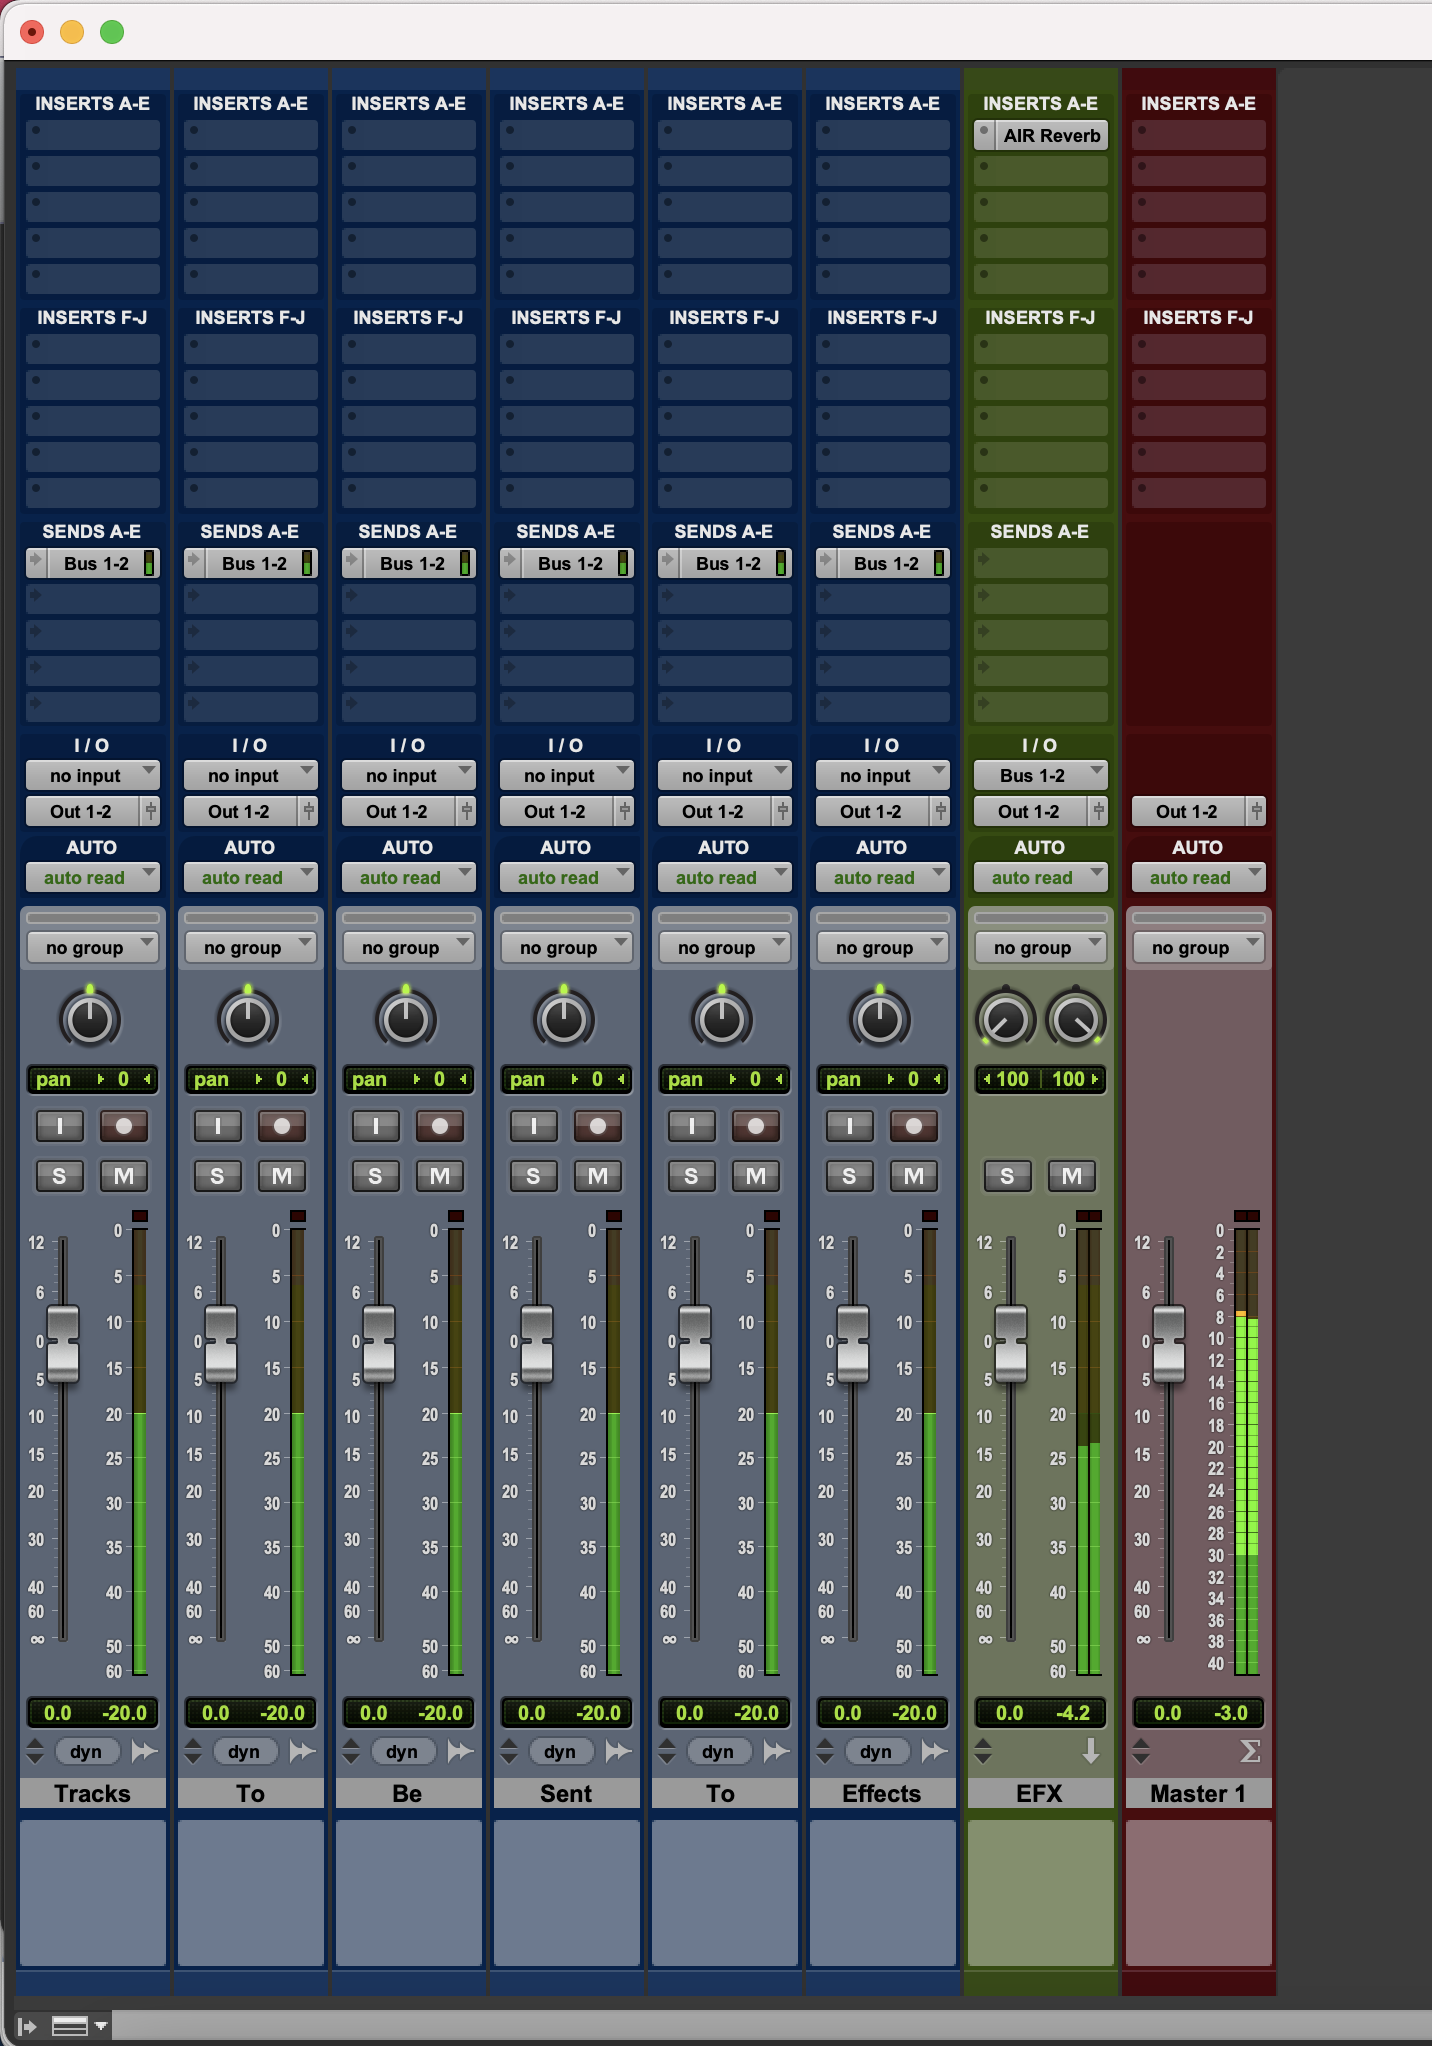
You can use Aux tracks, internal busses, and track sends to create effects tracks that operate independently from the track feeding them. To do this, you would use:
- Audio Track
- Inputs: Any
- Send: Internal Bus
- Output: Any
- Effect Track (Aux Track)
- Input: Internal Bus Input used by audio tracks (for example, Bus 1-2)
- Output: Main Output path (for example, Output 1-2 on most interfaces
- Master Fader (Optional)
- Output: Main Output path
With this routing, each audio track is combined and sent into its assigned subgroup, which is then fed to the Master Fader. The signal from the Master Fader is then sent out your main output path.
Preparing for Recording
Now that your I/O and playback engine are set up, you will need to create tracks and route them properly.
- By default, newly-created Pro Tools sessions are blank. To add a new audio track for recording, navigate to Track > New, or press Command + Shift + N on Mac, or Control + Shift + N on Windows.
- In the resulting New Tracks dialogue, change the options in the dropdown menus to ensure the dialogue reads new Mono Audio Track in Samples. You can also choose to change the amount of tracks you are creating by changing the number next to Create, then rename the track(s) by changing the name next to Name.
- Click Create to create the new track(s).

There are specific scenarios where you would want to create a stereo track instead of a mono track, such as when recording the stereo output of a synthesizer. However, in any case that uses a single microphone or instrument input, you will need to create a mono track.
- If you did not rename the track(s) in the New Tracks dialogue, you can do so now by double-clicking the name of the newly-created track, entering a new name, then clicking OK.

- Ensure the correct input and output are selected in the I/O section of your newly-created track. In most scenarios, the input of the track should correspond to the input that the microphone or instrument is plugged into on your interface, and the output should be set to your main output. To change the input or output, click the input or output name and select the proper source or destination from the dropdown list.
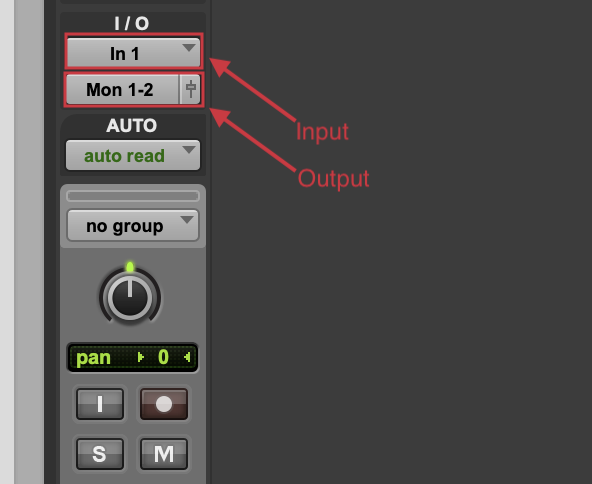
- If you are recording guitar and want to use an amp simulator such as AmpliTube, you should instantiate that on the track now. See the note below for instructions on how to do instantiate a plug-in.
How to Instantiate a Plug-in
How to Instantiate a Plug-in in Pro Tools
Plug-ins can be instantiated from either the Mix or Edit window in Pro Tools. In the example below, the Mix window will be used.
Note
If you do not see the Inserts A-E view on the Mix or Edit window, select View at the top of the window, hover over Mix Window Views or Edit Window Views, then click Inserts A-E.
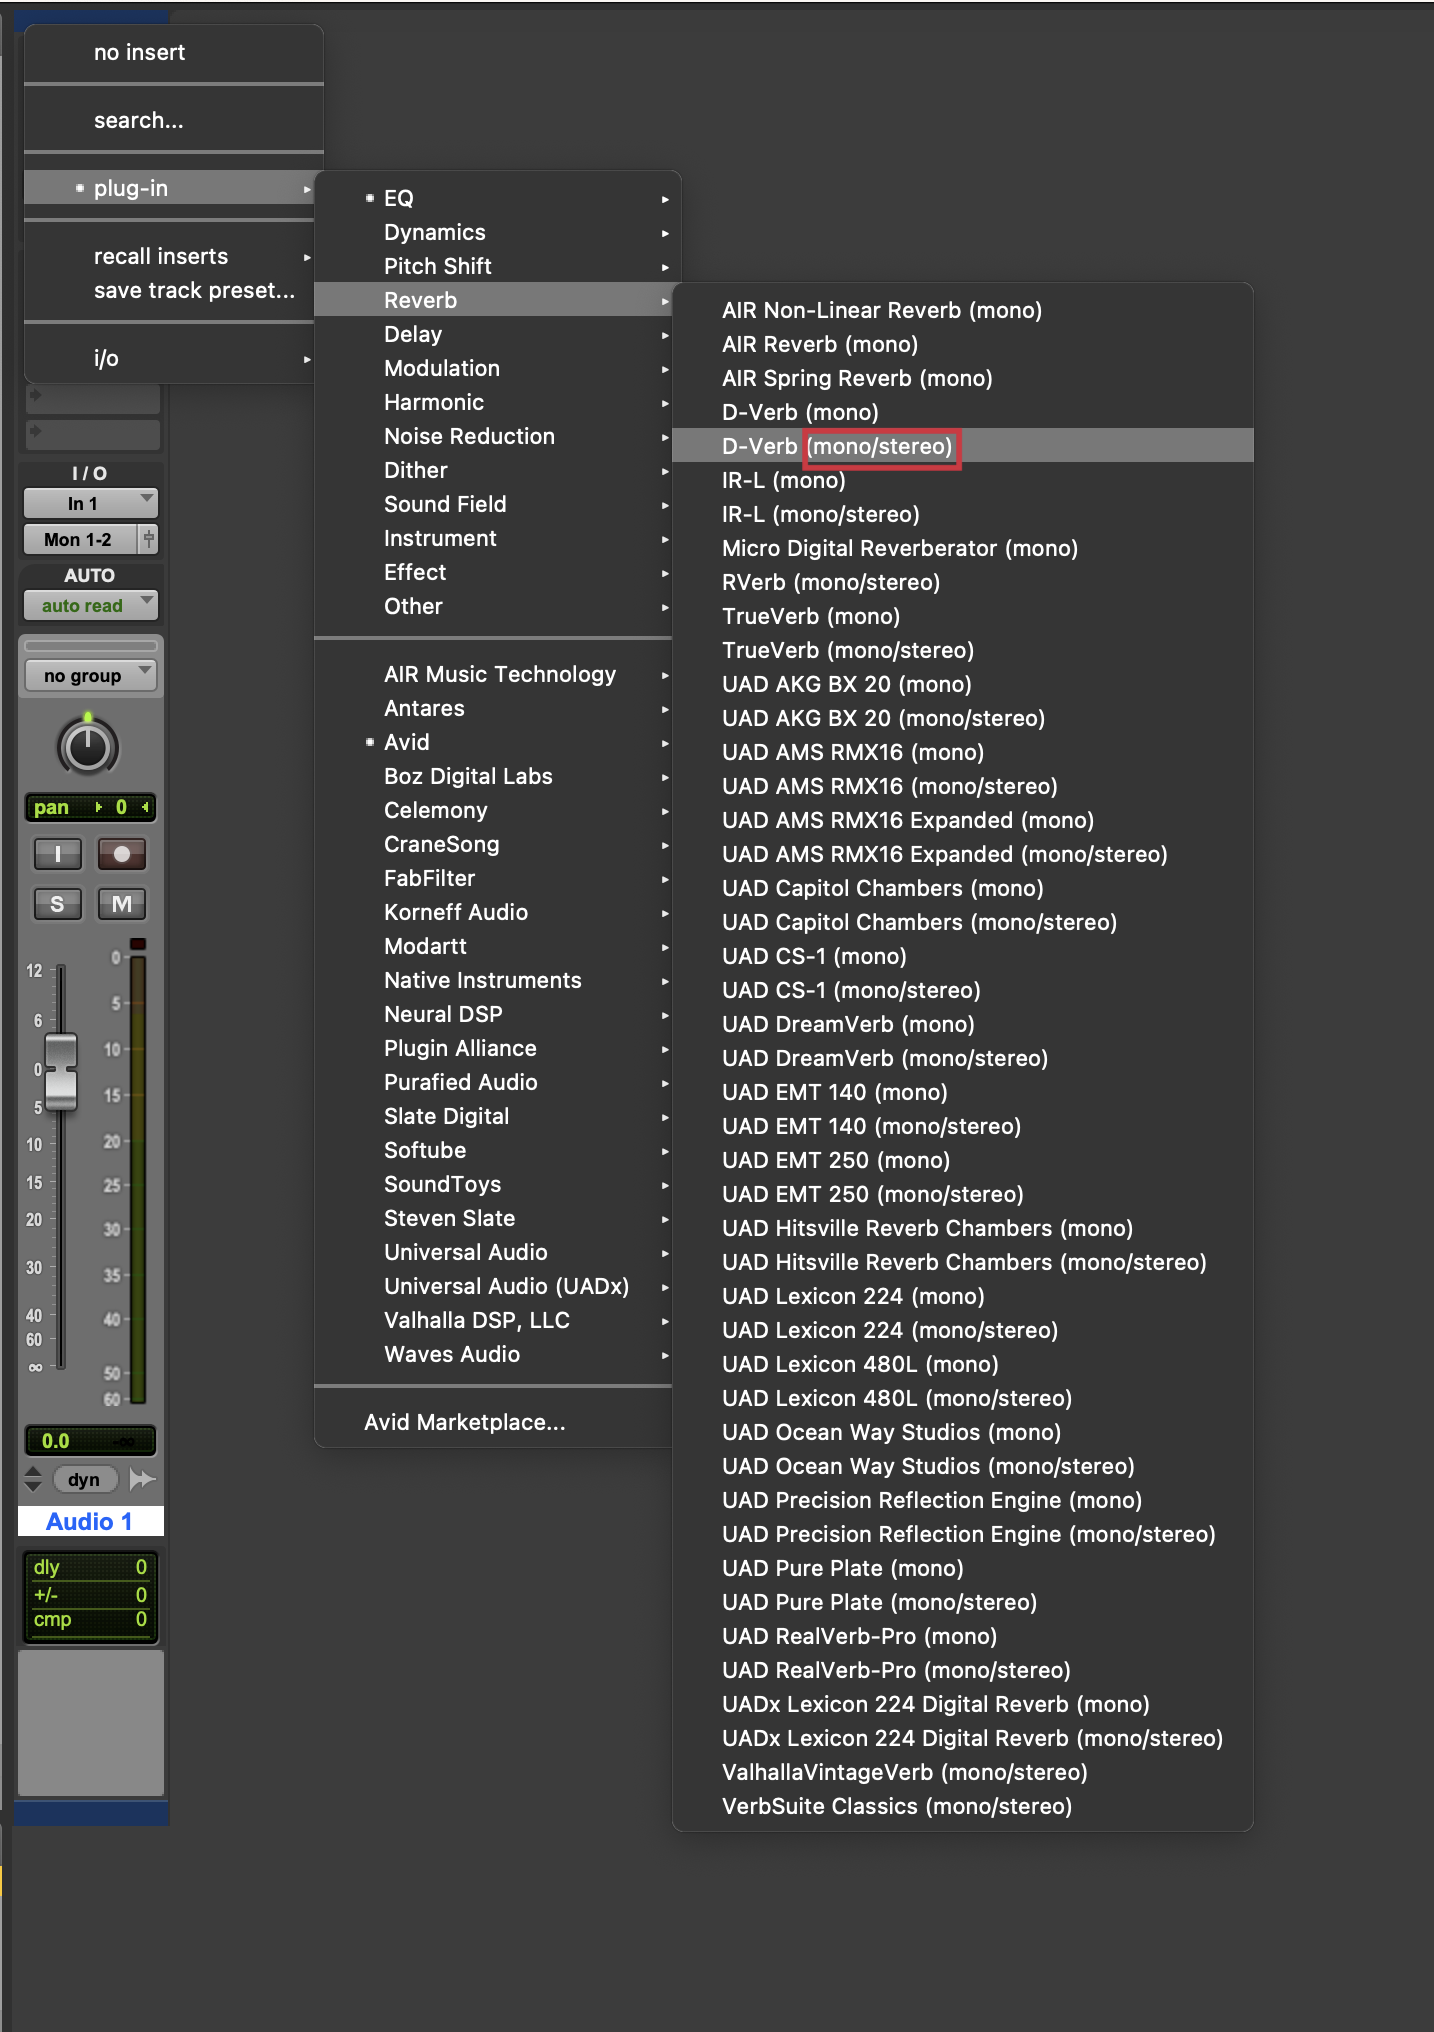
- Locate the track on which you want to instantiate a plug-in, then click one of the empty slots under Inserts A-E (or Inserts F-J).

- Hover over the plug-in menu item; this will display your available plug-in categories and/or manufacturers (depending on your settings).
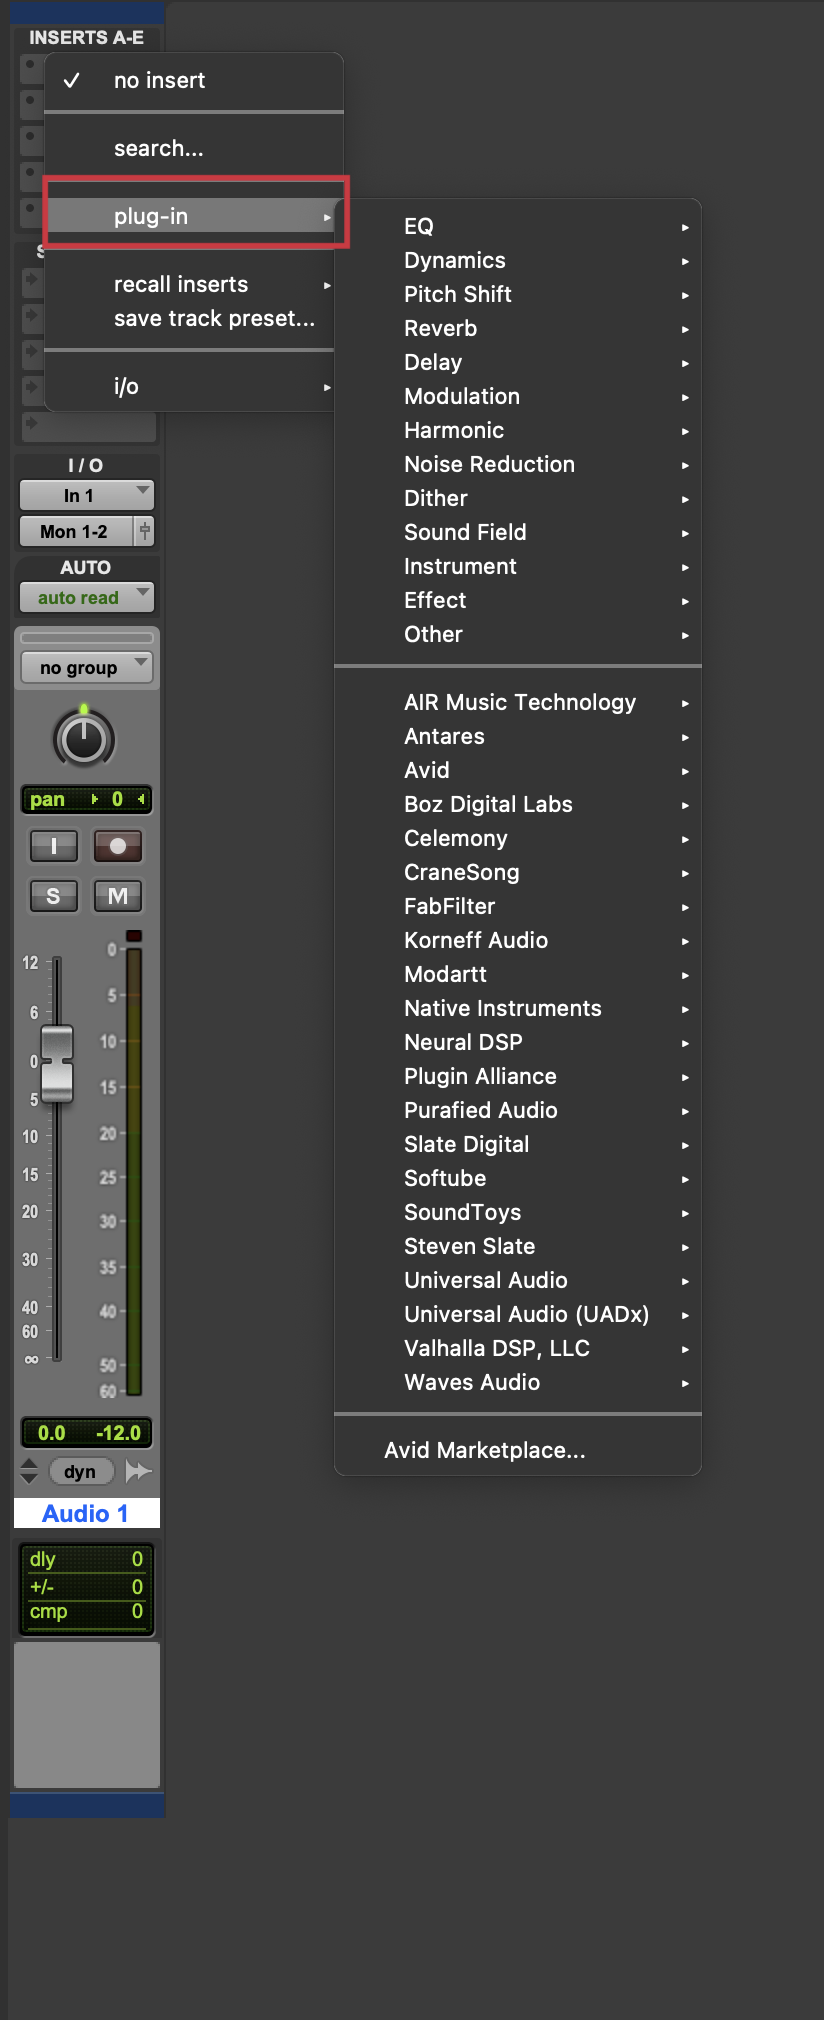
- Hover over a plug-in category or manufacturer to display the plug-ins available in that category. Click on a plug-in to instantiate it on the track, which will open its interface in a new window.
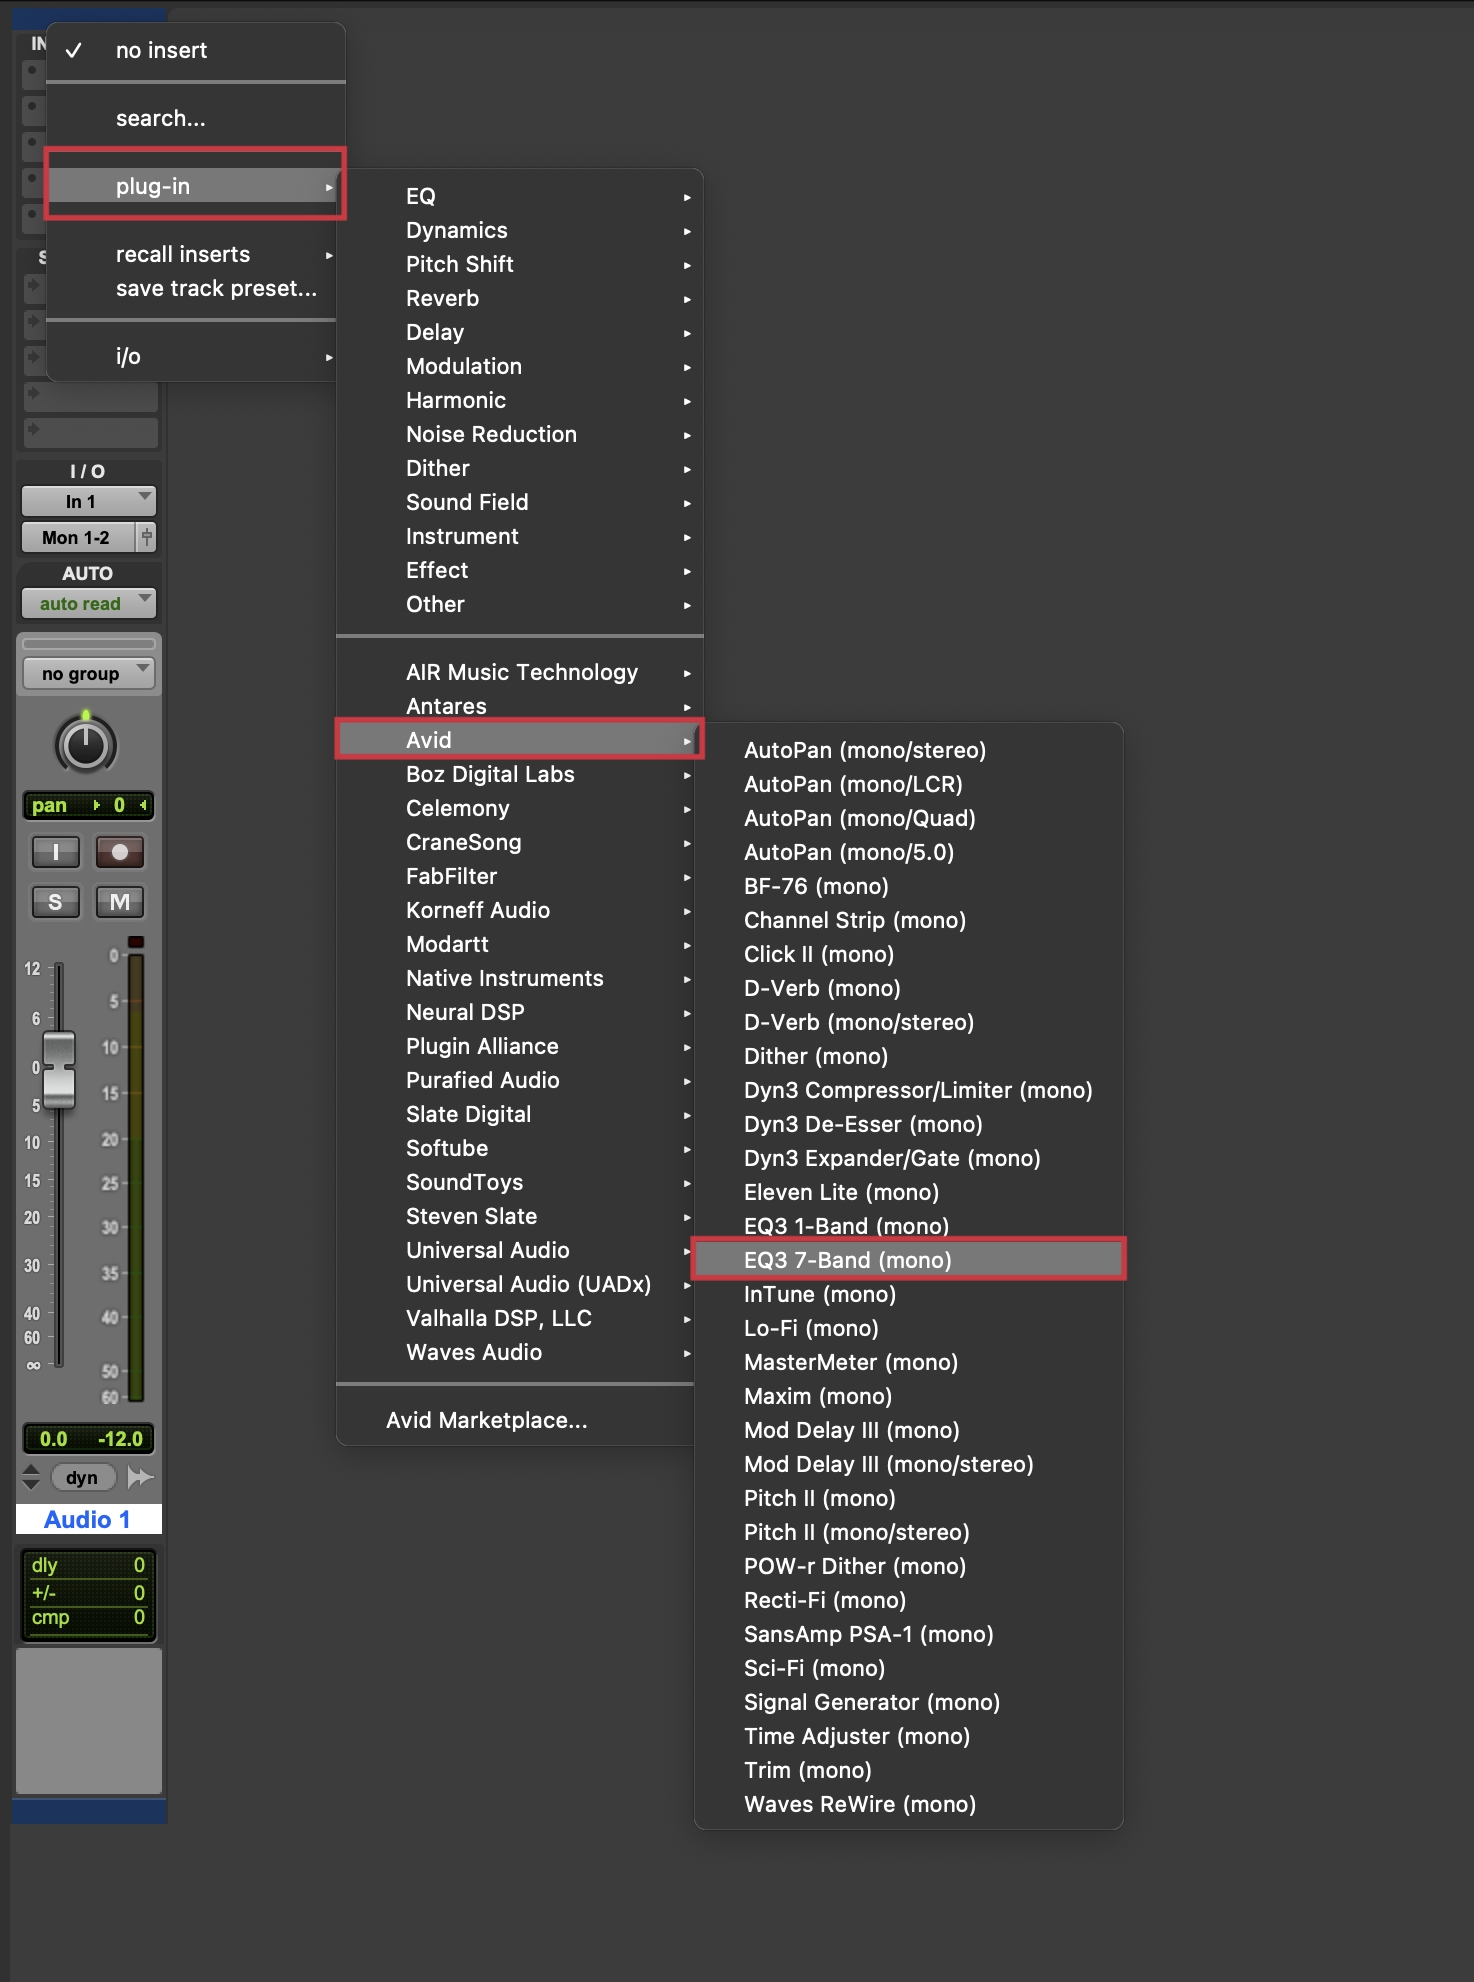
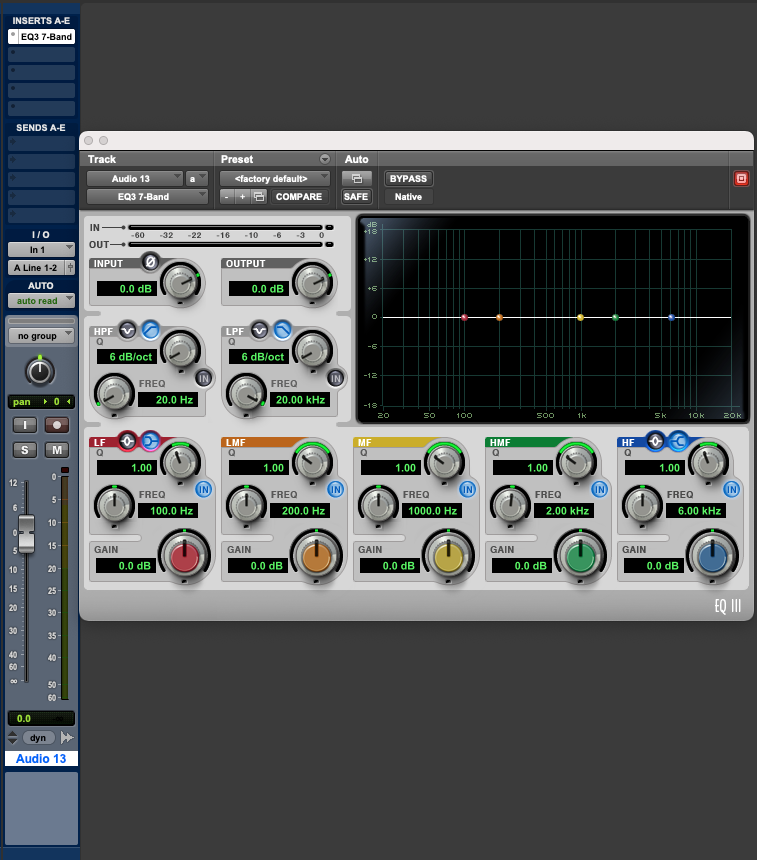
The plug-in has now been instantiated on your track. The plug-in window can be closed by pressing the X at the top left of the window, and re-opened by clicking the plug-in name on the track.
It is worth noting that some plug-ins, when instantiated on a mono track, will give the option to open a stereo version of the plug-in. This is denoted by the (mono/stereo) being present at the end of the plug-in name. Selecting this option on a mono track will convert the track to a stereo track. This option is mainly present on stereo effects, such as reverbs and delays; the example shown below is a stereo reverb.
- If you are recording over a backing track, import it using the instructions below.
How to Import an Audio File into Pro Tools
How to Import an Audio File into Pro Tools
- Open the Import Audio dialogue by clicking File > Import > Audio. Alternatively, press Command + Shift + I (Mac) or Ctrl + Shift + I (Windows).
- In the dialogue, navigate to and click the file you wish to import; it should appear in the Clips in Current File box.
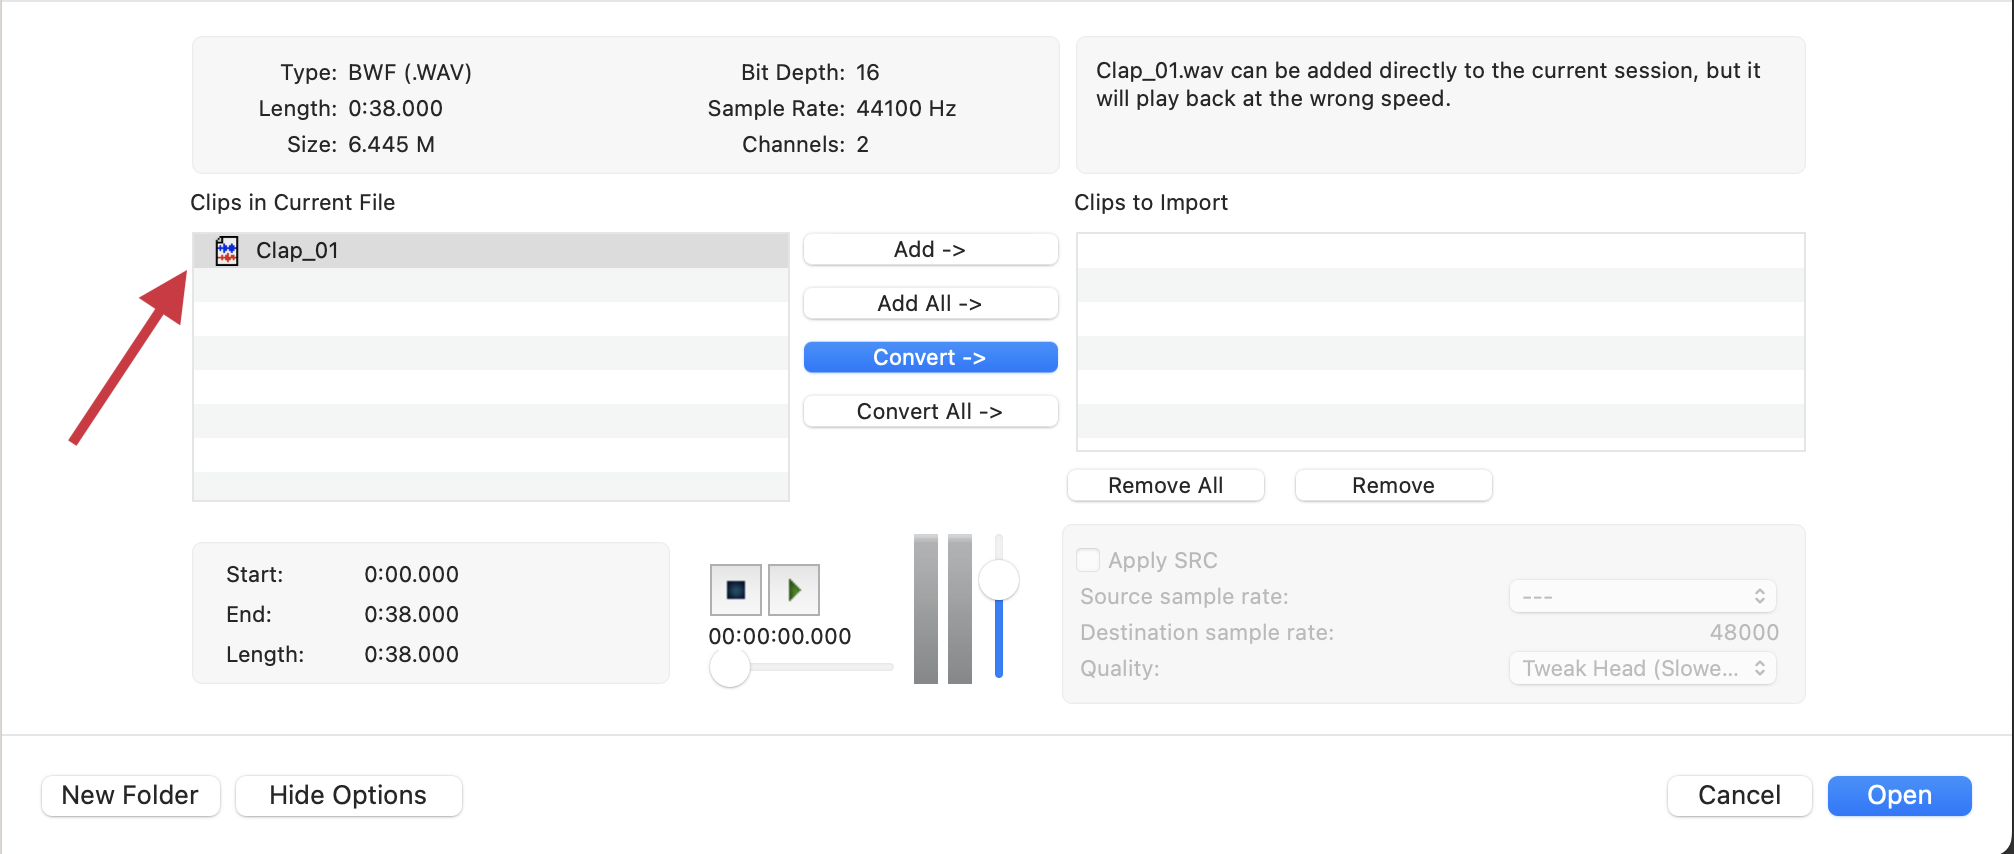
Depending on the type of file selected, you will be presented with different import options: Add, Copy or Convert, as well as each option with All added to it. In most cases, you will want to select Copy or Convert; both of these options will create a copy of the audio file and place it in the audio files folder of your Pro Tools session. If you select Add, the file will remain in its original location, which may present issues if you move your Pro Tools session to another machine.
- Select your desired import option; the file will then move to the Clips to Import box.
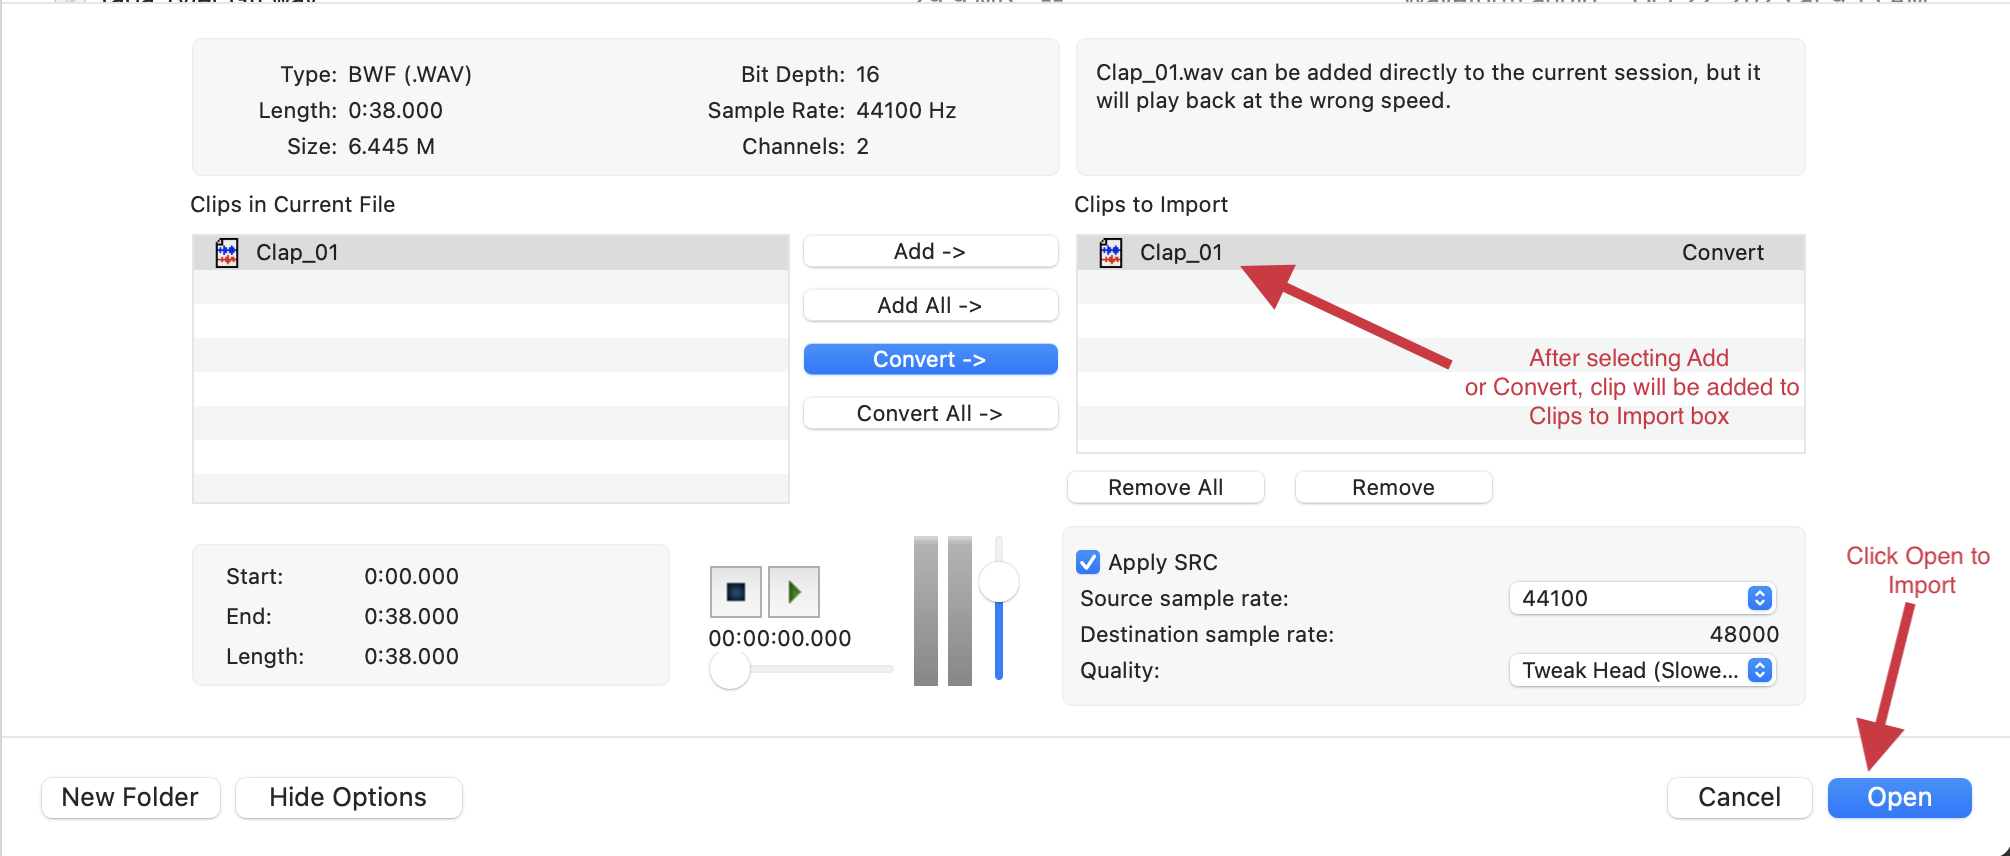
- Select Open; if you selected Convert or Copy, you will be prompted to choose a destination for the copied or converted file. In most cases, you will to add it to the session's Audio Files folder.
- You will then be prompted to either add the file to a new track or to the clip list, as well as the file's location in the session. In most instances, you will want to select New Track and Session Start.
Recording
Now that your session is prepared, you can begin recording.
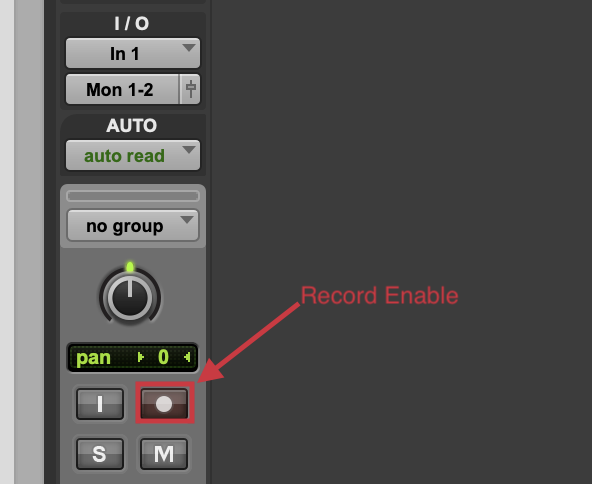
- Record-enable your track by pressing the track record enable button (the red square with white circle inside it). This record-enable button should blink red, indicating the track is armed for recording.
- Press the session record enable button in the transport area to record-arm the session.

- To begin recording, press the space bar on your keyboard or the green play button in the transport. To stop recording, press the space bar again or press the stop button in the transport.


- After recording a clip, you can repeat the above steps to create and record to a new track. Once you have finished your recording, you can export your recording using the instructions below.
Bouncing an MP3 of Your Recording
How to Export an MP3 File from Pro Tools
Once you have finished a project in Pro Tools, you can export an MP3 version of your project by taking the steps below.
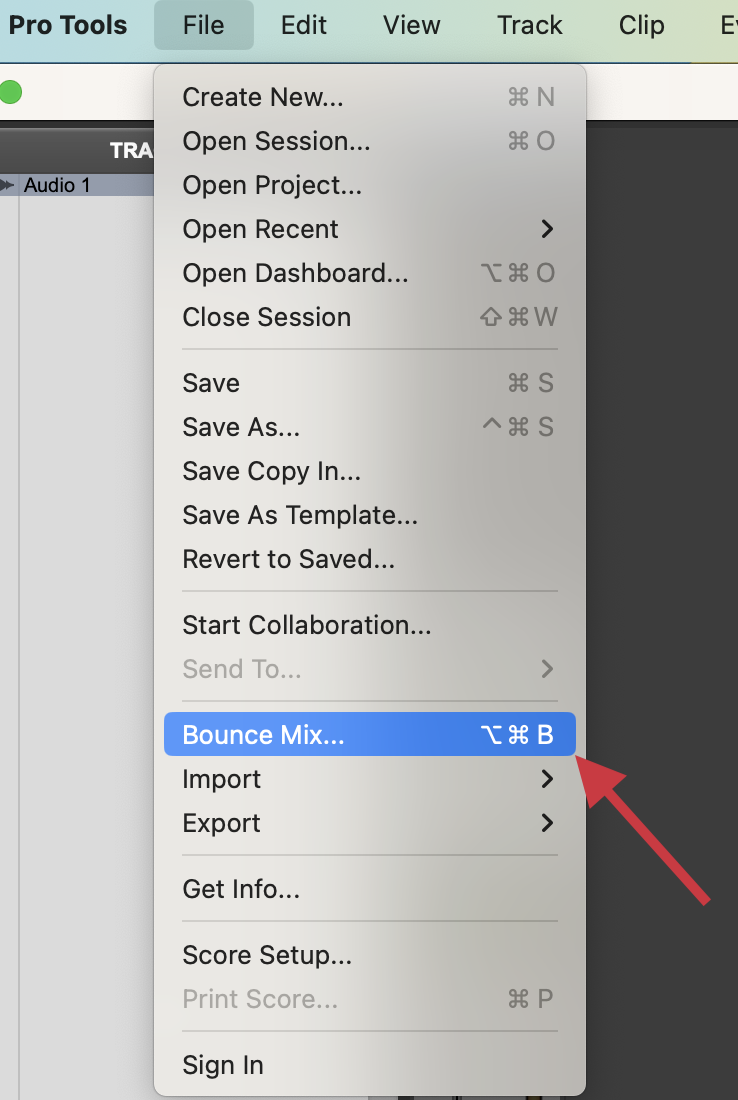
- Click File > Bounce Mix…
- The resulting window will have a variety of export options available; to simply export an MP3, ensure File Type is set to MP3. Most other settings can be adjusted to your preference, such as the File Name, File Location, and the Offline Bounce option.
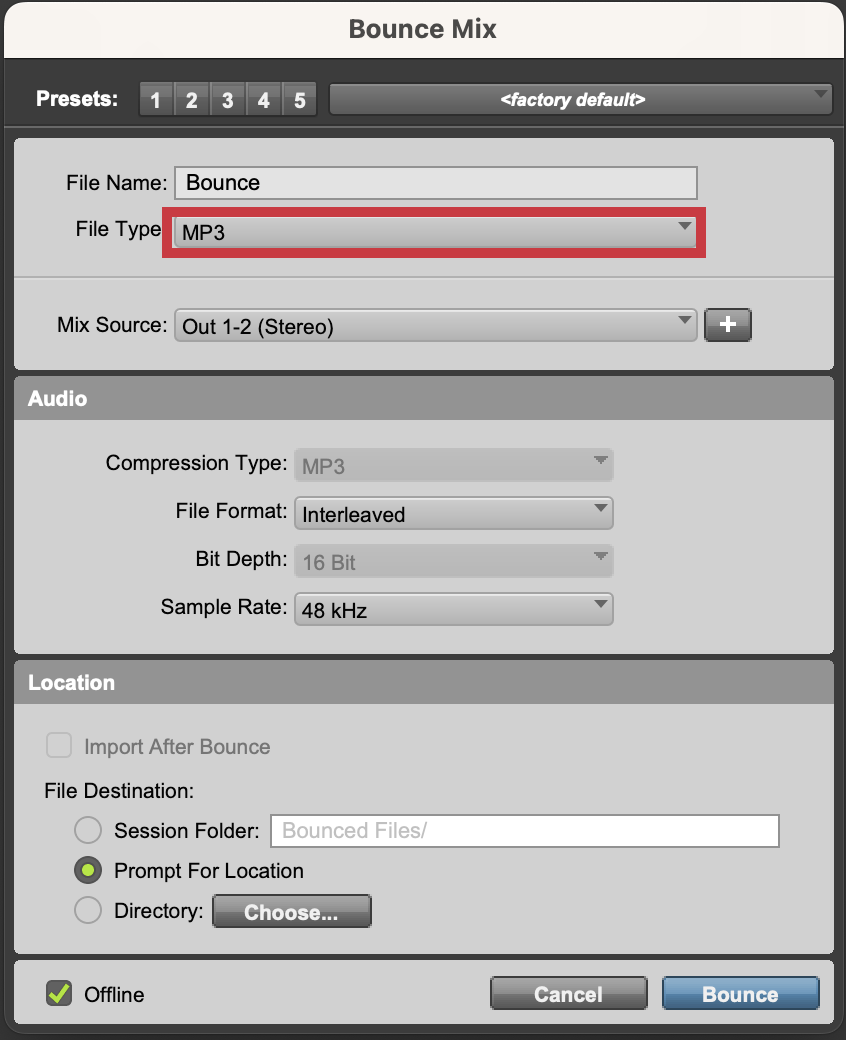
In most instances, you will want to have Offline checked in the Bounce Mix window. This will bounce the mix as fast as possible versus printing it in real time.
- Click Bounce.
- Once the file has finished bouncing, you can then find the resulting MP3 file by navigating to the location on your machine where you chose to save the file in Step 2.

