


From Polar Patterns to Phase, Try Live Drum Miking That Really Works
The following information on drum mics and miking drums is excerpted from the Berklee Online course Microphone Techniques for Live Sound Production, written by Ben Cochran and Ken “Pooch” Van Druten, and currently enrolling.
Choosing the correct microphone for the job is key to achieving excellent mix results. Nowhere is this more apparent than when you’re miking a drum kit for a live concert. In this article we’ll discuss which drum mics have the best rear rejection and tightest polar patterns in order to counteract the negative effects of drum fill stage monitors. We will also discuss the most popular drum mics, and why they are so widely used by live sound engineers. Basically, we’ll show you the right way (and the wrong way) to mic a drum kit.
Choosing the Right Drum Mics for a Drum Kit
Before we get into the nuts and bolts of drum microphone choices and placement, it cannot be stressed enough that superb sound starts with a great sounding drum kit. The ingredients required are high-quality manufactured drums, undamaged drum heads, proper tuning, and a player with great tone production. All of these things are the first components for getting a good result. Remember that no amount of EQ, plug-ins, mic choice, or mic placement can substitute for an acoustically great-sounding kit and player. Drum head tuning is a true art form, and might be something that you might consider learning as a practical skill. Having the knowledge to assist in improving the acoustic sound of a drum kit can add great value when it comes time to choose and mic drums for a live performance.
One of the things to consider when making a decision on what microphone to use on a specific drum kit input is the frequency response of our microphone choice. Using microphones that have a narrow frequency response leads to less processing later in the chain. For instance, a small diaphragm condenser would be a great choice for a hi-hat microphone because of its inherent low frequency roll off. Small diaphragm condenser microphones tend to be more sensitive in the high end, so you are doing yourself a favor by making this microphone choice, as a hi-hat generally does not emanate frequencies below 200 Hz.
Drum Mics Inside or Outside the Bass Drum—What Works for Live Sound
Generally the kick drum is the only drum that we tend to mic inside of the drum. The main reason that sound engineers do this is to get the snap and body out of the drum while isolating it from all the other parts of the kit. This is especially important in live sound, as we have learned that anytime you can isolate a microphone from extraneous sounds, the better it will be. The rub here is that low frequency wavelengths are long. The wavelength of an airborne audio frequency of 60 Hz is close to 19 feet!
So how does a microphone pick up low frequencies of instruments like a kick drum? The energy transfer at a microphone is quite efficient and works well regardless of frequency because the microphone element responds to all pressure differences, regardless of frequency.
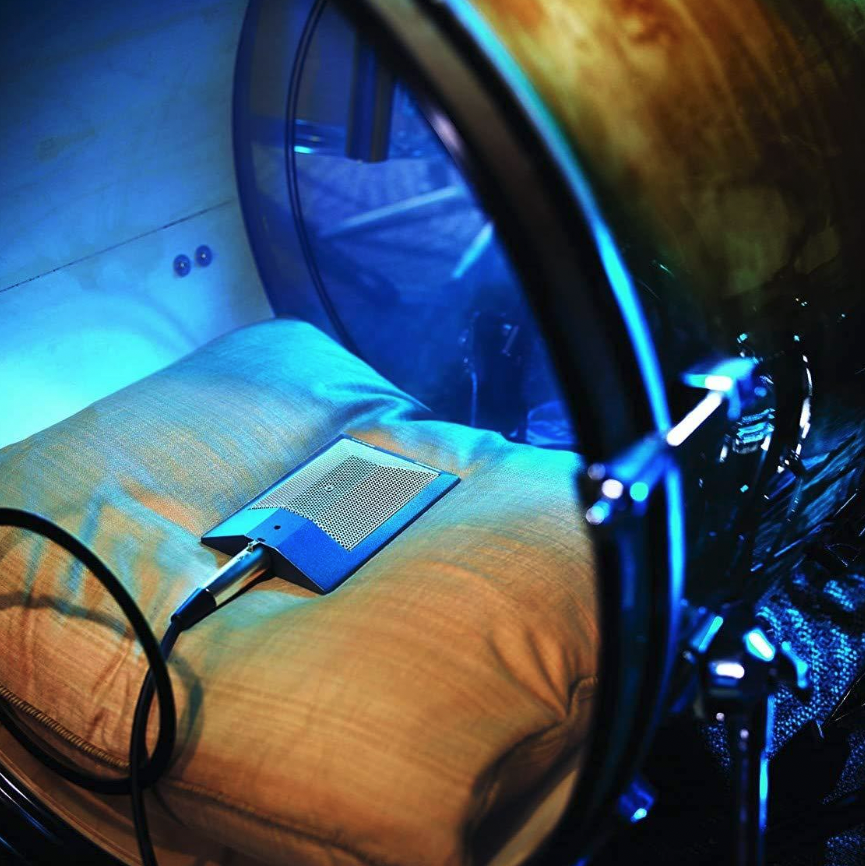
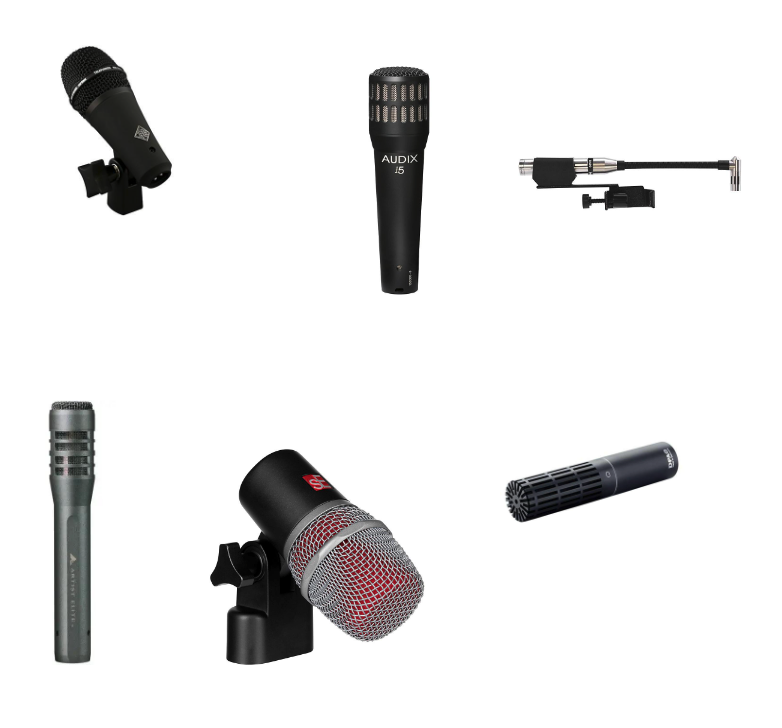
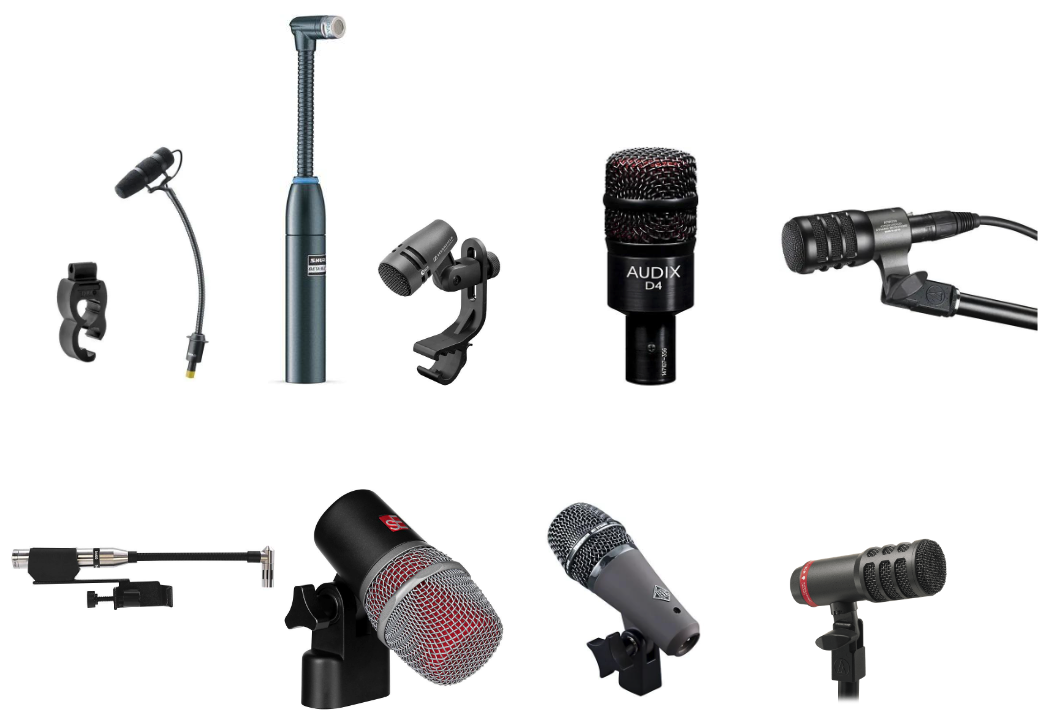
The most common drum mic used inside of a kick drum in live sound is the Shure Beta 91A.
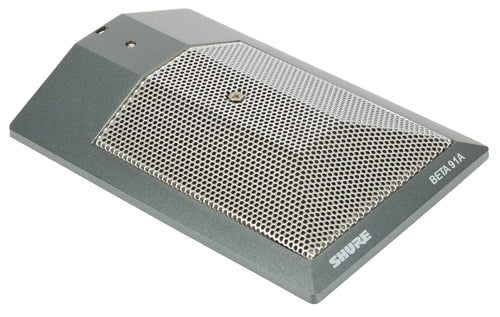
There are really two reasons that the Beta91a is the most common drum mic found inside of a kick drum. Its frequency response is tailored for the sound of a kick drum (especially when utilizing the mid range dip EQ switch).
Also because it is a boundary microphone it utilizes the surface it sits on, and creates a half space pickup pattern, allowing for more surface area of the kick drum head to be picked up by the microphone.
Microphones placed at distance from a kick drum are just asking for trouble when we are talking about live sound. We close mic everything in live sound, including the kick drum.
LEARN ABOUT THE SOUND ENGINEERING FOR LIVE EVENTS CERTIFICATE
So why do we see kick drum mics in recording and sometimes in live sound placed just outside of the drum? Often placing a microphone right in front of a bass drum will give you more impact than a microphone placed inside the drum. So in live sound using the term “outside” the bass drum generally means a microphone capsule that is still inside the drum but much further from the front head and “inside” microphone. Here are a couple of examples:
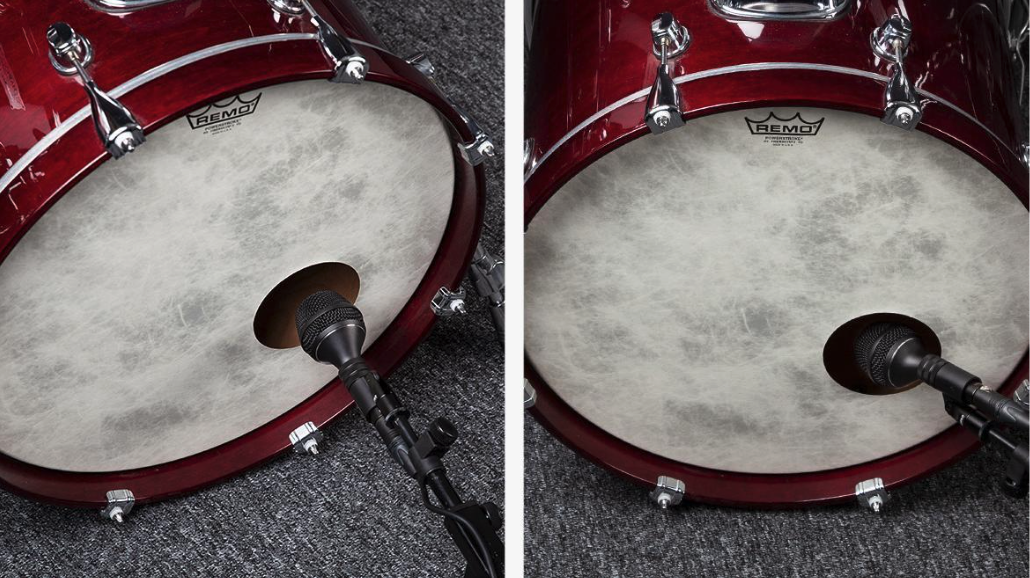
It is pretty common in live sound to use two microphones on the kick drum. Most engineers are looking to capture the “click” from the beater with one of the drum mics, and the “umph” of the air moving by such a large drum head with the other microphone. These are commonly called “Kick in” and “Kick out” drum mics because of their placement.
I have miked the front (beater side) of a kick drum with some success, but isolating a mic inside of a bass drum will probably lead to better success, and less ambient capture of the other drums.
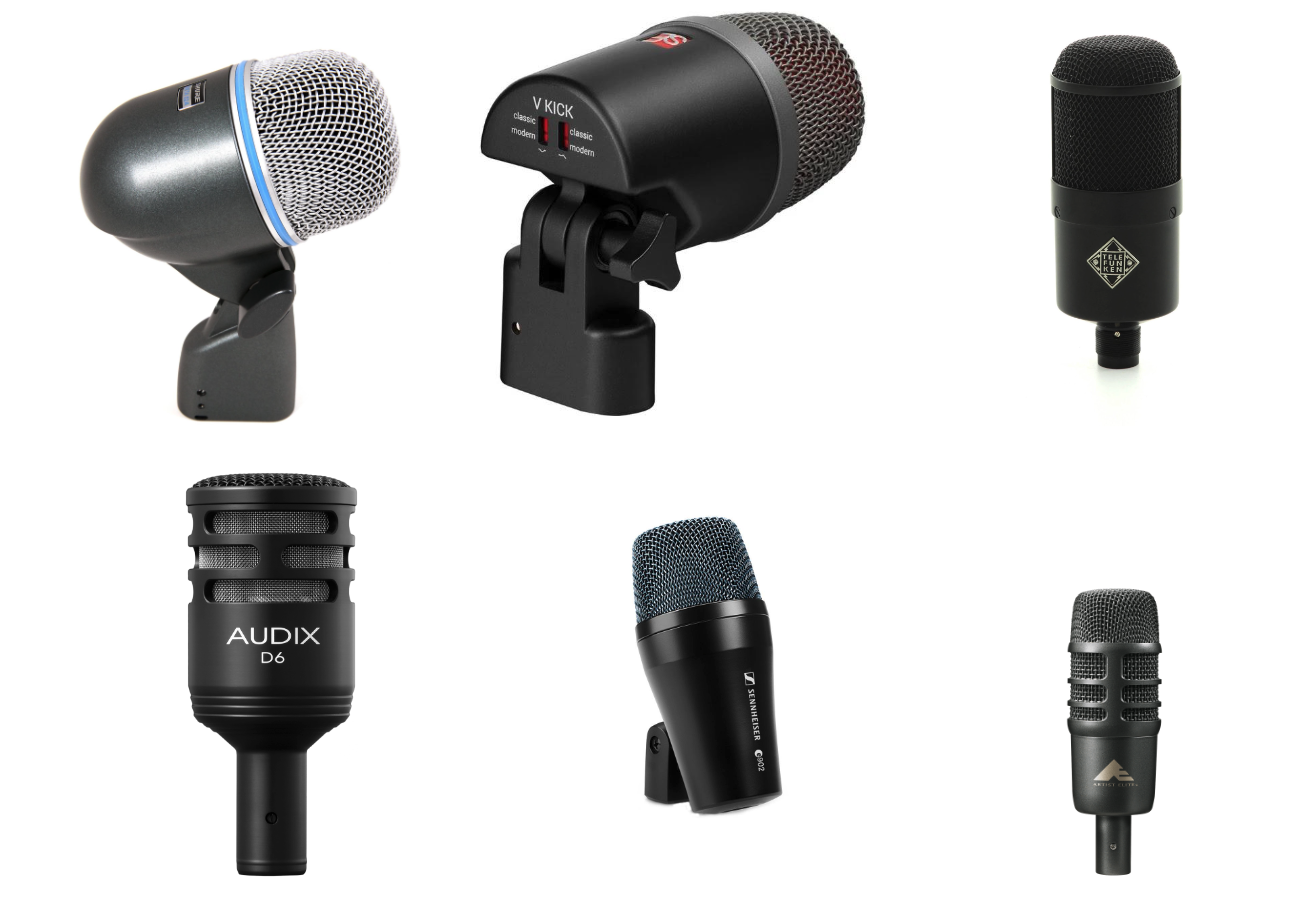
Some other common inside and “outside” bass drum microphones in no particular order are the Shure Beta 52A, sE Electronics V Kick, Telefunken M82, Audix D6, AKG D112, Sennheiser e902, Beyerdynamic M88, and Audio Technica AE2500. Although these are the most common, there are many other choices out there. What may sound good on one kick drum, may not sound as good on another, so don’t be afraid to try different microphones. A lot of these mics can be pretty stunning on a visual level, so it’s important to listen with your ears instead of your eyes!
Ken “Pooch” Van Druten—who wrote much of this article—is the front of house engineer and production master behind Jay-Z, Travis Scott, Justin Bieber, Iron Maiden, KISS, Guns N’ Roses, Linkin Park, and many more. He holds close to a dozen FOH engineer accolades. Take a Course with Pooch!
Common Drum Mics and Placement for Snare Drum
Snare drum is usually the only drum in a kit that we mic the top and the bottom of. The reason comes from the fact that the snare drum is the only drum that has several metal snares stretched across the bottom head and give it its signature “rattle” sound when struck. The reason we mic both the top and bottom snare drum heads is to capture these distinct “rattle” sounds and combine them into what we consider the perfect snare sound.
As a general rule when miking snare drums: A great place to start is to point the microphone at the stick marks on the drummer’s drum heads towards the center of the head. In other words: Where the drummer strikes the drum is where it will sound the best (or at least it is a great place to start prior to actually hearing the drum through the microphone). This is where I start on the top snare microphone.
For the bottom snare, pointing the microphone at the metal snares in the same part of the drum that the top microphone is pointed at will usually allow you to flip the polarity of one of the microphones (on your console) and the sum of both will be full-bodied and include the sound of the metal snares. I generally line up the top and bottom snare microphone placement for the best flipped phase continuity.
Here are some common drum mics used for snare drums. The only thing I caution with snare drums is that they tend to be the loudest instantaneous impulse-producing instrument on the stage. One should be especially concerned with maximum SPL before clipping on the microphones we choose for snare drum. The most common microphone used on top and bottom snare drum in live sound, hands down, is the Shure SM57 or its cousin, the Beta57. The SM57’s durability and capacity to handle impulses upwards of 150 dB is unparalleled and has been a standard on stages for more than 55 years.
Other microphones commonly found on snare drums in live sound are the Telefunken M80SH, Audix i5, Earthworks DM20, AKG C414 XLS, Audio Technica AE5100, sE Electronics V Beat, DPA 2011c, and Neumann TLM102. There are many other choices out there: find one that works best for you, and don’t forget that what may sound good on one snare drum may not sound good on another, so don’t be closed-minded about trying new things.
Common Drum Mics and Placement for Tom Toms
Toms, in my opinion, are one of the hardest things to get right in a drum kit. Mainly because every tom sounds different, is a different size, and may sound great several feet away from the drum but closely miked it might sound thin and papery. Unfortunately in live sound we are forced to place mics close to toms, regardless of whether they actually would sound better at a distance and “breathe.” If I do run into a kit where the toms sound considerably better from a distance, I tend to use more overheads in my mix than the close mics to compensate. If you ever experience a situation like this, try going after the attack of the toms with the close mics, but capture the body of the toms with the overheads.
As mentioned above with snare drums, a great place to start miking a tom is to point the microphone at the stick marks on the drummer’s drum heads, towards the center of the head. As we said with the snare: where the drummer strikes the drum is where it will sound the best (or at least it is a great place to start prior to actually hearing the drum through the microphone).
When placing microphones on toms, I try to take into consideration the fact that most drum kits have toms right next to each other, and generally I do not mic the bottom resonant head of a tom. Also, do not forget about the proximity effect of moving a cardioid microphone nearer toward the center of the head to get the free “fatness” that comes with that.
Some common microphones in live sound that you will find on toms are DPA 4099s, Shure Beta 98 AMP/C, Sennheiser e604, Audix D4, Earthworks DM20, sE Electronics V Beat, Telefunken M81SH, and Audio Technica ATM25, or its newer cousin ATM230.
The Sound Engineering for Live Events Professional Certificate features the following courses:
Overheads and Stereo Miking
There really are two philosophies when it comes to overhead drum mics. One way is to use the overheads as cymbal microphones, and treat them as if they were just another close microphone on a different part of the drum kit. The second way is to use the overhead drum mics as a capture or picture of the whole kit, not only capturing the cymbals but helping to emphasize the other close microphones on the kit. Either way is a fine strategy, they are just different thought processes when it comes to placement and choice of microphones.
Spaced Pair Overhead Placement
The most common live sound drum overhead stereo miking technique is called spaced pair. A spaced pair is usually just two drum mics placed on either side of the drum kit, above it somewhere. Although this is the most common, it is probably the most ineffective way of miking a drum kit, (and in my opinion, completely the wrong way) when placed left and right of the kit, supposedly creating a stereo picture. If we can agree that the most important role of rock ’n’ roll, R&B, and most music (that has a drum kit, anyway), is to have a strong kick and snare center image in your mix, then two microphones placed left and right above the drum kit is just wrong. The mics are not equidistant to the kick and snare. In fact, both microphones are different distances from everything in the kit.
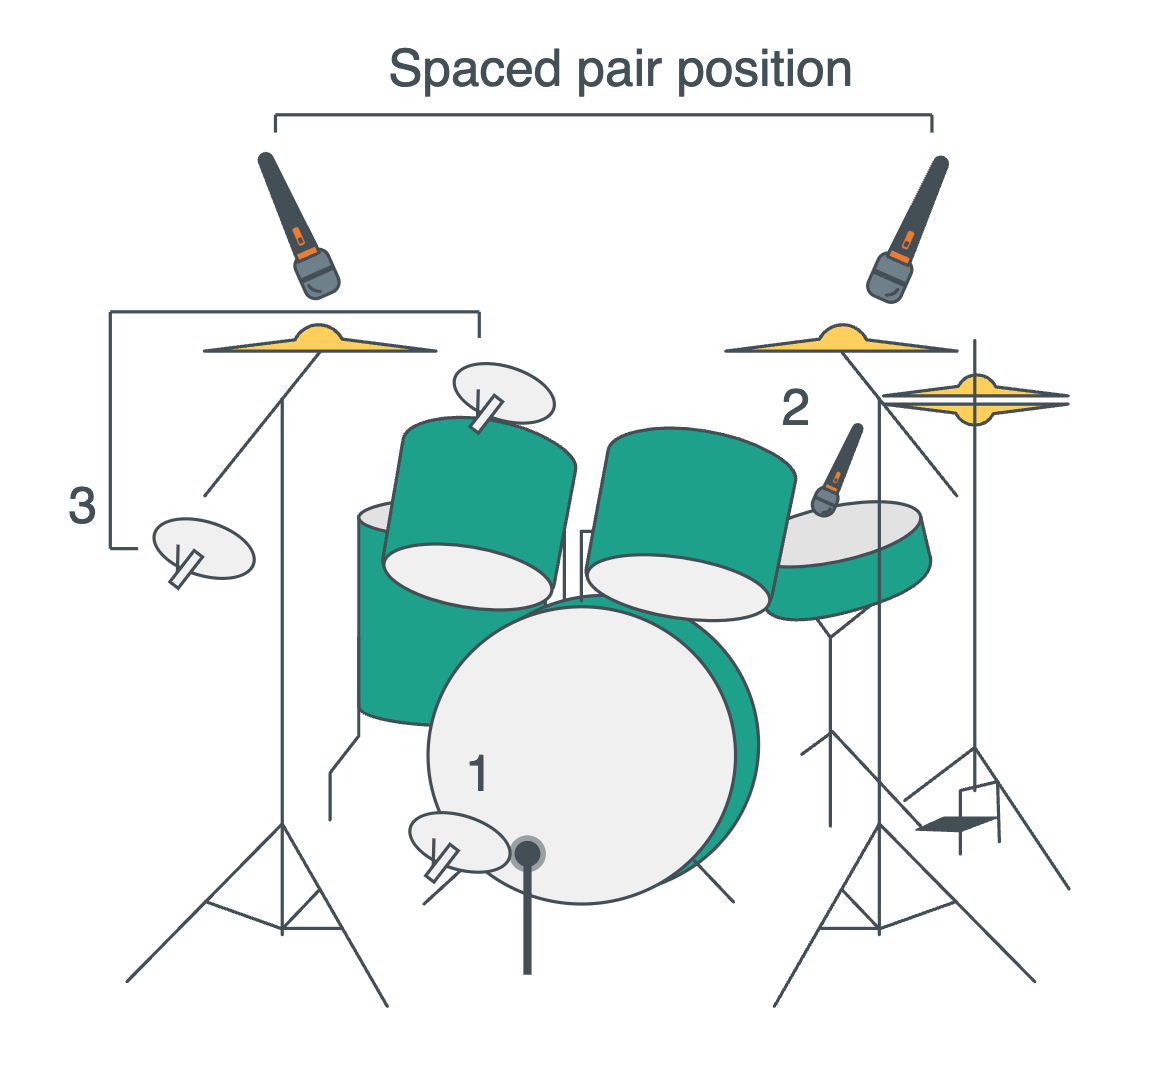
This is important to note because it means that every single drum in the kit is arriving at each microphone at a different time. The chances for phase and comb filtering here are very high. I think that engineers over the years simply see other engineers doing this, and aren’t really listening. It’s laziness as well. It is the simplest place to put overhead microphones, and from the front it looks congruent on the kit.
This is not necessarily a bad thing if your goal is to create a drum kit that feels very wide, and without a phantom center. (The phantom center is a psycho acoustic phenomenon of a sound source appearing to emanate from a point between two speakers in a stereo configuration—the center of your mix.)
Spaced pair overhead, when it is placed correctly, however, can be a very effective way to create a balanced and natural drum kit sound.
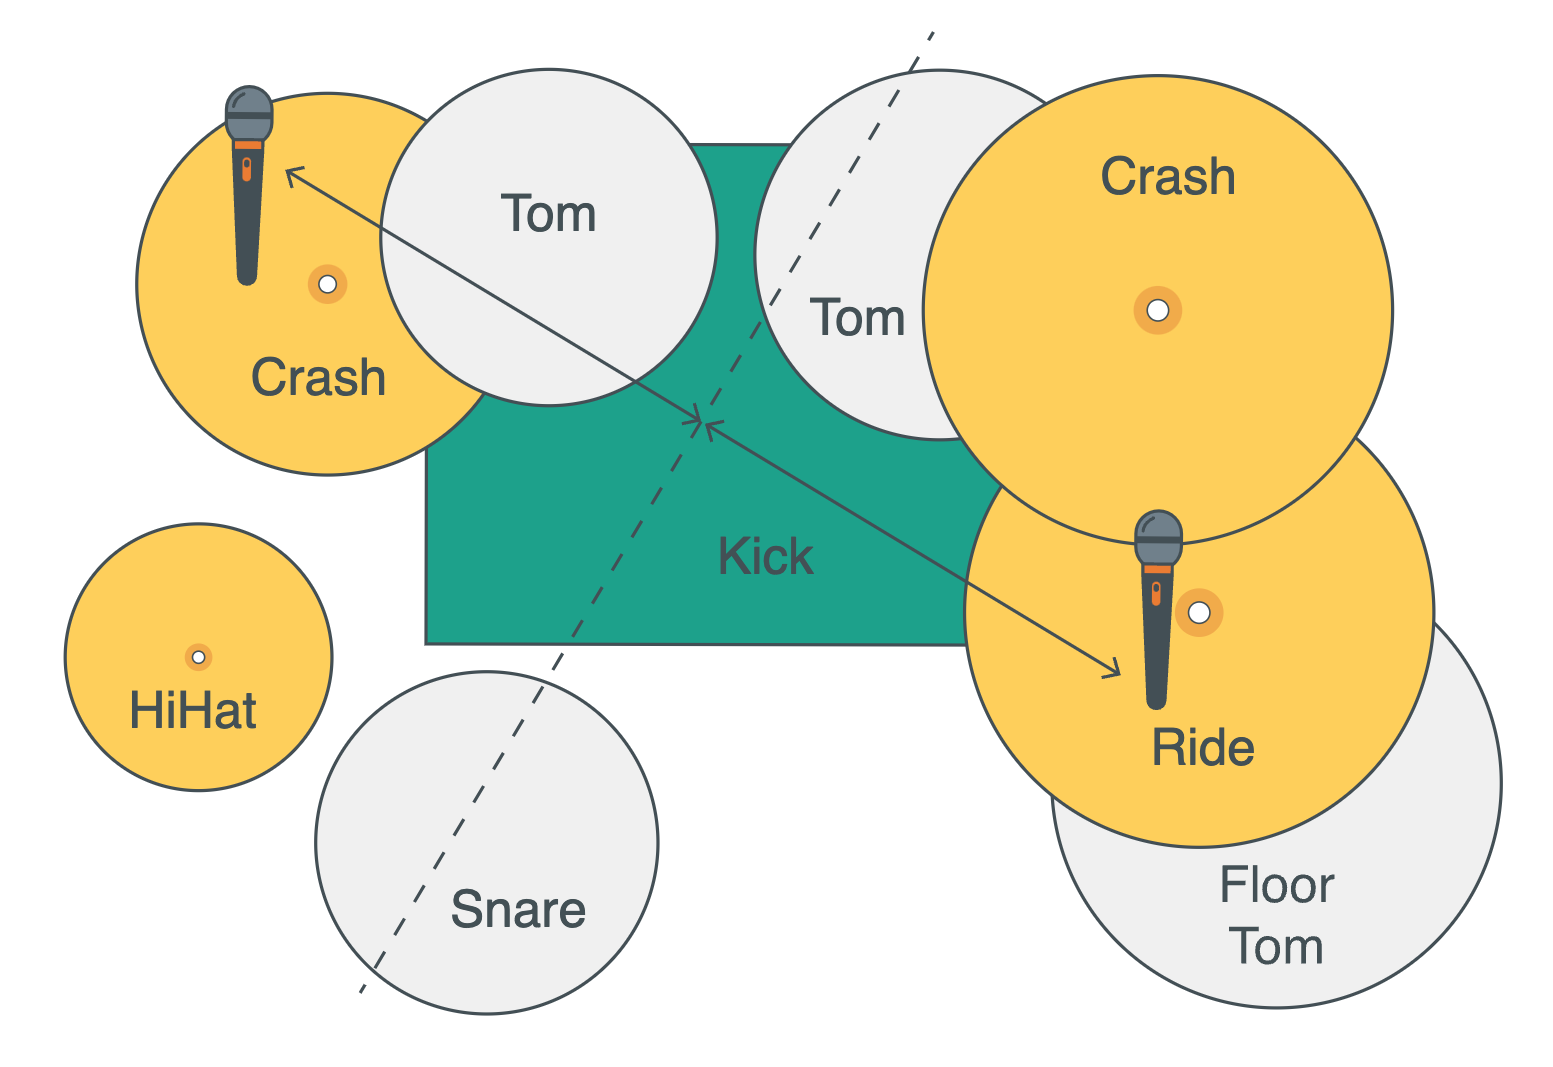
So first let’s look at an overhead view of a drum kit and notice if you make a centerline through the kit (splitting a drum kit exactly in half) the kick and snare are not in the same centerline if you just place microphones left and right of the kit.
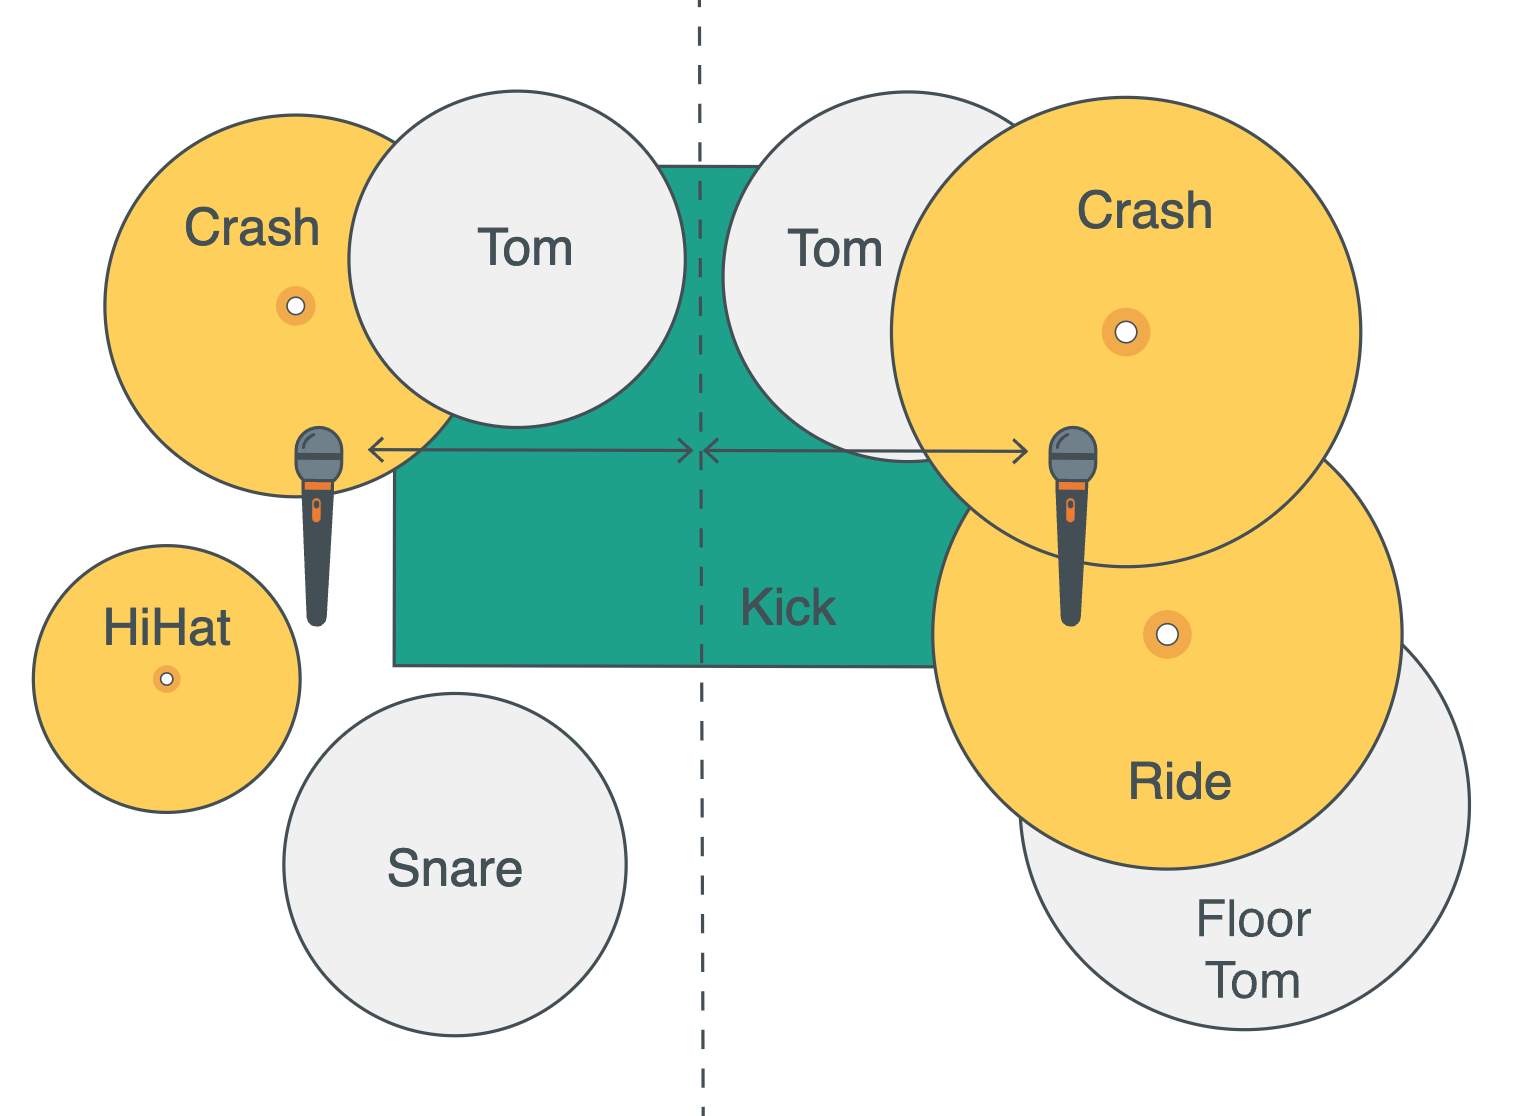
If you draw a centerline splitting the kit while keeping the kick and snare arrival times the same, you will notice that the spaced pair microphones need to be placed more at an angle.
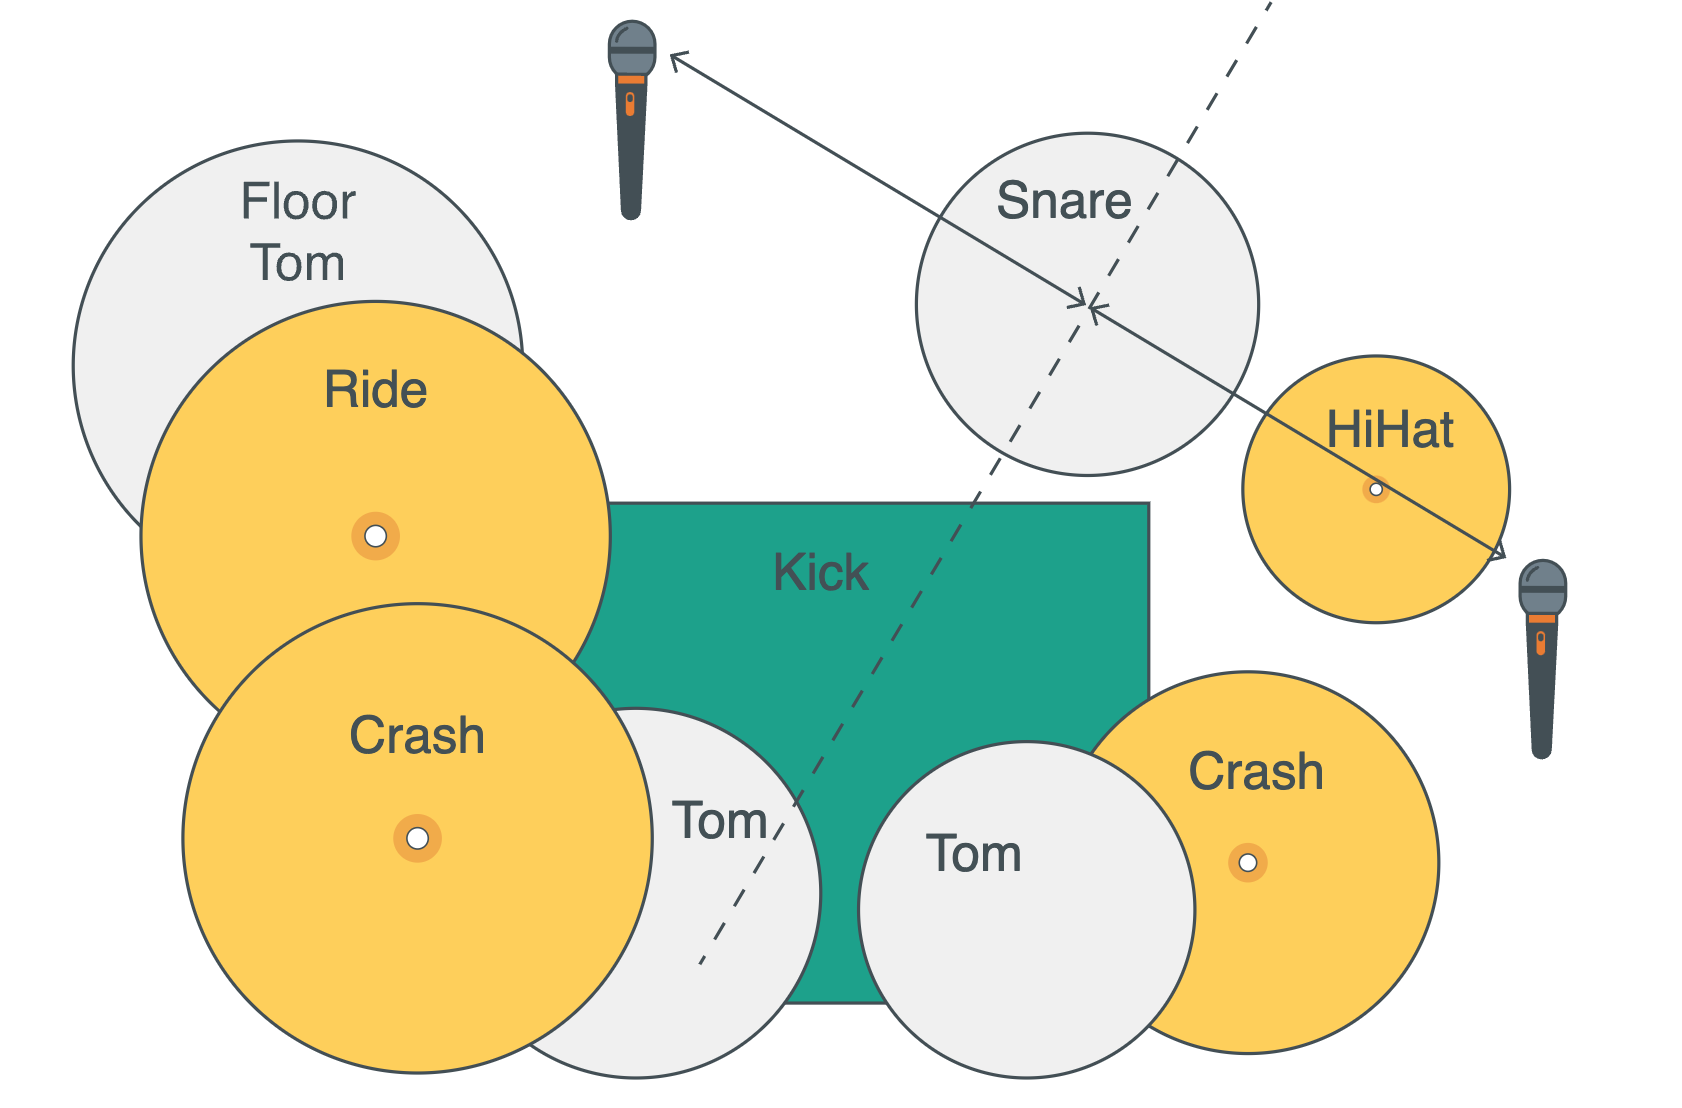
I like to call the above example “spaced partially correct.” Make the kick drum be equidistant from your two microphones by drawing an imaginary cross that goes through the kick and intersects the toms. Then imagine an arc perpendicular to that. Place the two microphones equidistant from the kick drum in that arc, following the line of the highest tom and lowest tom. I find the result is the kick and snare being perfectly centered, and the toms and cymbals are very nicely spread.
It is important to note that the measurements of equidistance from the kick should be accurate in order for the technique to work. Don’t just eyeball it. I carry a tape measure with me for this very reason. Measure the distance from the same point (center) of the kick drum to each microphone capsule and be exact along the imaginary arc. It makes a difference.
By the way, there are two schools of thought for this method. Some use the kick drum as the center of the split, but one could argue that the snare drum is the loudest drum in the kit, and should therefore be the center. I have had success with both. You decide.
XY Overhead Placement
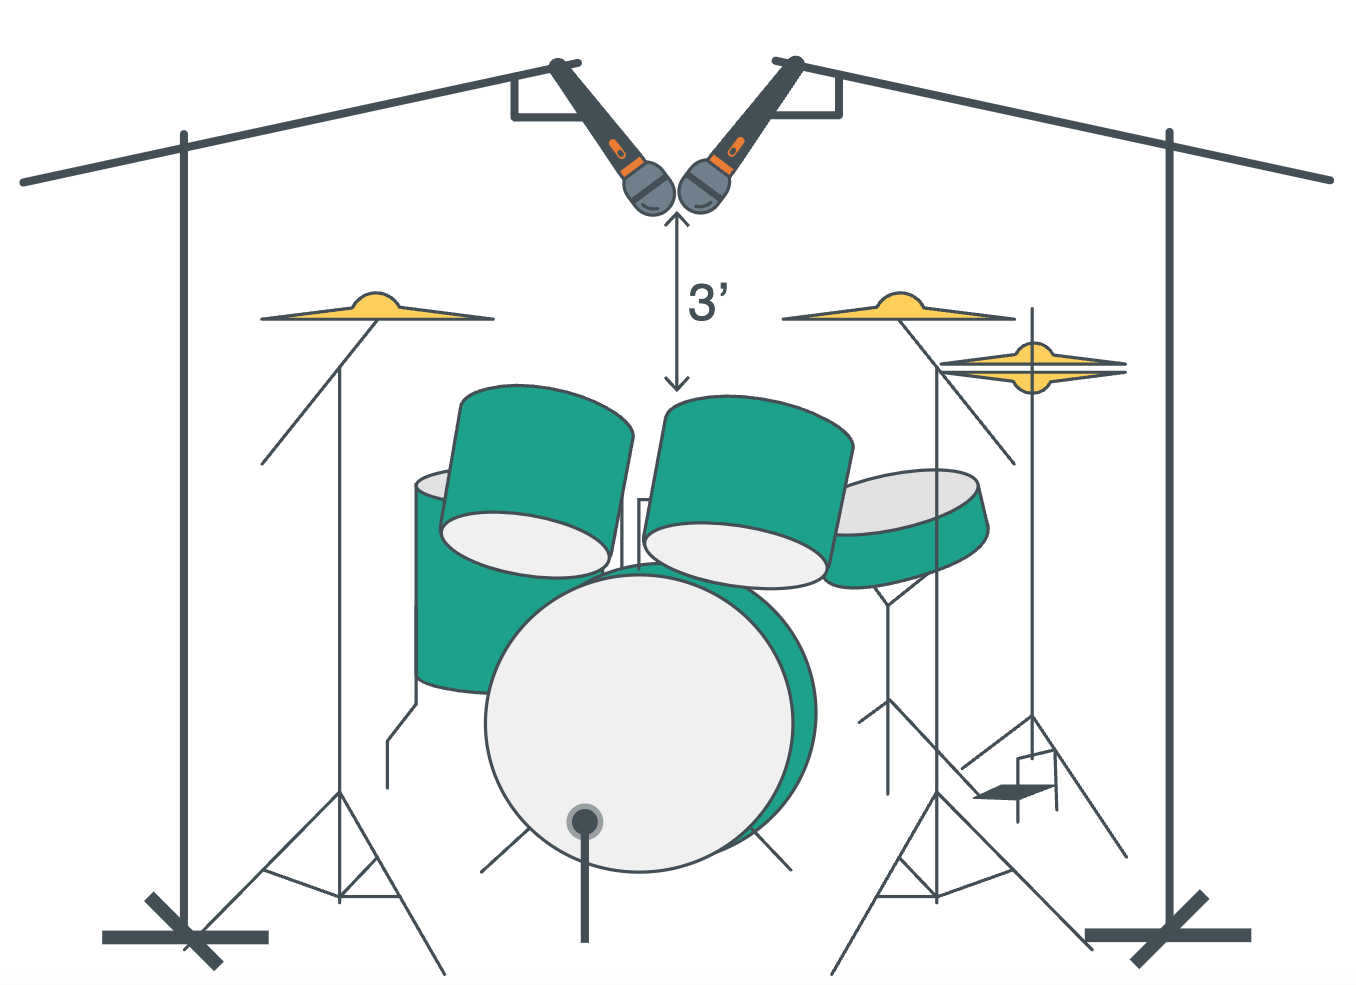
What is the simplest way to avoid phasing, comb filtering, and maintain a good phantom center? Put two microphone capsules next to each other so that sources arrive at the microphones at the same time. The XY coincident pair technique makes use of two paired cardioid microphones. The idea is to place the two capsules of the mics as close as possible with an angle of 90 to 135 degrees. Obviously the wider the angle, the wider the capture of the kit. One must be careful not to place the angle so wide that you capture unwanted noise outside the width of the kit. Keep in mind that when the mics are placed like this, the left mic captures the sound coming from the right of the kit and vice versa. (This is a common stage-patching mistake). Height makes a difference with this technique. Placing the mics too high can capture too much of the ambience and not be very effective in giving you an accurate “picture” of the kit. There is a dance between height and angle of the mics to get it just right. The advantage to this method is very good mono capability, given the proximity of the capsules. The disadvantage is that the result is not a very wide “larger than life” stereo image.
Using two regular mic stands over a drum kit on a live stage and getting the angle and distance to each capsule correct is very difficult. Luckily we have all kinds of microphone stands these days that help us achieve microphone techniques like this.
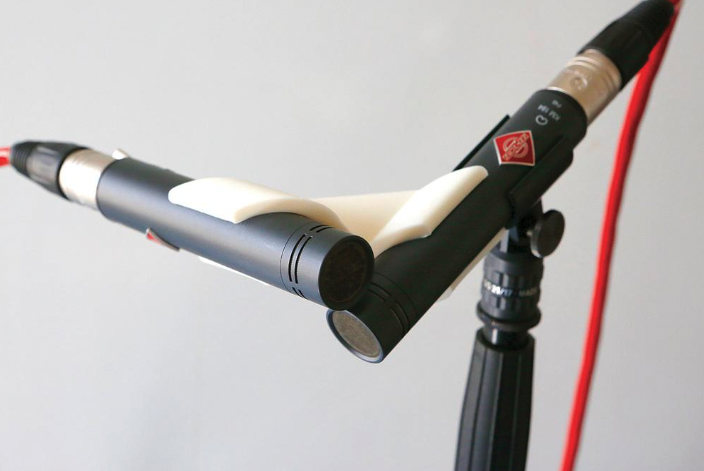
This is an XY coincident pair mic clip.
Finally the best advice I can give you on drum overheads is a mantra I used earlier in this lesson: don’t listen with your eyes. I spend a great deal of time listening in headphones when I adjust my drum overheads. After choosing one of the above techniques, I don’t go back to my console, hard pan the two microphones, and call it a day. Instead, what I do is listen to the overheads only, and pan both microphones so that the kick and snare are as close to the phantom center as possible, but I also listen where the toms are in the stereo space. I want all of my close microphones to pan and end up in the same stereo space where that same drum is in my overheads.
Cymbal Close Under-Miking
Some engineers treat cymbals as just another part of the kit and use close mics. I understand this in theory as we are just combining all of the individual close miked drums, why not include the cymbals in that?

In the photo above of Daniel Williams from the band the Devil Wears Prada, you will notice that there are no overheads. The engineers have chosen to go with Shure SM81s under each cymbal and hi-hat. With all microphones panned in the appropriate places I’m sure that this sounds just fine. The disadvantages of close miking cymbals is that the natural sound of a cymbal (and its decay) tend to sound best at a distance. So placing a mic closer to a cymbal does not necessarily make it sound better. I have found that cymbals don’t sound as brillant on their underside. I notice this the most in hi-hats.
If you can mic closer to where the drummer strikes a cymbal, the more nice splashiness it has. By choosing to go this route you rely on all of your close microphones to create space. You can do this by panning things, but it just doesn’t quite have the same wideness as capturing the whole picture with overheads. Also, you may notice when microphones are too close to the cymbal, you will hear flanging and phasing because of the actual movement of the cymbal itself. As the cymbal gets closer and further from the microphone as it is being struck, it’s as if the microphone were being pushed and pulled away from the source. Not a great sound.
Cymbal close miking does give you more control if you have a really loud stage. Just like how when you put a microphone closer to a guitar amplifier, you eliminate extraneous outside noise by close miking the cymbals. If the drums are surrounded by very loud sources, or the drummer uses a particularly loud drum fill, cymbal close miking might be right for you.
If you find yourself having to go the cymbal under-miking route, try to place the center of the capsule of the microphone as close to the center of the cymbal as possible and low enough on the stand so the polar pattern is as only as wide as the cymbal. This will minimize the inevitable flanging of the moving cymbal.
Combination of Overheads and Close Cymbal Miking
Above we discussed the techniques, advantages, and disadvantages of overheads vs. close cymbal miking. Truthfully most of the time, I use both in combination. A properly placed capture of the drum kit with a stereo pair as the main picture of the kit, andclose microphones on the ride and hi-hat. Sometimes I use close microphones on specials like a gong, or a splash cymbal that is prominently featured in a song. Sometimes a drum kit is just too large and wide to capture everything appropriately with a stereo pair. I have used three or even four overheads spaced in sections over a drum kit, but this is making a virtue out of necessity. Armed with all the knowledge above you can decide to break the rules, or be disciplined and follow the rules without any variation.
One Last Thing: Drum Kit Listening
The drum kit is really the only instrument in which we “disassemble” the instrument by closely miking individual things and then electronically sum the things back together to create an overall picture of the instrument. So many times I have heard disproportionate drum kits in live sound situations. The kick drum being incredibly louder than the rest of the kit, for example. I call this “symphony for kick drum.” I believe engineers do this to create impact by taking the low end part of the drum kit and over-emphasizing it to move some air and create excitement. To me, it just sounds unnatural and unpleasant.
When I am first working with a band I spend a great deal of time asking the drummer to play for me without anyone else playing. I listen intensely to the acoustics of the kit, standing in front of it and to the side, with no assistance from microphones or speakers. I try to gauge what drums or cymbals are louder than others, which drums are softer, and the drummer’s playing. Are they a “finesse” drummer, are they a “basher”? What makes them different from others? What is the signature of this drummer? Perhaps they really overemphasize the snare drum. Maybe it is significantly louder than any of the other drums. Who am I to say that my mix of the kit should not sound the same? After all, they spent hours, months, years, developing their craft and sound. It is what they want their kit to sound like. The drum kit is a WHOLE instrument. Not individual instruments. Treat it as such.