


Learn How to Build Custom Instruments and Shape Unique Sounds with FL Sampler
The following information on how to use FL Sampler in FL Studio is excerpted from the Berklee Online course Producing Music with FL Studio, written by Rishabh Rajan, and currently enrolling.
I personally love using FL Studio for my productions. When FL Studio first came out, it was called FruityLoops and many in the general public treated it like a toy. But now FL Studio—with a name that can be taken a little more seriously than FruityLoops!—is a very advanced DAW with tools that are unmatched. In fact, I can say with certainty that there are some features in FL Studio that aren’t available in some of the other major DAWs, like Ableton or Logic.
When it comes to producing contemporary music of any kind—hip-hop, EDM, or any of the many subgenres within the hip-hop or EDM world—it’s very important to know about sound design, i.e., how to create your own custom sounds. Sampling is very popular in modern productions. Let’s take a look at FL Sampler within FL Studio to learn how to manipulate a sample and create a unique sound.
You Might Also Enjoy: WhoSampled: Chris Read on the Art and History of Sampling Music
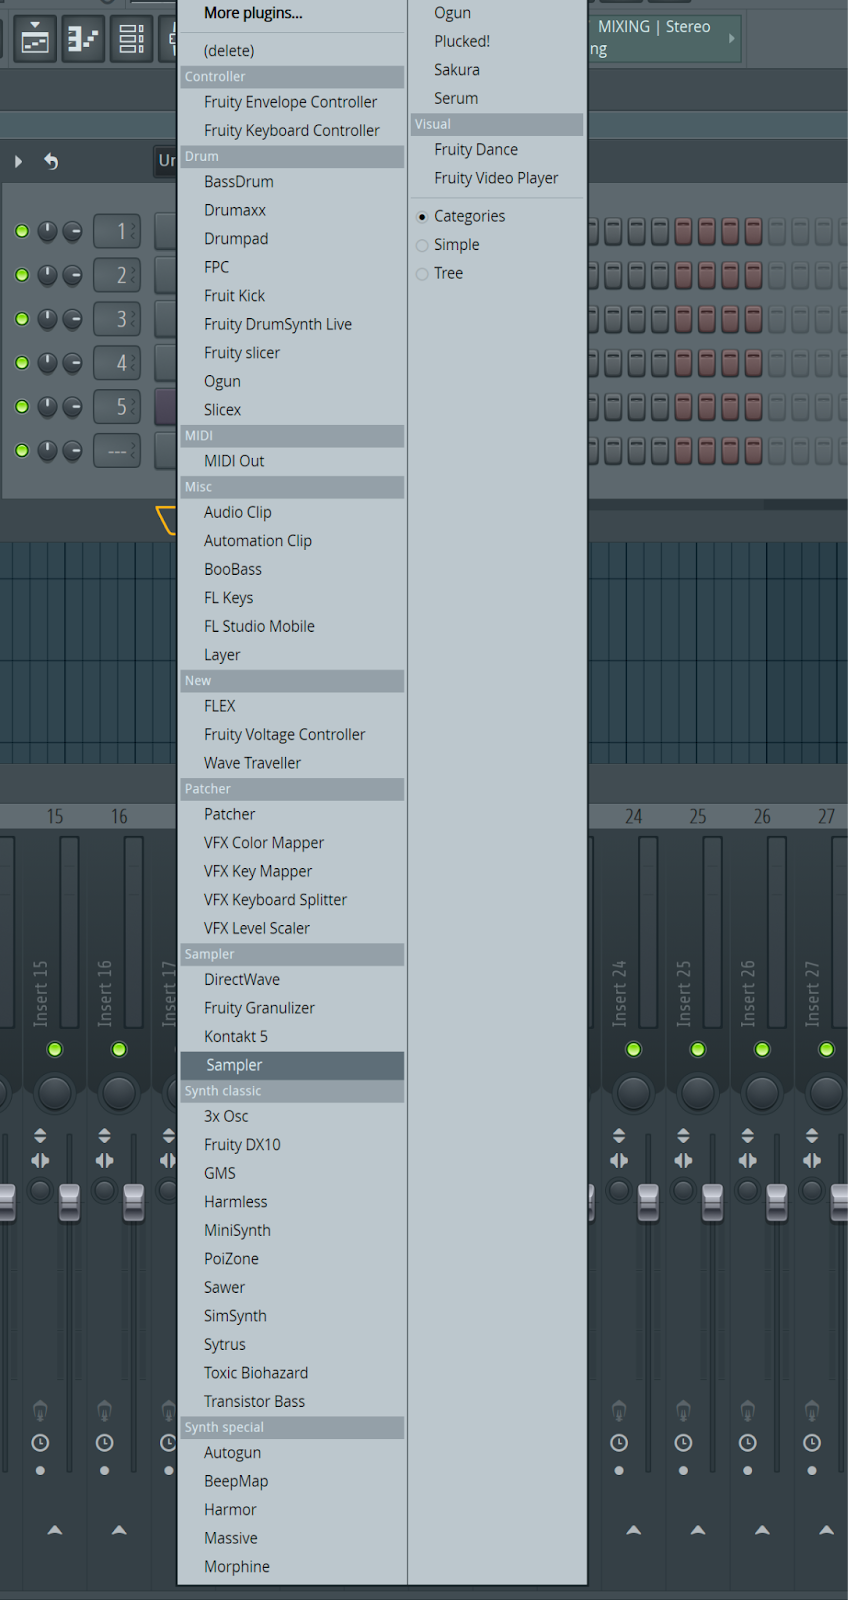
1. Load FL Sampler into the Channel rack.
Go ahead and load the Sampler into the Channel rack. It will be under the Sampler category.
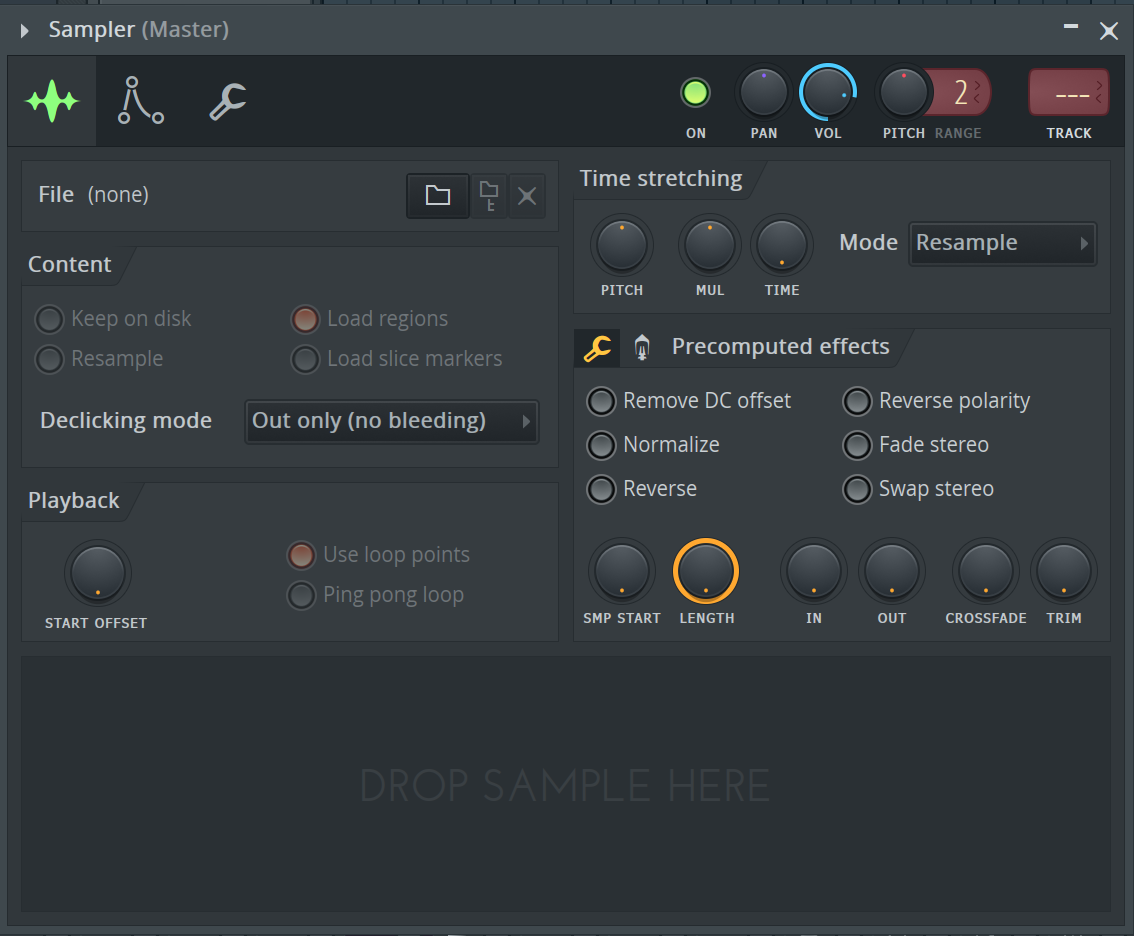
2. Drop in your sample.
The Sampler has a very simple interface with a section at the bottom that says Drop Sample Here. We can drop any audio recording from FL or from the computer’s file browser into this area.
3. Or work with a vocal preset within FL Studio.
Let’s work with a vocal sample that is included with FL Studio. In the Library, navigate to Packs > Vocals. Here you will find a collection of vocal samples. I’m going to load Laurie Webb Ahh C into the Sampler.

As long as the Sampler is selected in the Channel rack, you can play this instrument with your MIDI controller. Middle C will trigger the sample as is. Playing higher on the keyboard will transpose the sample up, also making it shorter, while playing lower notes will transpose it down and extend its length.
4. Create loop points in Edison.
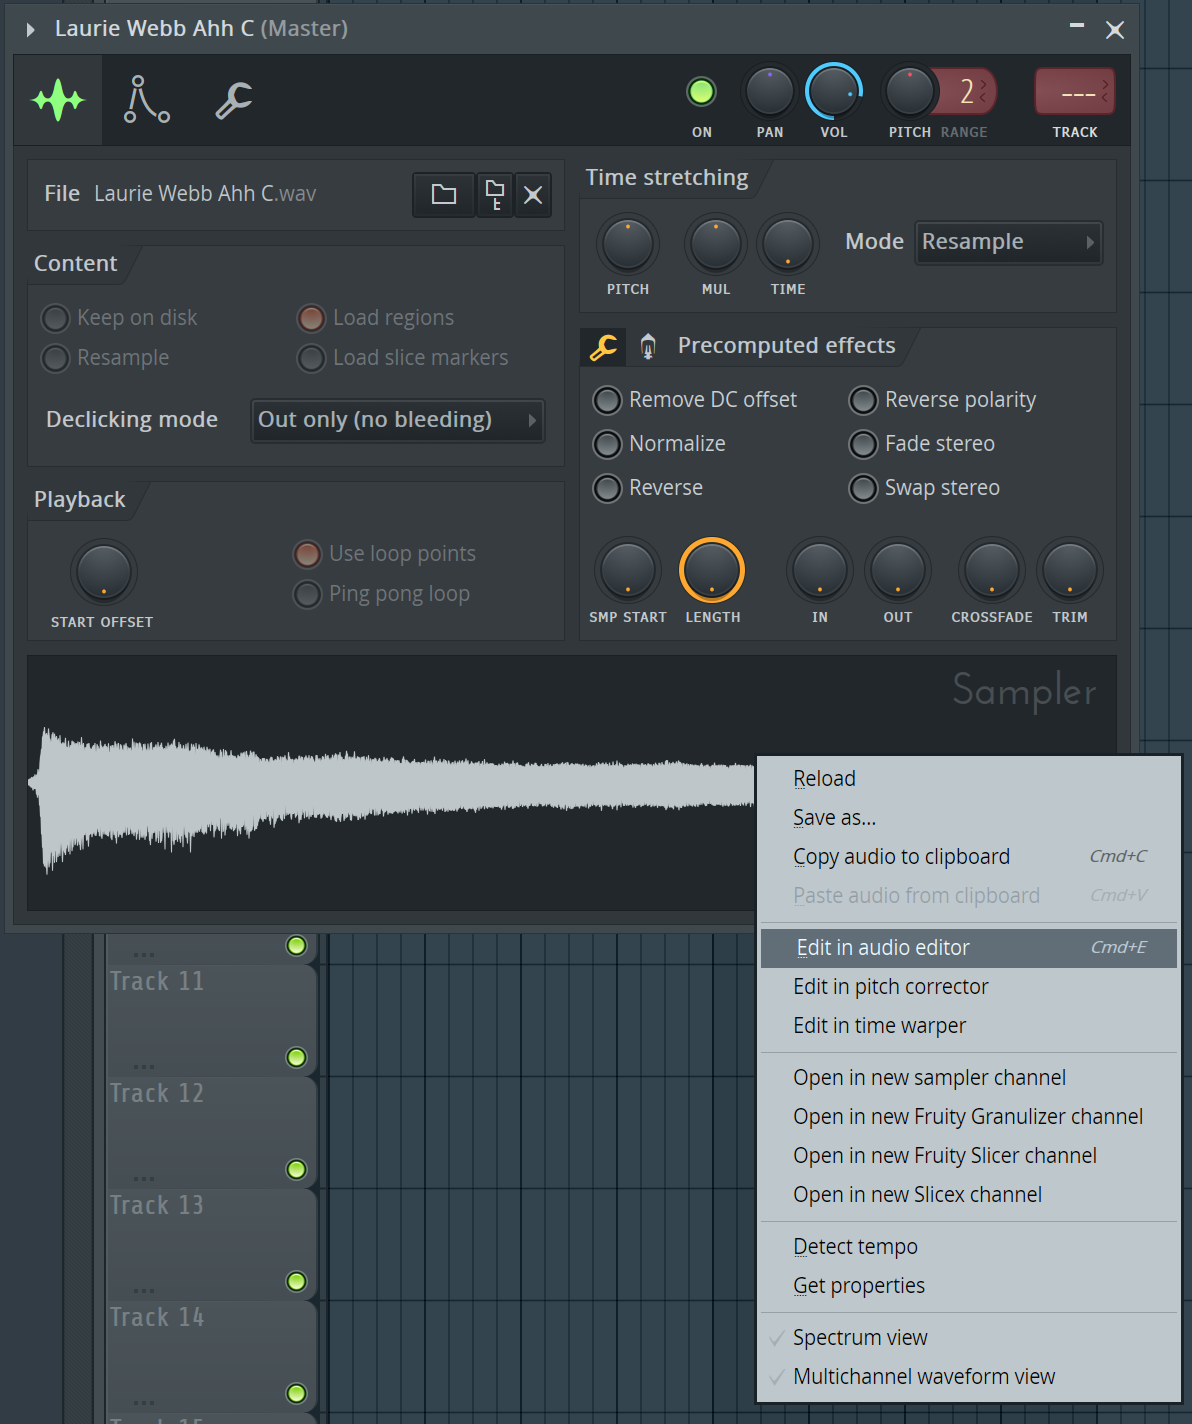
One issue you will notice is that the sound eventually dies out, even if you keep holding down a key on the controller. We can make the sample play indefinitely by creating loop points. This can’t be done in the Sampler. We will need to load this sample into Edison to create loop points. Aside from being a useful tool to record audio, Edison is a very powerful audio editing and processing device within FL Studio. Right-click the sample and choose Edit in audio editor. This will load Edison into the master track and load the sample into it.
Let’s create a selection within the sample where the voice is fairly consistent. Then in the Regions menu select Set loop.
TIP: You can play notes on your MIDI controller to preview the sound while in Edison.
5. Detect the pitch of your sample.
Another very helpful thing we can do here in Edison is to detect the pitch of the sample. You will notice there are two distinct pitches the vocalist is singing. Let’s use Edison to help us figure out what those two pitches are. Go to the Regions menu and select Detect pitch regions.
Now we know that the two notes are A♯5 and G5. This is helpful information, which we can use later on in the Sampler.
6. Move the sample back to Sampler.
Make sure to select the whole sample by clicking Command (Mac)/Control (PC) + A. Then go to the Tools menu in Edison and select Send to selected channel. Assuming the Sampler channel is still selected, the sample will be placed in that instrument. If not, make sure to select the Sampler in the Channel rack before executing this command.
Now we are done with Edison. You can close it out and even remove it from the Master insert in the Mixer.
7. Smooth out transition points.
Back in the Sampler, we have the updated version of the sample loaded in. Make sure to click on Use loop points and now when holding down a note on the controller, the sound doesn’t die out.
If the loop you created wasn’t perfect and you are hearing clicks or pops when the loop repeats, you can make use of the CROSSFADE knob to smooth out the transition point.
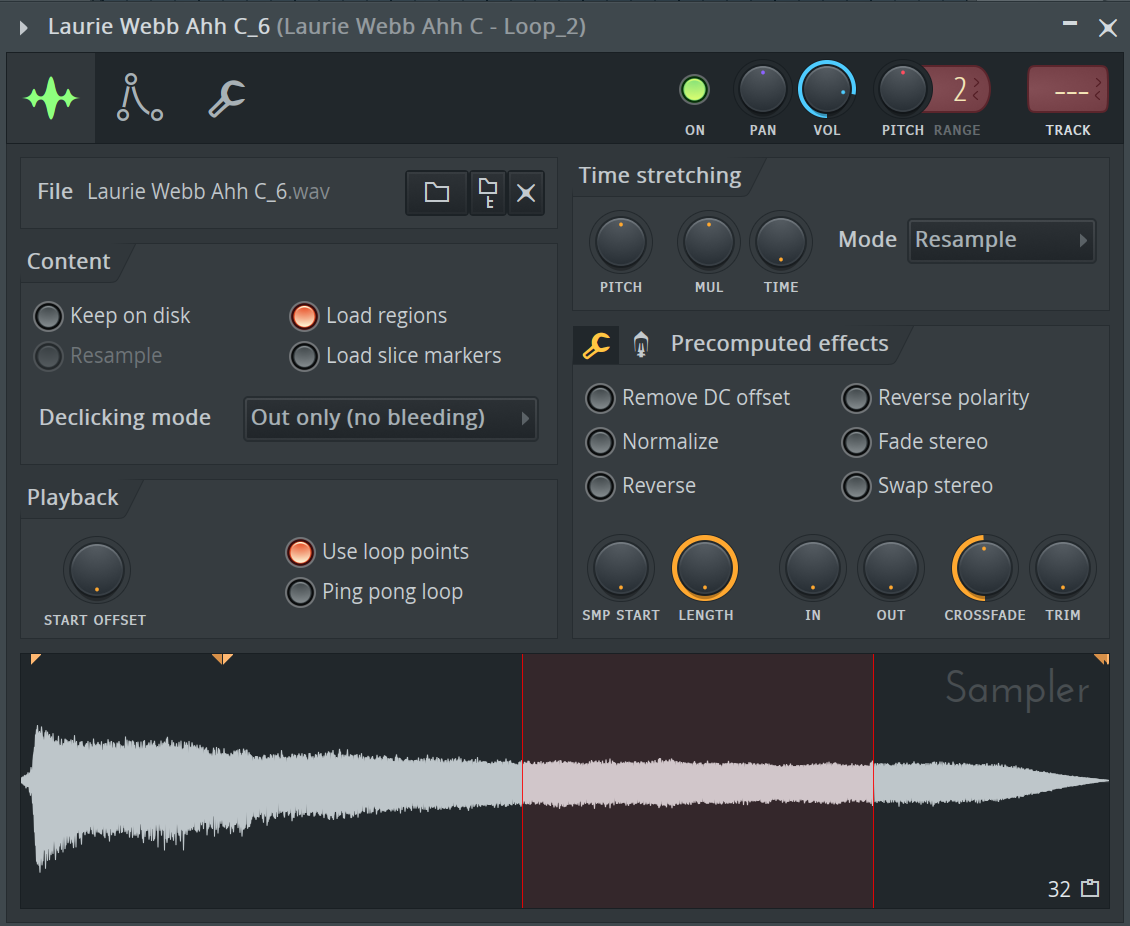
Now, I don’t like the two notes in the sample. I just want to hear one note. If you feel the same way, increase the START OFFSET knob and make the sample line up right at the beginning of the second note. This should be easy since there is a marker where Edison detected the pitch. I’m going to set the start a little bit further in the sample to get an even cleaner sound.
8. Set to the correct pitch.
One last thing we need to do to ensure this instrument will work well with others is to tune it. As we know the original sample is at the pitch G5 (if you trimmed the beginning). So when the note C is played, we hear a G. We don’t want this. We want to hear a C when a C is played. To fix this, we will have to tune down the sample 7 semitones to get the correct pitch. To do this, increase the Pitch knob range to 7 and set the PITCH under Time stretching to -700 cents or the lowest position of the knob.

9. Try the Reverse button and other features.
Now we have a very playable instrument created from a vocal sample. One technique to try out with this instrument is the Reverse button, which will play the sample backwards. This can create an even more interesting tonality. In Miscellaneous Functions (wrench icon), you can engage the arpeggiator by clicking on any of its direction modes. Adjust the Time, Gate, and Range parameters to further change up the arpeggiator controls.

The Sampler has an Envelope/Instrument Setting tab where you will find the AHDSR envelopes, LFOs, and filter section. All of these can be used to further manipulate the sound.
10. Save your sample.
Once you are happy with the changes made, save the instrument by clicking the Plugin options drop-down and select Save channel state as. Sampler doesn’t have a preset section, so you will have to save the entire channel. Check out the video below to hear all of these changes in context.
Take the ‘Producing Music with FL Studio’ course at Berklee Online!


 She Needed to Produce Music")