


Explore Essential Acoustic Techniques for Guitar That Build Confidence and Musicality Beyond Basic Chords and Strumming
The following information on advanced beginner acoustic guitar techniques is excerpted from the Berklee Online course Acoustic Guitar Techniques, written by Abigail Aronson Zocher, and currently enrolling.
You have an acoustic guitar, you know some basic chords and strums, but now you’re looking to get to the next level in your playing. To start sounding like some of your favorite records and recording artists, you need to employ some common acoustic guitar techniques such as open tuning, fingerstyle, and dynamic strumming. To get your acoustic guitar sounding like Joni Mitchell, Nick Drake, James Taylor, and Lindsey Buckingham, here are three acoustic guitar techniques that you can start practicing today:
Alternate Guitar Tunings
Alternate tunings open a new world of possibilities for acoustic guitar players. They allow us to access harmonies and melodies in ways that make us forget our usual playing and writing conventions. They help us remember how fresh things sounded when we first started playing the instrument, only much better now that we have developed the hands and ears of a guitar player.
Generally, standard guitar tuning refers to the tuning guitar players most commonly use today: EADGBE. Alternate tunings for guitar can be anything different from that. You could move each string by the same amount, and the result would be the same sound, just higher or lower (Jimi Hendrix, for example, tuned each string down a half step).
You could drop certain strings and let others remain; for example, “drop D” tuning lowers the 6th string one step down to a D, and double drop D lowers both the 6th and 1st strings down one step to D. Open tunings change some or all string pitches by varying amounts, to allow the open strings to sound a chord. Alternate tuning, or scordatura, has been used on other instruments, and in many styles and eras of music, but always serves to change the sound of the instrument, and the accessible fingerings (most notably chord voicings on guitar) available to the player/writer.
Open D Tuning
Re-tuning the guitar can feel quite natural after you are used to it, but can be disorienting at first. Try to think of that disoriented feeling as part of the charm of alternate tunings. You can tune to DADFAD using Berklee Online’s electronic guitar tuner. Or if you’d rather use your ear, you can follow these steps:
- 6th string: tune down one step from E to D
- 5th string: tune to 7th fret of 6th string
- 4th string: tune to 5th fret of 5th string
- 3rd string: tune to 4th fret of 4th string
- 2nd string: tune to 3rd fret of 3rd string
- 1st string: tune to 5th fret of 2nd string
Now that we are in open D tuning, let’s find some of the chord shapes that live there. Let’s take a look at the diatonic chord shapes which can travel up and down the neck. For these shapes, we’ll be fingering the 5th and 3rd strings, and using the rest of the strings as open drones.
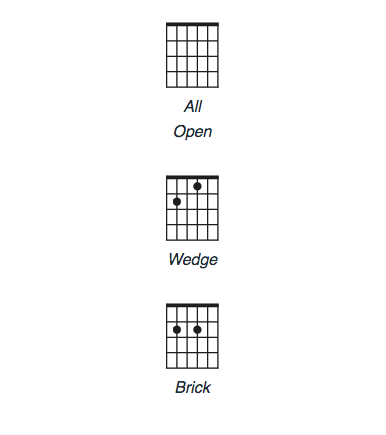
Start by playing the chord which occurs when all the open strings are strummed (D major). Then move up the 5th and 3rd strings by whole or half steps, using the diatonic notes of D major. The other strings are included in your strum but remain unfingered.
Using two basic movable shapes (the “Wedge,” and the “Brick”), play all the shapes that occur, until you reach the octave on the 12th fret.
Open D is just one of many alternative tunings you can use. Once you get it down, try exploring a different tuning with the guidance of the aforementioned Berklee Online electronic tuner.
Songs that are in open D:
- “You Turn Me On, I’m A Radio” by Joni Mitchell
- “Pink Moon” by Nick Drake
- “The Gardener” by the Tallest Man On Earth
Fingerstyle
While you might want to bust out playing Fleetwood Mac’s “Landslide” right away, fingerstyle technique is very much like any other athletic venture: it requires relaxed and focused repetition to progress and become reliable. Here we’ll go over a few concepts to help you start your practice.
Most fingerstyle techniques can be described as either arpeggiated or melodic/scalar in texture.
Arpeggios
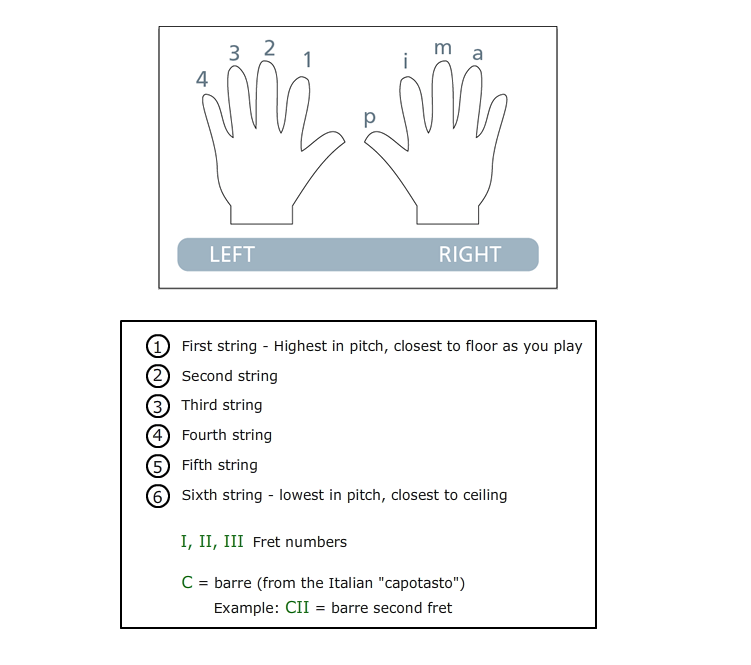
Arpeggios happen when the notes of a chord are played one after the other in a particular order, rather than all at once. When playing an arpeggio, you will likely use many of your right hand fingers, moving in a particular order, but never the same right hand finger twice in a row. Your left hand will likely hold one chord shape throughout the entire passage, not changing. Strings are always alternating, never repeating twice in a row.
Melodic Textures
Melodic textures also feature notes played one after the other with the right hand. But instead of holding a static chord, the left hand will change its fingering for every note. The right hand can still alternate fingers, but it may play two consecutive notes on the same string.
Classical guitar teaching includes some standard and sensible solutions for how to notate fingerstyle guitar music (you’ll often find this notation in non-classical fingerstyle guitar sheet music as well).
Here are some tips for practicing fluency and consistency:
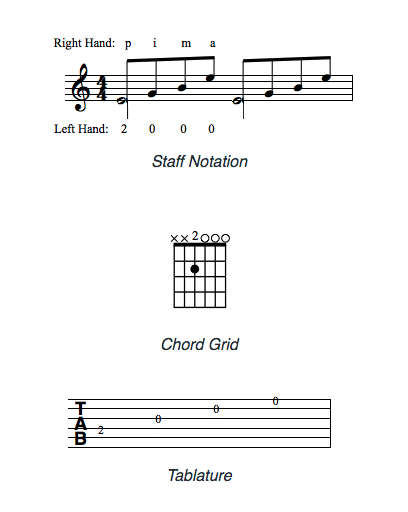
Compare the Notations
To start, try out the arpeggio. Then, compare the notations we have to choose from, shown above. Even though we play it one way only, it can be written out using three different types of guitar notation: staff, chord grid, and tablature. All these notations are describing the same, single exercise we are playing. Try this arpeggio, and notice how the music is described by each of the three notations.
In this instance, staff notation provides the most complete directions for how to play the exercise.
Arpeggio Practice Methods
Now play the arpeggio, focusing on each of these practice techniques separately (one at a time), staying with each technique until you have had time to focus in on it.
Metronome Use
Using a metronome, choose a tempo where your right hand is relaxed. Focus on sitting deep in the pulse, with your thumb note falling right in the middle of the click. Repeat as long as you like but at least until you feel you have honed in on the pulse and are one with the metronome. It might take anywhere between 30 seconds and a minute or more, depending on how quickly you settle in and focus on any particular day.
Relaxed Repetition
Continue playing the exercise with the metronome, and shift your focus to how your hand feels. Think of releasing any tension. Slow the metronome down if necessary; relaxation, not speed, is the primary condition. Repeat as long as you like, but at least until you have focused in on the feeling. Continue, inching up on the metronome. Quit if your hand feels tired, and repeat later in the day, or the next day.
Balance of Volume and Tone Amongst the Fingers
Continue playing the exercise with the metronome, and shift your focus now to how each finger sounds and feels on the string, devoting some time to each finger individually. As before, slow the metronome down if you like; relaxation, not speed, is the primary condition.
Start with your “p” or thumb finger. Repeat the arpeggio in a relaxed, looping way, with the metronome. As you play, focus in on “p.” How does the tone compare to the other fingers? How does the volume compare to the other fingers? Are you moving slowly, or quickly, through the string? Does your nail catch? Are you still relaxed? If not, where is the tension? Repeat as long as you like, but at least until you have focused in on the relationship between your finger tip and the string.
Repeat the process for the “i,” “m,” and “a” fingers.
Songs that use fingerstyle technique on acoustic guitar:
- “Landslide” by Fleetwood Mac
- “Fast Car” by Tracy Chapman
- “Naked As We Came” by Iron and Wine
Strumming Texture
The word “strumming” has never been one of my favorite terms, and I hope someday someone can find a better word. For now however, it is the only term I can think of to describe this cloth from which we create so much of our accompaniment texture. Within a strumming texture, though, there are many possibilities. Tone, touch, dynamics, register, weaving in melodic lines; all these variables offer ways to tailor our strumming so it suits our creative intentions.
You can refine and control your strumming technique by developing your ability to use touch, tone, dynamics, balance, registers, melodic lines, and bass lines; all within the context of a strumming part. In clarifying our tone choices on guitar, our classical kin offer us some useful terms.
Sul Tasto (or just “Tasto”)
Tasto refers to the fingerboard of a stringed instrument. Playing “sul tasto,” or with your right hand over the fingerboard, makes your sound sweeter and rounder. I tend to think of tasto as not just “on” the fingerboard, but near to it.
Ponticello
Pont refers to the bridge of the instrument, and playing ponticello means that your right hand plays near the bridge, giving a sharper, brighter, crisper sound.
Normale
Normale refers to playing in between the other two extremes, the place where most playing probably happens, somewhere around the bridge-side edge of the soundhole.
If you think of it, electric players use a pickup selector switch for this. We can do it the old fashioned way, moving our hand around. Also notice that as you strum, your path across the neck can be straight, or angled, for different effect.
Along with the area (fingerboard, soundhole, bridge) you choose to play over, the touch of your finger or pick to the string will determine the sound you produce. Classical pieces usually have character markings at the beginning which, although they don’t specifically apply only to touch, can help determine it. At the top of a classical score you might see words like:
Briskly, aggressively, gently, vivace (lively), dolce (sweet), con fuoco (with fire), grazioso (easy, graceful), agitato (agitated), espressivo (expressive), and many more.
The way you touch the strings—for example moving slowly or quickly through them, lightly or heavily, easily or with tension—can determine the character of the sound you get.
Watch and listen to these players, all playing in a strumming texture for at least part of the song, noticing their touch.
- “Freedom” by Richie Havens
- “It’s For You” by Pat Metheny
- “Ritual Dance” by Michael Hedges
I hope you enjoyed this excerpt from my Berklee Online course, Acoustic Guitar Techniques, and that you’re feeling inspired to keep learning more about acoustic guitar. In my 12-week course, we’ll cover a wide range of techniques through video tutorials, weekly assignments, discussions, live chats, and much more!
STUDY GUITAR WITH BERKLEE ONLINE