


Plus: Travis Picking, CAGED Shapes, Pentatonic Scales, and the Rhythms Behind the Country Sound
The following information on country music guitar techniques is excerpted from the Berklee Online course Country Guitar, written by Kevin Belz, and currently enrolling.
In all genres of music, there are songs that survive the test of time. These standards are used as the springboard for building a repertoire in a style. In this time we have together we’ll explore a few songs that I feel every aspiring country music guitarist should know. (There are many, many more in the 12-week version of my Country Guitar course!) Over time, these songs have been interpreted in many different ways, and this versatility makes them great tools for developing your chops and your own style. We’ll explore some notable approaches by listening to different versions of each song discussed, and explore how each song lends itself to practicing techniques and tools needed to build a country guitar repertoire.
Let’s begin by looking at everything from the roots all the way up to some more modern country music (which has more of a pop edge). We’ll see how the style splits off into subgenres, such as Americana, to avoid the corporate structure of country pop music, while still staying true to the original country music founders. We’ll review some basics of rhythm playing, chords, and the fretboard, and we’ll practice rhythm, melody, and chord melody playing. We’ll also get into some classic techniques like string bending and chicken pickin’.
CAGED System
Before we get too deep, let’s review an effective system that has become popular in recent years, called the CAGED system, for better understanding the guitar fretboard. The system is named for the 1st-position chord shapes of C, A, G, E, and D, which are mirrored in different places up the guitar neck.
The idea behind the CAGED system is to memorize these open-position triad shapes all over the neck to generate chords in different keys. This method can help in visualizing and understanding the intervals found in chord tones and arpeggios in relation to these chord shapes. The CAGED system harnesses the open chord forms as guideposts that can expose note relationships up the guitar neck. The CAGED system is a way to help expand your fretboard knowledge in an efficient way.
Check out this summary of the CAGED system from Premier Guitar magazine to read more about how it works. And then come back here to learn how it applies to country music guitar.
What Scales are Used in Country Music?
There’s not one correct answer to this question. If there is an answer, it would be all of them. This can be confusing, but in essence, you tend to use a combination of pentatonic, major, minor, blues scale, modes—major, Mixolydian, minor, natural minor, etc. It ultimately depends on the chord progression or the harmony of the song. Is it in one key? Does it modulate? How long does it stay on the I chord before going to the IV or V chord? All of these variants will determine what scale works. And it’s up to you to decide what kind of “color” sound or mood you want.
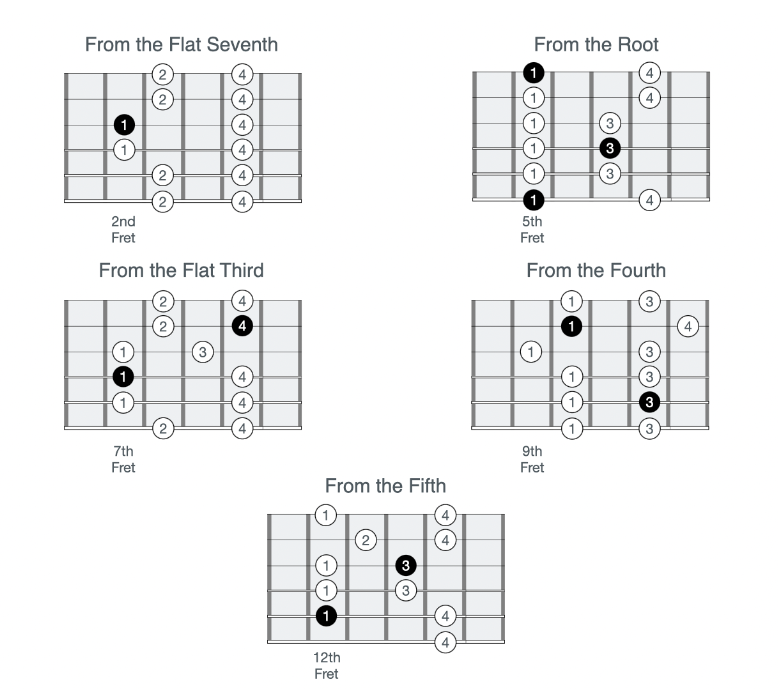
Let’s do some scale review on our major and minor pentatonic scales. Here, we’ll review them in all five positions. Once you feel comfortable with the positions, it’s important to explore different keys with these scales.
Remember, the order of the scales are always the same and movable all over the neck, so understanding your starting point—or root note—is the key to visualizing the fingerboard.
Let’s examine our A minor pentatonic scales. Pay special attention to your root note, and what degree of the scale position you start and end the scale on. Practice your scales slowly and accurately, using a metronome, focusing on accuracy and consistent-sounding notes.
The Blues Scale
The A blues scale is basically the same scale as the A minor pentatonic pictured above, just adding the b5th to the scale. In this case it would be the Eb. This note is often used as a passing note to help link phrases together. Play through all positions of the A blues scales, paying special attention to where the b5 falls in the scale.
Now that you’ve familiarized yourself with five positions for the A minor pentatonic scale, practice the five fingerings for the A blues scale that follow. Like the pentatonic scales that you’ve been practicing, parts of each of these fingerings work particularly well for generating soloing licks and phrases. Keep your ears open while practicing the scale fingerings, and try to relate or connect sounds from each scale fingering to licks and phrases from solos that you’ve heard. Keep experimenting with the fingerings to find licks and phrases to expand your soloing vocabulary.
Major Pentatonic Scale
What’s the difference between major and minor pentatonic scales? You may not even realize you already know major pentatonic scales. If you already know all your minor scale positions listed in the key of A, then playing major pentatonic is the same fingering, just starting on a different note.
For example, If we take our A minor 5th fret position and move it down to F# on the 2nd fret, it’s F# minor pentatonic, which is also the relative minor of A. In order to play A major pentatonic, you can play the F#min pentatonic starting and ending on an A instead of F#. This will sound as an A major pentatonic scale: A B C# E F# A.
Another way to look at it is by playing any minor pentatonic scale, and starting on the 2nd degree of the scale (2nd note), you’ll get its relative major scale. In this case, with F#min being the minor pentatonic scale, starting on the next note A will give you the major pentatonic.
These are all movable root scales. If you take a look at E major pentatonic, you’ll notice it’s the same as playing C# minor pentatonic, but starting and ending on a different root note, in this case being the E.
Honky-Tonk
One thing you’ll find as a common thread in many honky-tonk songs is a change from the traditional laidback sound of country music, to a more aggressive “twang” and “edge.” The guitar takes on more of an up-front role in the mix, as opposed to that role being held by fiddle, pedal steel, or piano.
There are a few rhythms you’ll find throughout many honky-tonk songs. Let’s take a look at a couple variations commonly played, starting with the country shuffle feel. You hear this kind of rhythm in many country songs. It’s usually played with a quarter-note walking bass line outlining the chord changes and/or a snare drum, and sometimes a piano or guitar playing all the up beats or “&”s of the chords. Eighth notes also have a bit more of a “swing” to them. They aren’t played as straight eighths as you might hear in a basic rock rhythm.
Straight Eighths
(1 & 2 & 3 & 4 &)
In straight eighths, each eighth note is of equal value, dividing the quarter beats in half.

Swing Eighths
(1…&2…&3…&4…&)
In swing eighths, the first eighth note of each pairing is longer and the second eighth note of each pairing is delayed or “felt” later in time. The most common description is a triplet without the middle note. If you count “1 trip-let 2 trip-let 3 trip-let 4 trip-let,” and take out the “trip” of each grouping, you have approximated the swing feel. Sometimes, based on genre and feel, the swing subdivision can be called a shuffle. Generally speaking, in a shuffle feel, each second note of the pairing is even more delayed than in a swing feel. For charts, the convention is to write regular eighth notes, even though they are performed in this “long-short-long-short” way.

You can hear this swing-eighth feel in a song like “Heartaches by the Numbers.” This version features Ray Price on vocals. Notice the offbeat rhythm that is being played with the chords, and the swung-eighth note feel.
Practice this rhythm using down up strums, focusing on consistent timing. Once you feel comfortable with the triplet feel in your eighth notes, we can add the low-end bass part.
Play this rhythm using the swing eighth notes discussed above, accenting the “&”s on the upstroke. The effect you want from this is almost like you can only hear the upstrokes and not so much the downbeats, since you’re accenting the “&”s and not the downbeats.
Now let’s try this rhythm just using the low A string and adding the 4th string E on the 2nd fret up to the 6th–F#. To help get a cleaner sound, and keep all the other strings from ringing out, you can try slightly resting the palm of your hand on the strings down by the bridge. Be careful not to mute or dampen too much though; you still want the rhythm to ring out. This technique is used to help filter out any excess string noise.
Chicken Pickin’
A variation you hear often when using 6ths in your solo is a style of picking or attacking the note using your pick and fingers, slightly pulling on the string to give it a “snap” called chicken pickin’. No one knows for sure where the term originated from, but one can only assume from having the notes sound like a barnyard chicken—“pluck, pluck, pluck” is a lot like “cluck, cluck, cluck.” James Burton, the legendary guitarist who performed with Elvis Presley, Emmylou Harris, Merle Haggard, and countless others, seems to be the one who made it so popular.
Everyone seems to have a different take on this technique, and there are multiple variations on it. As long as you achieve the staccato-type pluck sound, then you’re doing it right!
Here’s a cool video of James Burton talking about and demonstrating his famous chicken pickin’ technique.
Here’s another example of guitar great and country legend Vince Gill discussing his take on chicken pickin’.
And before I get into showing you how I go about chicken pickin’, check out this great compilation of some of the best country guitar players in the business doing their interpretation of chicken pickin’. Notice some of these licks might sound familiar, since we went over a few of these patterns earlier in the lesson, including double stops, unison bends, and bending into triads. Notice how the technique may vary slightly from player to player, but the resulting effect is the same.
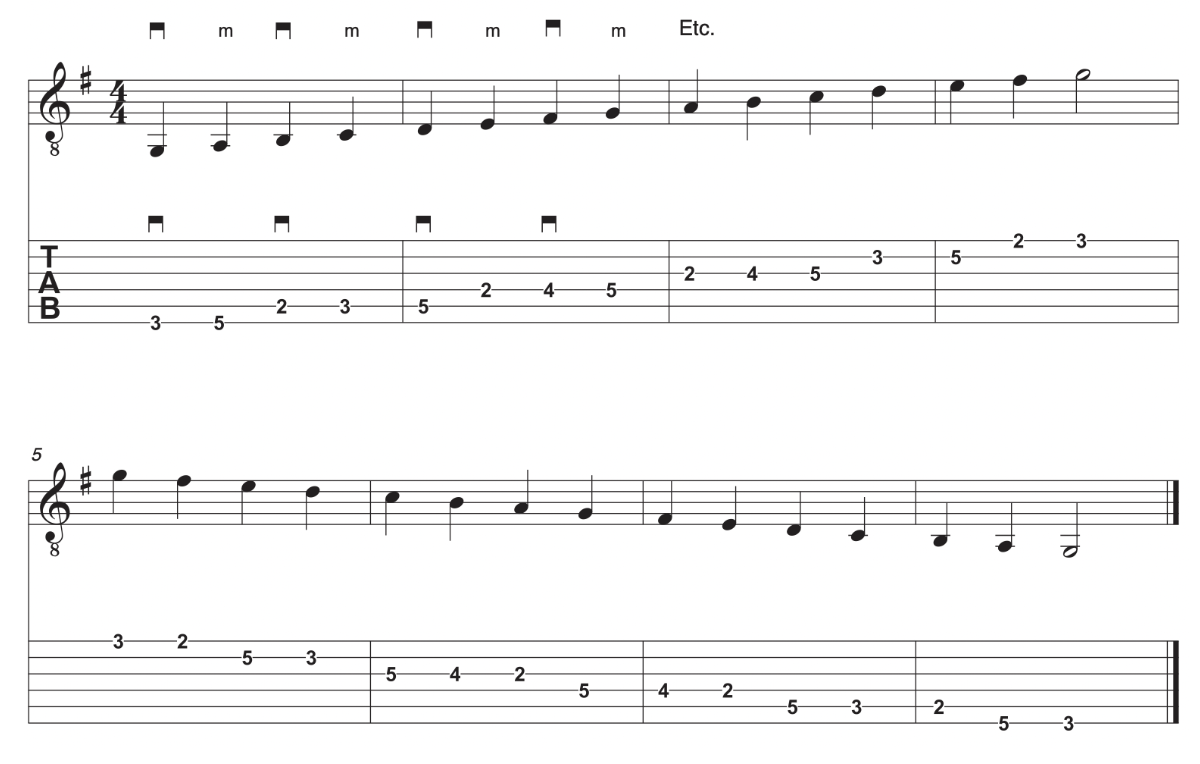
To get started on some chicken pickin’, let’s try an exercise that is similar to hybrid picking. For this exercise we’ll play a G major scale alternating between the pick and m finger. The one difference is that we’ll give a slight pull on the string we play after the picked note. The slight pulling of the string, and the string hitting the fret helps give the note the staccato “pluck” sound you want.
In this exercise, we’ll play a G major scale, alternating between the pick and second finger (m), so be sure to try and give the fingered note a quick snap. Take a look at the notation below before you watch the video.
For another good chicken pickin’ exercise, we’ll play the G major scale on the G string, ascending, and G Mixolydian, descending on the B string. This exercise will be played with triplet groupings using deadened notes or ghost notes. This is the rhythm used to get the barnyard chicken “pluck pluck” sound. The technique used on this is to lightly place your fingers over the note you’re going to play, but don’t press down. By lightly touching the string, you’re muting the note out. Think of it as a percussive note: the first two notes are played with pick and (m) finger, and the last note with your pick unmuted.
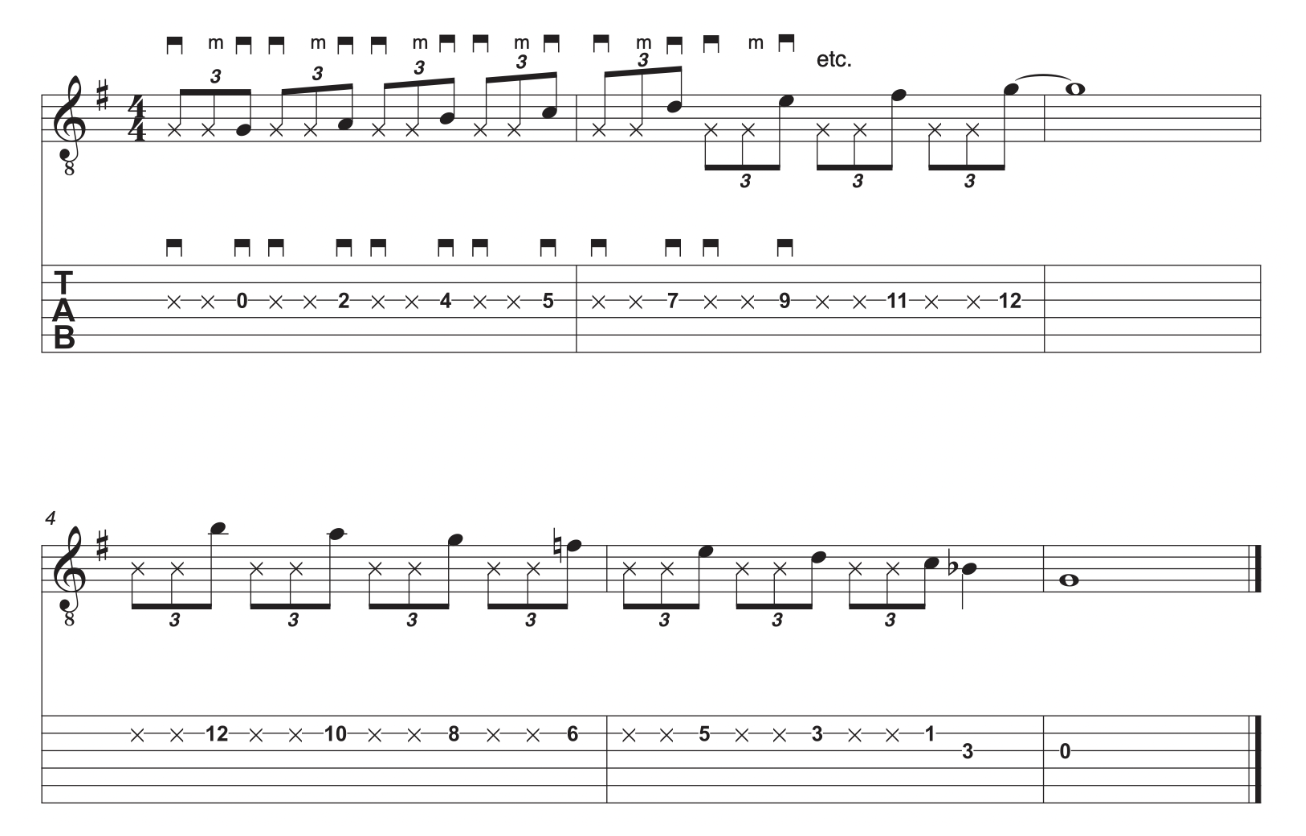
Practice Exercise: Chicken Pickin’ Triplets Open G and B Strings
A variation on this technique is to play the triplet as the above example but adding on an open-string note at the end. Since we have an added note to our phrase, instead of using triplets we’ll use sixteenth-note groupings, having the first two notes muted, third note fretted, and fourth note open string. To help get the “pluck pluck” sound, it’s important that you mute or dampen the strings slightly. To get this, rest the side of your palm on the strings down by the bridge. Be careful not to press down too hard or you won’t be able to hear the string at all. You want just enough pressure to slightly dampen the strings, still being able to hear the note. Most commonly used in soloing when chicken pickin’ are the 1st, 2nd, and 3rd strings, but this is also a great exercise to try on the 6th, 5th, and 4th strings as well. Let’s try this exercise using the same pattern of major-scale G string, ascending, and B string Mixolydian, descending.
I’ve heard this technique used by players such as Danny Gatton, Albert Lee, and Arlen Roth.
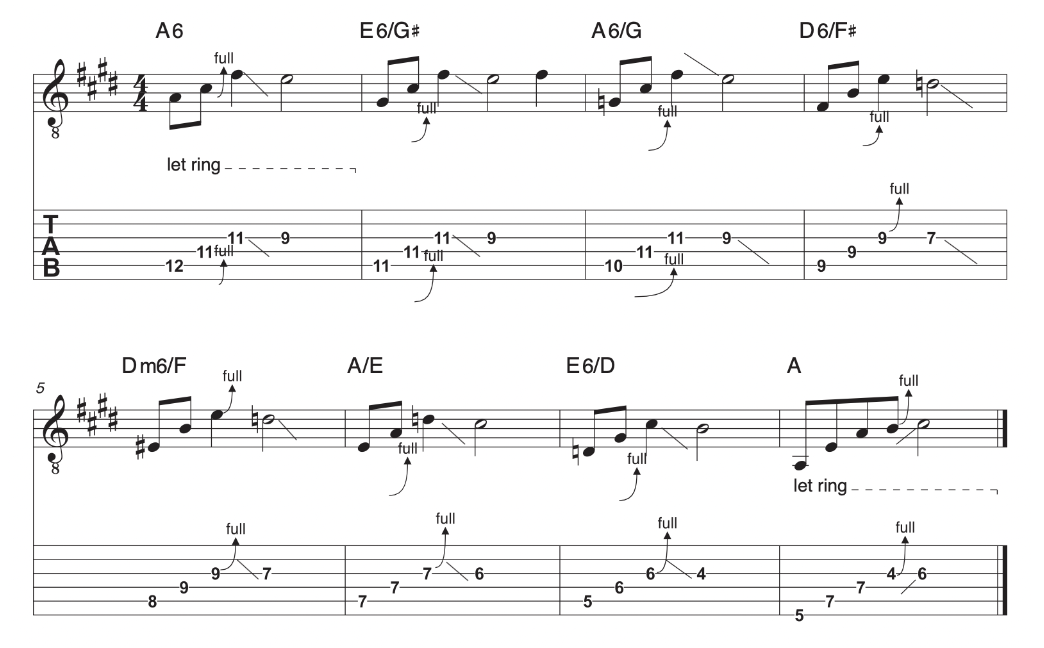
You’re basically playing a chord progression with a descending bass line incorporating voice leading with the top note of the chord (the leading tone) and embellished by a whole- or half-step bend.
This is a good exercise to build strength in your hands for chordal bending.
Travis Picking
Travis picking is another essential of country guitar playing. It was developed by Merle Travis. Born in the small town of Rosewood, in the western part of Kentucky, Travis began playing banjo as a boy, learning the songs popular with the miners in his working class community. After hearing guitarist Arnold Schultz, a fingerstyle blues player, Travis began developing his own style of playing, which has become known today as Travis picking. Travis’ new style involved the use of three fingers of the picking hand to pluck out the chords and melody, while the thumb would play an alternating bass figure on the quarter notes.
Here’s Merle Travis playing a song he wrote for Tex Williams called “Smoke Smoke Smoke.”
Notice his thumb playing the alternating bass while consecutively playing chords and a melody on top.
Travis Picking: Alternating Bass and Rhythm Chord Practice
This is a good practice exercise to help get used to the Travis picking alternating bass while playing rhythm chord changes.
Be sure to use your thumb in the bass (slightly muting the notes at the bridge), and using your index, middle, and ring fingers to pluck the chords.

‘Cannonball Rag’
One of Merle Travis’ favorites and a big part of the repertoire for fingerstyle guitar is a song called “Cannonball Rag.”
The song starts out with a section outlining dom 7th chords going through the cycle 4, and then a turnaround starting from the IV chord C resolving on G (the I chord), before the cycle repeats.
String Bending in Country Guitar
Much of the signature sound in traditional country music comes from having a pedal or lap steel guitar in the band. The sound of bending into notes is a key element in country guitar playing.
Before we get into bending, let’s review a couple scales we’ll be using to help develop this technique.
A couple of really important things to be aware of when bending strings:
- Always have the pitch in your ear before bending. When working on your bends, it’s a good idea to play the note you’re bending to first, by fretting the note, then bending into the note.
- Always have at least two fingers behind the note you’re bending: Reinforcing the note with more fingers behind it will give you a stronger-sounding bend, and will really make hitting the note you’re bending to much easier.
- Bend slowly and accurately, focusing on the pitch. Pay attention to how it feels to bend a whole step and how it feels to bend a half step (which requires less force then a whole step). Eventually, you’ll develop muscle memory and won’t have to focus on pitch every time, but in the beginning it’s crucial to get used to hearing and playing the pitches accurately.
- Country players usually use very light-gauge strings: It’s common to have a high E of 009. I wouldn’t go heavier than .10 high E. An extra-light-gauge to light-gauge set of strings should do the trick.
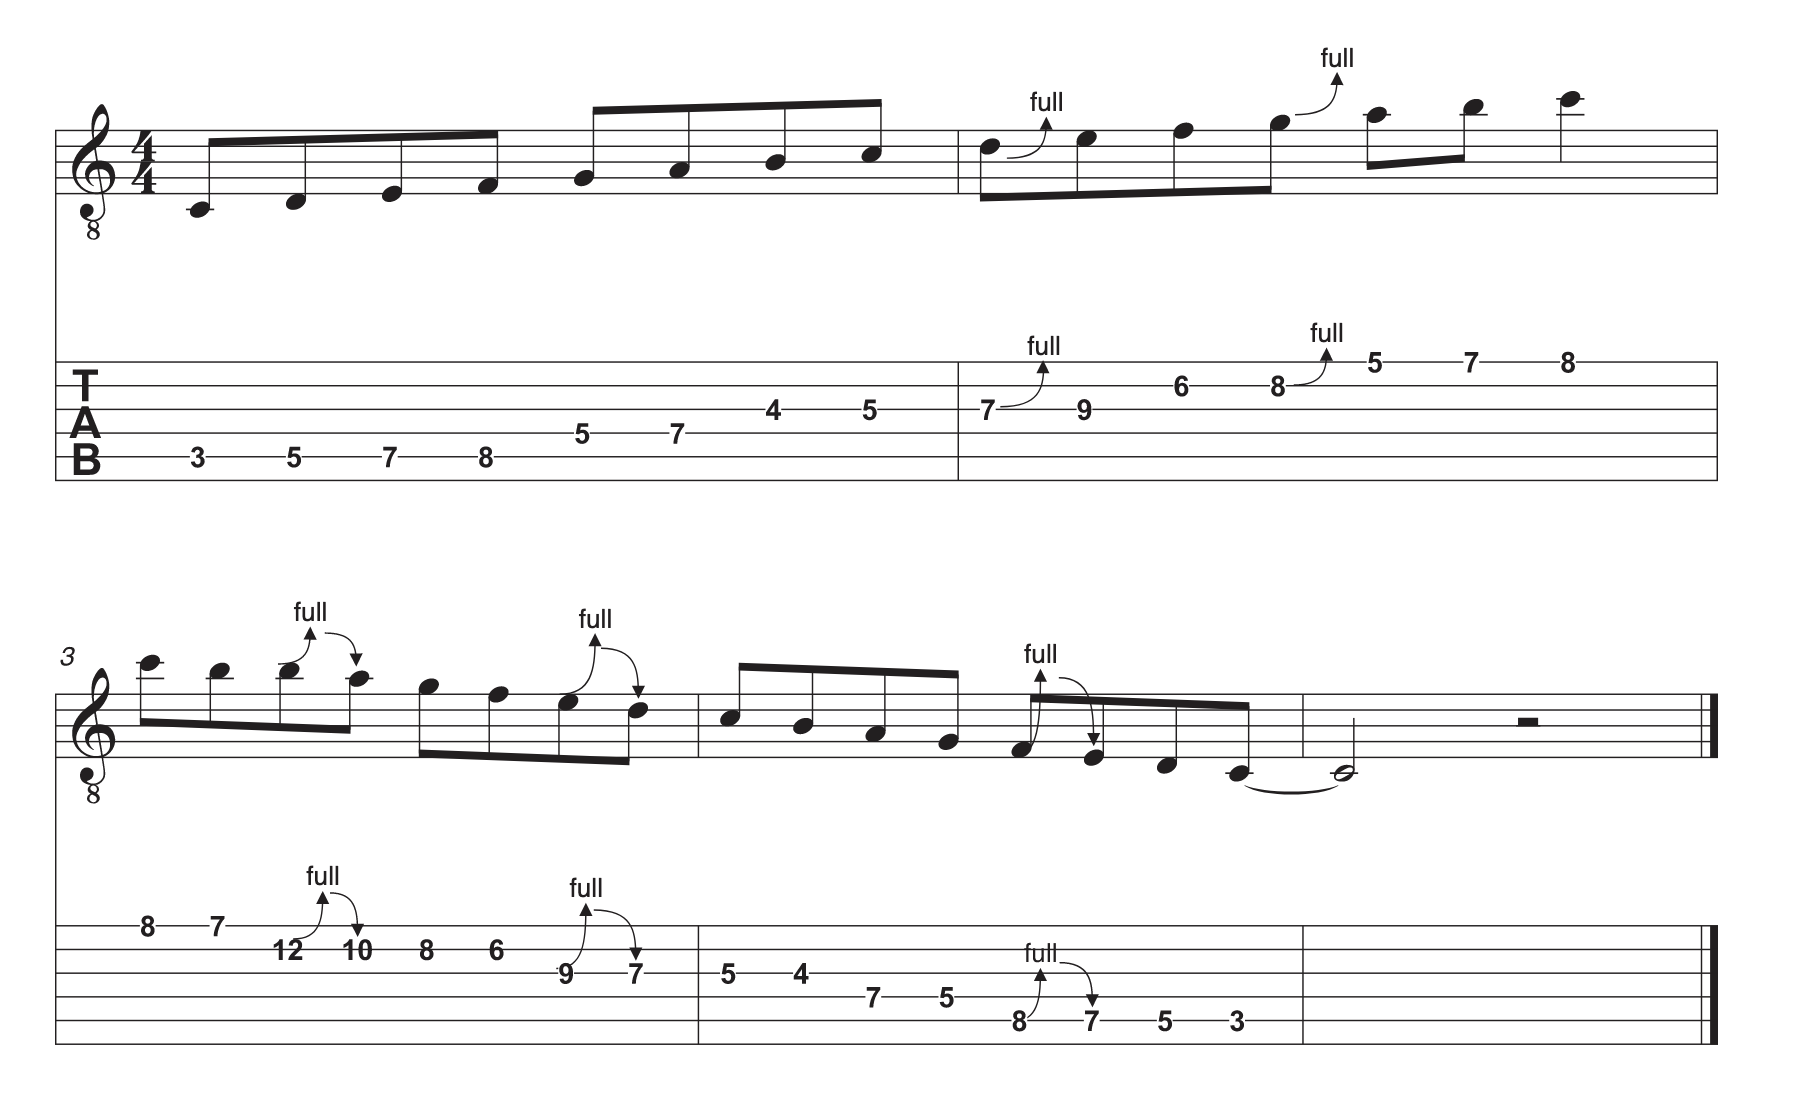
For this example we’ll be playing a C major scale using the 5, 4, 3, 2, and 1 strings, ascending from 3rd fret to 8th.
Here we have a C major scale, and we’ll apply some common bent notes of the scale. Note that in country music, all six strings can be used for bending into notes, but more commonly you’ll find the 1, 2, and 3 strings being used. In this example when ascending, you’ll bend into the D to the E on the 3rd string, G – A on the 2nd string. When descending we’ll incorporate some “pre-bends”—these are notes that start with the string already bent, in which the bend resolves to the next note. For this example descending, we’ll have the B, 2nd string resolving to A 2nd string 10th fret; E – D, 7th fret, 3rd string; and F – E 5th string, 7th fret.
This might take some practice getting your bends in tune at first, but once you get adjusted to how the bends feel, and hearing the pitch, you’ll develop muscle memory and should be able to bend effortlessly and accurately in no time at all.
Practicing these techniques should really help open up new ways of looking at the fretboard and help inspire new harmonic and melodic phrasing and melodies. With techniques like Travis picking, chicken pickin’, and string-bending techniques, you can use these in all kinds of different ways whether it’s in a solo or a melody in any music genre, not only country music.
As with any style you haven’t played before, it will take more than a week of study to develop the proper technique needed. Stick with it. Patience and perseverance will pay off in the long run. Doing so will help bring you closer to the goal of being a well-rounded and versatile musician. And most importantly, developing this style will increase a parallel goal of just having fun playing guitar!