





Build Dynamic, Immersive Audio Environments for Video Games
The following information on making interactive game soundscapes is excerpted from the Berklee Online course Video Game Sound Design, written by Gina Zdanowicz and Spencer Bambrick, and currently enrolling.
When you are designing the background ambience for games, you are creating the invisible fabric that holds the virtual world together. In a film, a scene has a fixed runtime, but in a video game, a player might linger in an environment longer. If you just drop a stereo audio file into the engine and set it to loop, the player’s brain will spot the pattern. The immersion breaks, and you run straight into repetition fatigue. To prevent this, you have to shift your mindset from recording a background track to building an interactive acoustic ecosystem.
Soundscapes and Looping Ambience
Let’s start by visualizing the game Inside by developer Playdead.
If you aren’t familiar with the game, do a quick search to get familiar with the art style and setting, and consider watching part of the walkthrough video included here.
Disclaimer:
Please note that Inside is a puzzle-horror game rated M for Mature with Blood and Gore, and Violence by the Entertainment Software Rating Board. Some themes may not be suitable for certain viewers.
In the game, players control a young boy navigating a dark, dystopian world while avoiding capture and solving environmental puzzles. The game is celebrated for its atmospheric storytelling and moody art style.
A good game soundscape needs enough variation to keep the player from hearing the machinery behind it. That means building texturally rich loops that can run for extended periods without calling attention to where they begin and end.
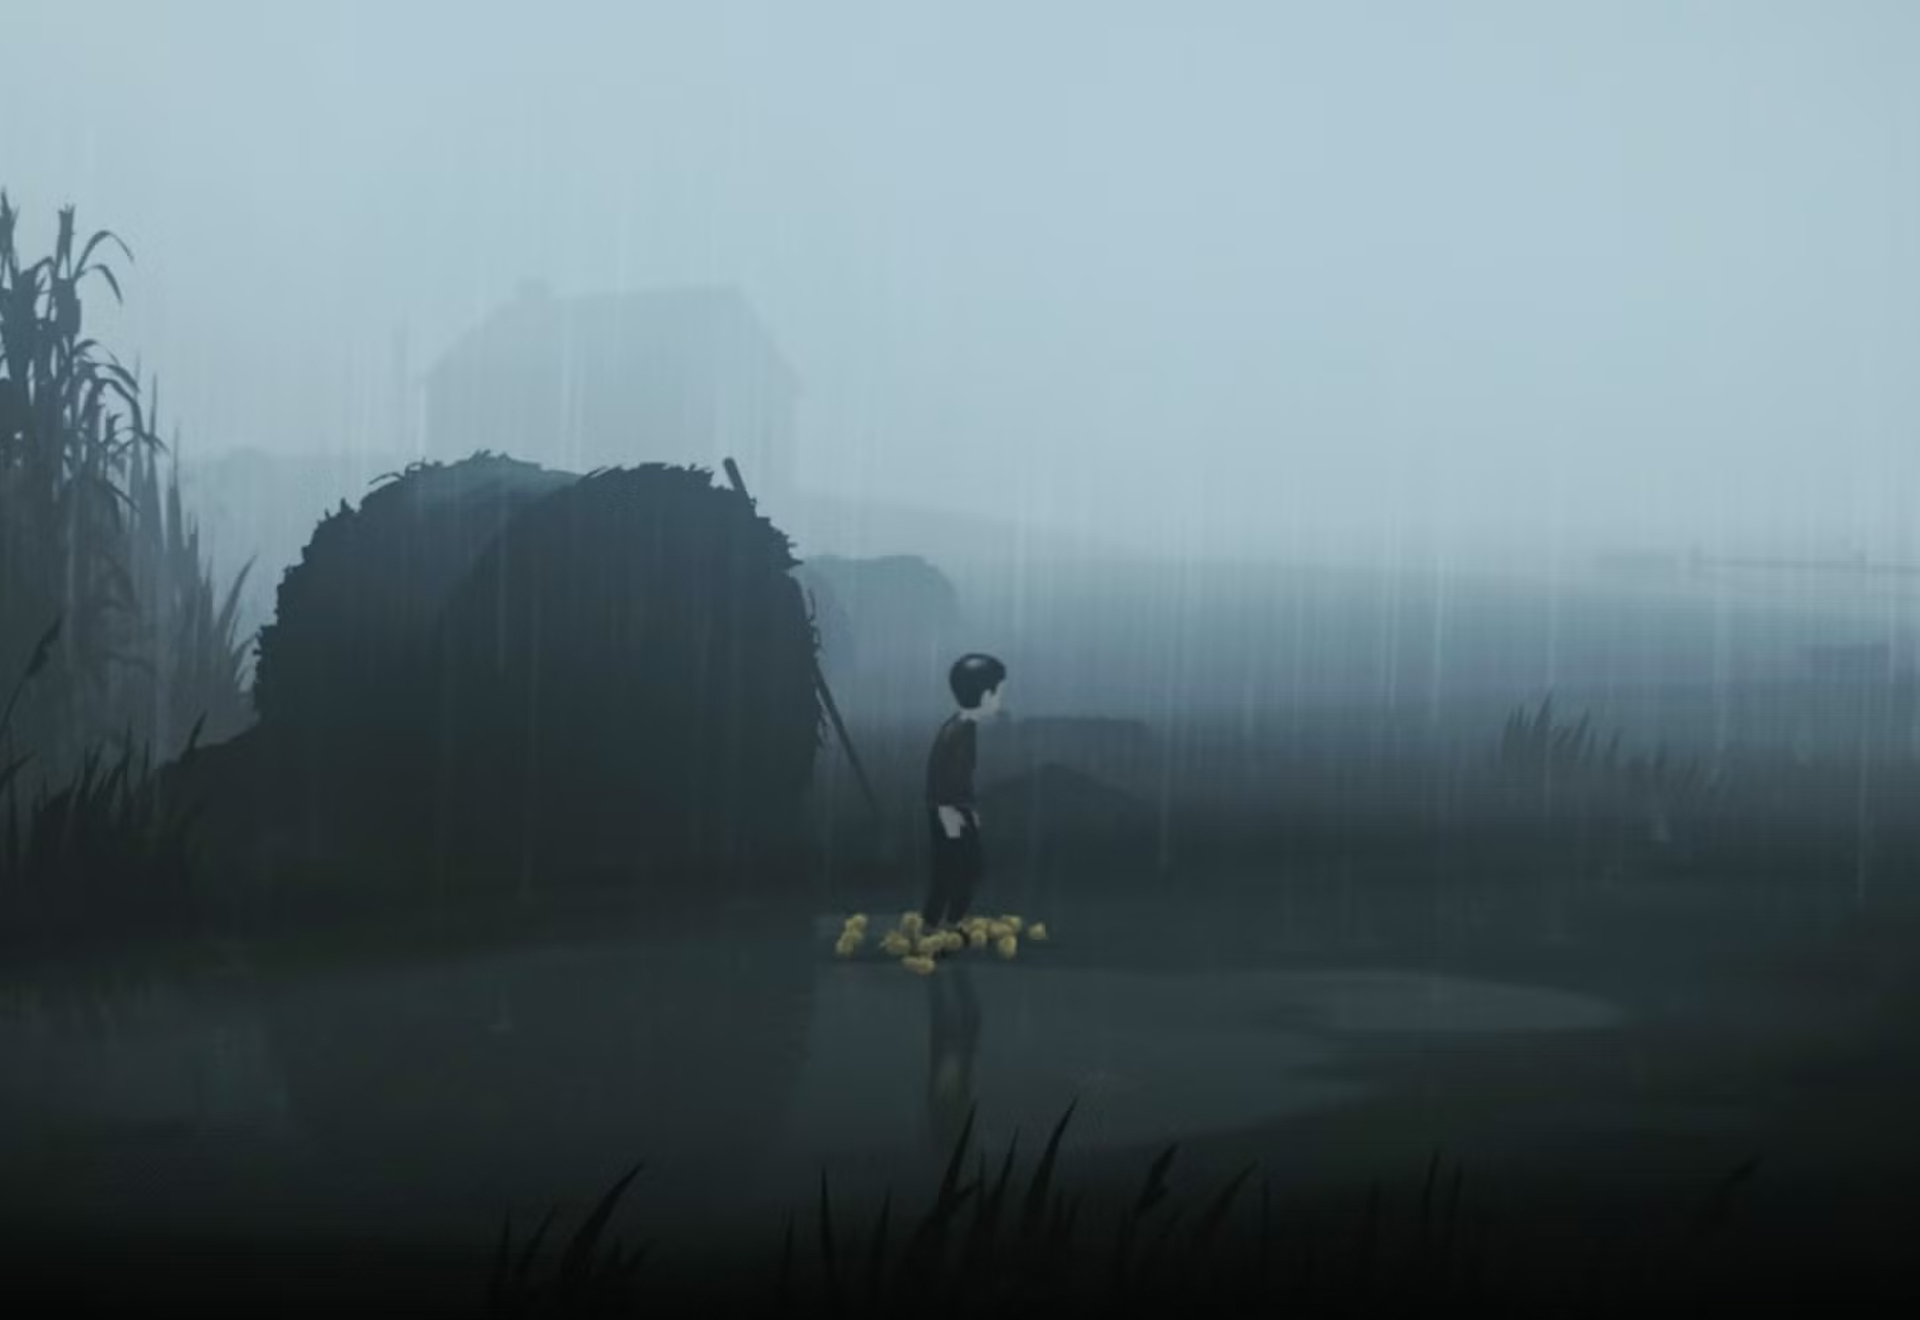
Let’s use the visual aesthetic in this image from the game to explore how we might craft the ambient sound design for a rainy farm area where the player must stay hidden from searchlights.
Unlike linear media, where a scene lasts for a fixed two minutes, a player might navigate slowly through a game environment for 20 minutes, an hour, or even longer. If your background audio is static, the human brain will instantly spot the pattern. To build a world that feels alive and believable while also keeping resource management in mind, we have to shift our mindset entirely: we are no longer just recording a background track, we are constructing a systemic, interactive soundscape.
Step 1: Editing
If a player hears a distinct, identifiable sonic event repeated at a fixed interval, their brain instantly maps the pattern and the illusion breaks. Your base layer should strictly consist of the continuous, unidentifiable undercurrent of the scene: the steady, uniform wash of rain hitting the dirt and grass on the farm.
Once you have sliced out the thunderclaps, you need to stitch the remaining pieces back together. Drag the clean segments together and apply an equal-power crossfade at each cut to ensure the rain transitions seamlessly without any digital pops or abrupt volume changes.
Step 2: Target Loudness
Before we turn the edited file into a loop, we must address its gain staging and overall loudness. Ambient beds are meant to support the environment, not fight the gameplay audio. If your background rain is slamming against the digital ceiling at 0 dBFS, it will mask critical gameplay elements like the boy’s footsteps, the hum of approaching searchlights, or enemy dialogue.
Open a loudness meter plugin (such as Youlean or iZotope’s Insight) on your master chain. You want to measure the Integrated Loudness of your file in LUFS (loudness units full scale). The integrated value represents the average loudness over the entire length of your clip, ignoring brief momentary spikes.
Step 3: Looping
Now that you have an edited and properly leveled asset, you need to prepare it to loop seamlessly inside the game. A sudden jump or pop at the loop point can break the player’s immersion. Depending on your game’s audio architecture, you will use one of two workflows to deliver your asset.
Method A: The Self-Contained Loop (Native Game Engine Workflow)
If your asset is a pure, continuous texture (like our rain base) and doesn’t rely on real-time engine effects, you can bake the loop points directly into the file using your DAW or dedicated two-track editor.
- Splice the File: Cut your clean rain asset exactly down the middle into two equal halves.
- Swap Positions: Drag the second half to the beginning of your timeline, and move the first half to the end. Because the new outer edges were originally joined seamlessly, the jump from the end of the file back to the start will be seamless.
- Blend the Center: The only rough edge is now sitting directly in the middle of your timeline where you made the cut. Apply a long, smooth equal-power crossfade right across that center seam. For a dense texture like rain, use a generous crossfade length of 2 to 4 seconds so the random fluctuations of the raindrops melt into each other smoothly.
Method B: The In-Engine Loop with Reverb Tail (Middleware Workflow)
Audio middleware (like Wwise or FMOD) allows us to set explicit Loop Markers inside a file while leaving extra audio at the end to catch the decay.
- Set the Loop Region: In your DAW, define a specific timeline region that will serve as the main body of the loop (e.g., a perfect 40-second block).
- Allow the Tail to Bleed: When you export/bounce the file, do not stop the render at the end of your 40-second loop region. Let the selection extend for several seconds longer so the reverb or delay decay can naturally ring out to absolute silence.
- The Middleware Setup: When you import this file into your middleware, you will explicitly set the Source Start and Loop End markers to match that exact 40-second region. The extra audio after the loop end marker is your reverb tail.
Layering Environmental Elements
In a linear film, a re-recording mixer manually pans and rides the faders to keep the background interesting for the duration of a scene. In a video game, you have to design dynamic movement and sprinkle in 3D sound emitters to add detail to the ambience.
A truly immersive environment is never a single wall of sound. It is a curated playlist of sound elements working together. To turn your static loop into a living, breathing ambience, you need to understand how to select, layer, and inject movement into your environmental audio.
Building Contrast and Emotional Tone
When choosing assets to layer over your base rain bed, the idea isn’t just adding “more sounds.” The goal is to create contrast and narrative subtext so that every single element serves the emotional tone of the game. To find the right assets, you need to inspect the scene before you and establish a clear What, Who, Where, and Why strategy.
The next techniques we’ll explore are handled in the game engine or middleware, allowing audio to react in real time to the player’s actions. But it’s also important to understand how to mock them up in your DAW. Game development is a collaborative process, and you may need to demonstrate what you want a scene to sound like before delivering game-ready audio assets.
Volume Modulation
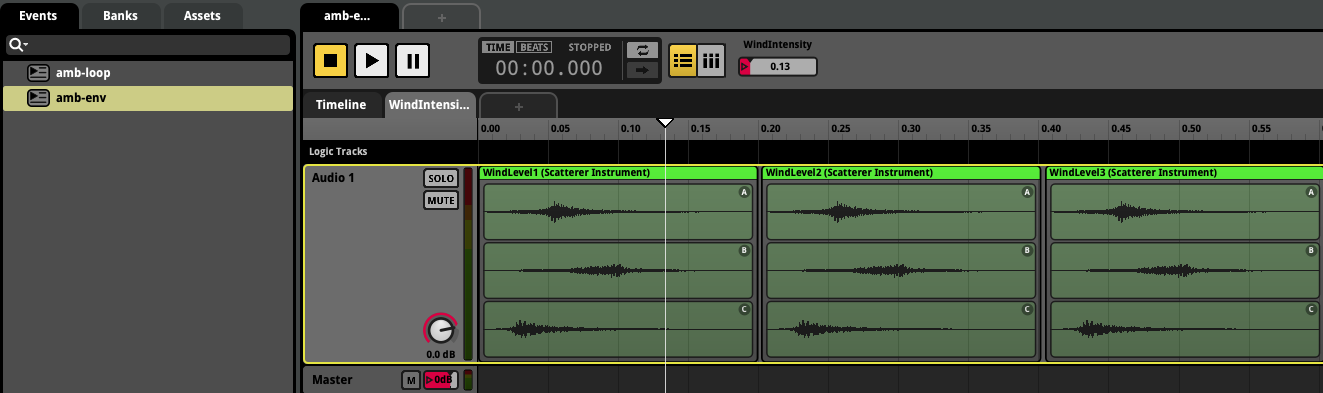
A constant wind asset playing at a static volume quickly turns into flat white noise that the brain immediately tunes out. In game development, because the player can stand idle on the farm indefinitely, we offload this work to the game engine or middleware using Volume Modulation and Parameter Control for real-time control.
Asynchronous Nesting
Middleware: To eliminate predictability, game sound designers use runtime logic inside middleware rather than letting files loop back-to-back. Within an audio container, you can apply three distinct randomization rules: probability, randomized start offsets, and randomized delays. This ensures the background soundscape never repeats the exact same combination of layers twice.
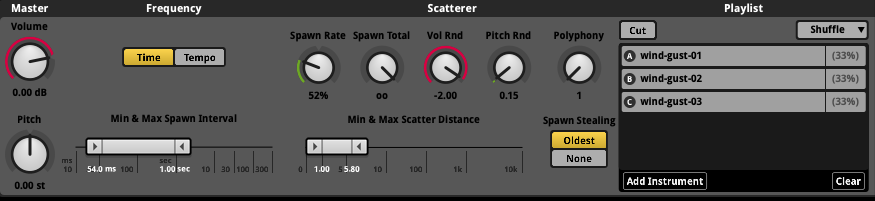
Asynchronous Logic in a DAW: To mock up this unpredictable environment on your DAW timeline, you must manually simulate asynchronous playback by scattering your assets irregularly. Instead of copying and pasting your one-shot spot effects at fixed grid intervals, manually offset and shift them across the timeline.
Spatial Cues and Distance Design (Theory)
In this video, notice how the sound changes as the camera moves from indoors to outdoors. Listen for the rain on the 3D objects in the world. Those sound emitters are spatializing audio cues to bring the world to life. As the player moves through the level, the sound appropriately changes with their surroundings. Each game does this to different degrees. In a more realistic scene, as demonstrated in this video, the world needs more realistic cues. In a more cartoony setting, you may not need as much detail.
Principles of Acoustic Distance Design
When you position a 3D sound emitter in a game world, like a groaning barn door or a leaky rain gutter, you are no longer manually riding the pan pots or volume faders like a traditional film mixer. Instead, you are establishing a set of mathematical rules. The game engine’s audio listener (usually attached to the player’s camera or character) calculates the distance between the player and the emitter in real time, altering the sound automatically.
Volume Rolloff
As a sound wave travels through air, it loses energy and drops in volume. In game audio, this is governed by an Attenuation Curve. You must define two critical boundaries for every 3D sound you place in the world: Min Distance (The Inner Radius) and Max Distance (The Outer Radius).
Distance Filtering
To simulate distance, we use Distance-Based Low-Pass Filtering.
When the player is close to an emitter, they hear the full frequency spectrum including the crisp, high-frequency transients of water drops hitting metal. As the player backs away, the game engine procedurally lowers a Low-Pass Filter. At a distance of, let’s say, 50 meters, the high-frequency splashes are completely cut out, leaving only a muffled, low-frequency rumble. This frequency loss tells the brain how far away an object is far more effectively than a simple volume drop.
Stereo Placement
Stereo Placement in Middleware: In a game engine, you create depth by separating wide, 2D background streams from localized, world-locked 3D objects. Your primary rain bed plays as a full 2D stereo file wrapping directly around the listener’s head, while your low-frequency wind hums are kept narrower and centered to anchor the weight of the scene. Meanwhile, material textures, like individual metal rain spatters or gutter drips, are attached directly to physical game objects as 3D sound emitters, where the middleware dynamically handles their panning, volume, and positioning in the stereo field based entirely on which way the player turns their camera.
Stereo Placement in a DAW: To mock up this spatial sound inside your DAW, you must manually position your assets across the stereo image to build a wide sonic horizon. Leave your base rain loop centered and wide, but manually hard-pan your one-shot spot effects (like foliage movement or insect chirps) to distinct left or right coordinates on your timeline to simulate physical locations in the world.
Choosing 2D vs. 3D Sounds
One of the most critical decisions you will make during preproduction is determining whether an asset should be implemented as a 2D sound or a 3D sound. Misusing these categories ruins localization and breaks immersion.
| Type | Spatial Behavior | Use Case |
|---|---|---|
| 2D Sound Events | Head-positioned. These events bypass the game world’s geometry and play directly in the left/right channels of the headphones/speakers regardless of which way the player turns. | Wide, ambient foundation beds (the steady wash of rain), UI sound effects, and abstract internal elements (like the player character’s heartbeat or a low-register tension drone). |
| 3D Sound Events | World-locked. Pinned to a specific X, Y, Z coordinate (game object) in the game world. These events pan, attenuate, and filter dynamically based on the player’s position and orientation. | Localized spot effects (a squeaking weather vane on top of the barn, an electrical spark from a searchlight post, or individual puddles splashing). |
Spatial Separation and Room Modeling
When planning an ambient design, you must map out how sounds occupy space without crowding each other. Space your emitters out logically across the environment. Remember that indoor spaces alter sound waves. If the player character steps inside an empty wooden barn while it rains outside, the rain bed shouldn’t just get quieter; it should send a portion of its signal into a distance-dependent reverb send.
Contextual Variation and Narrative Shifts
An environment in a video game is rarely static. As a player progresses, a single physical location will often change drastically based on time of day, weather cycles, or critical narrative events. In non-linear audio design, we do not author entirely separate, massive soundscapes for every possible scenario. Instead, we design dynamic variations of the same environment by swapping component layers, modulating parameters, and utilizing state machines inside the game engine. To plan these variations effectively, we add the critical element of When to your analysis.
Chronological Shifts (Time-of-Day)
When looking at chronological shifts, you are defining the When of your scene, which fundamentally alters the acoustic profile of the world between day and night. When the state shifts at night, those high-frequency characters recede, and the sonic space becomes more sparse.
Meteorological Shifts (Weather Systems)
Weather changes the physical properties and sonic textures of every surface in your scene. In a dry state, your focus is on crisp, tactile textures where assets interact with dry materials, such as the crunch of dirt underfoot or the light rattle of wind through dry, crispy foliage. To reflect this environmental change, you must swap your dry assets for wet alternatives, shifting the focus to the heavy thud of rain hitting mud, the slick splash of pooling water, and the damp, heavy weight of saturated wood structures.
Gameplay and Narrative Shifts (State Alterations)
Finally, gameplay and narrative shifts alter the Why, using environmental audio as a tool to subtly signal changes in game states without relying on intrusive UI elements. To evoke immediate anxiety, you procedurally attenuate the comforting, natural elements of the rain bed while driving up oppressive, low-frequency drones, or filtering out high frequencies to mimic the player’s internal adrenaline response. You are changing the audio assets because the underlying narrative reason for the soundscape has fundamentally transformed from environmental immersion to psychological survival.
In a game engine, these transitions happen seamlessly at runtime. Game audio designers and programmers use systems like Real-Time Parameter Controls (RTPCs) within middleware, allowing the game’s code to dynamically mix, filter, and swap audio layers as the player moves through the world.
Taken together, these techniques allow the soundscape to change along with the game. The same environment can sound and feel different depending on where the player is, what’s happening around them, and what’s happening in the story.